How to turn a PNG or JPG into a hand-drawn animation
A PNG or JPG has pixels, not drawable vector paths. To make a hand follow its contours, the image first has to be traced into geometry. That conversion works best when the source already looks like line art; it cannot reconstruct detail or drawing intent that the pixels never contained.
This tutorial uses a first-party 1000 × 1000 mountain-and-sun PNG, traces it in Scribe Animator, fixes a device-budget warning, plans a three-second Draw Step, previews the actual hand follower, and exports a verified MP4.
Verified on 9 August 2026 in the desktop web editor on macOS with frontend@2.0.0. The practice PNG traced to two drawable paths, was previewed at 1.450 seconds with a real drawing hand, and completed a 450-frame export. Independent inspection reported H.264, 1280 × 720, 30 fps, 15.000 seconds, and 602,506 bytes. Mobile tracing was not used.
Download the exact tested PNG
Download raster-tracing-practice.png
The practice image has four properties that make it suitable for tracing:
- high contrast between dark marks and a white background;
- large, clean contours;
- no gradients, shadows, texture, compression noise, or photographic detail; and
- enough empty space to keep separate forms recognizable.
Use it for the first run. When you replace it with your own image, choose artwork you own or are allowed to transform and publish.
What traces well—and what does not
Good candidates include:
- simple black-and-white icons;
- scanned line drawings with a clean background;
- diagrams with thick, separated marks;
- legally usable logos with uncomplicated silhouettes; and
- high-contrast educational shapes.
Poor candidates include photographs, hair and foliage, noisy paper scans, soft shadows, subtle gradients, low-resolution screenshots, and detailed logos whose identity depends on color blending. A trace approximates visible pixel regions. It does not recover the original vector file, hidden detail, font, layer names, centerline strokes, or a human drawing order.
For a source that is already vector, skip tracing and use the tested SVG drawing workflow.
1. Import the raster into the vector pipeline
Open Vectors, choose Vector Import - SVG to Paths, and select the PNG or JPG. The same panel accepts vector and raster sources, but raster input exposes trace controls.
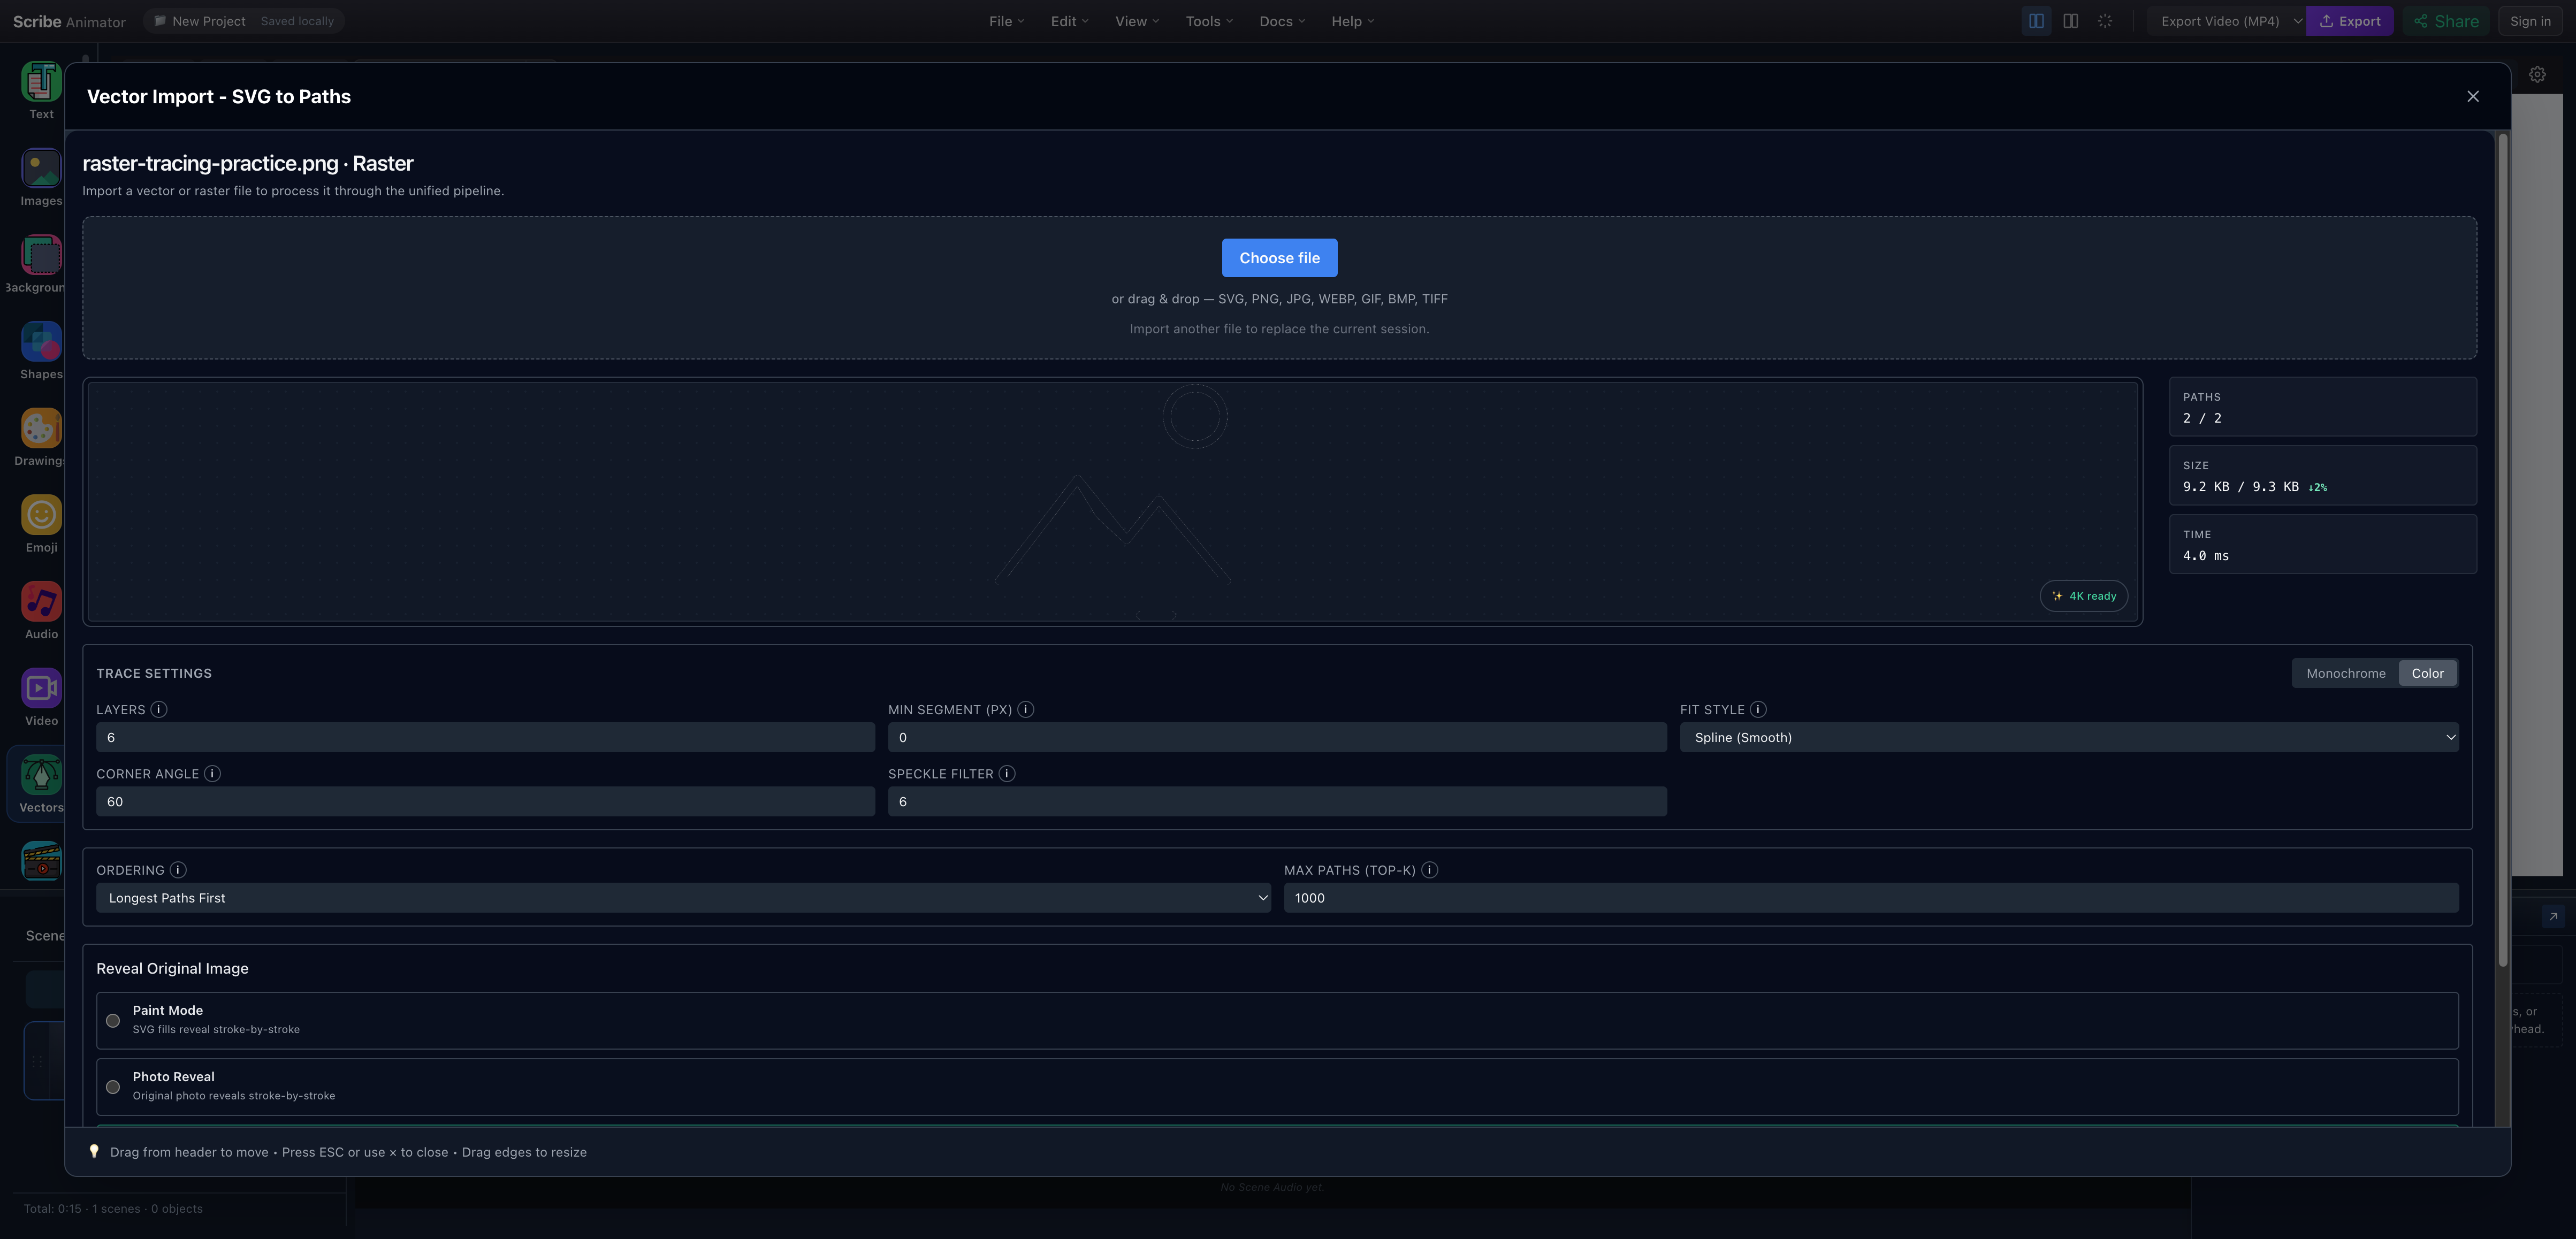
- Traced previewCompare the result with the source and look for missing marks, merged regions, or excessive fragments.
- Two traced pathsThe path count is plausible for this intentionally simple source; a noisy image can produce far more geometry.
- Monochrome traceMonochrome suits the dark-on-white practice file. Color tracing is a separate choice and can create more layers and paths.
- Spline fitSpline keeps the sun and mountain contours smooth; Polygon is better for intentionally sharp, faceted artwork.
The first run reported:
- PATHS:
2 / 2; - SIZE:
9.2 KB / 9.3 KB; - TIME:
4.0 mson this device; - TRACE: Monochrome;
- LAYERS:
6; - MIN SEGMENT:
0 px; - FIT STYLE: Spline;
- CORNER ANGLE:
60; - SPECKLE FILTER:
6; and - ORDERING: Longest Paths First.
Processing time, device budget, and output size depend on the source and device. They are diagnostic results, not performance guarantees.
2. Clean up the trace before adding it
Use the preview as the decision boundary. Check:
- The silhouette still matches the source.
- Important holes remain open—the sun is a ring, not a disk.
- Tiny noise has not become dozens of paths.
- Curved marks are smooth enough for the intended output size.
- The path count fits the complexity you expected.
On the first Apply Changes in this test, Scribe warned that the Top-K budget of 1000 exceeded the current device limit, which fluctuated around 981–983. The field was lowered to 900 and changes were applied again. The warning cleared and the result remained two paths.
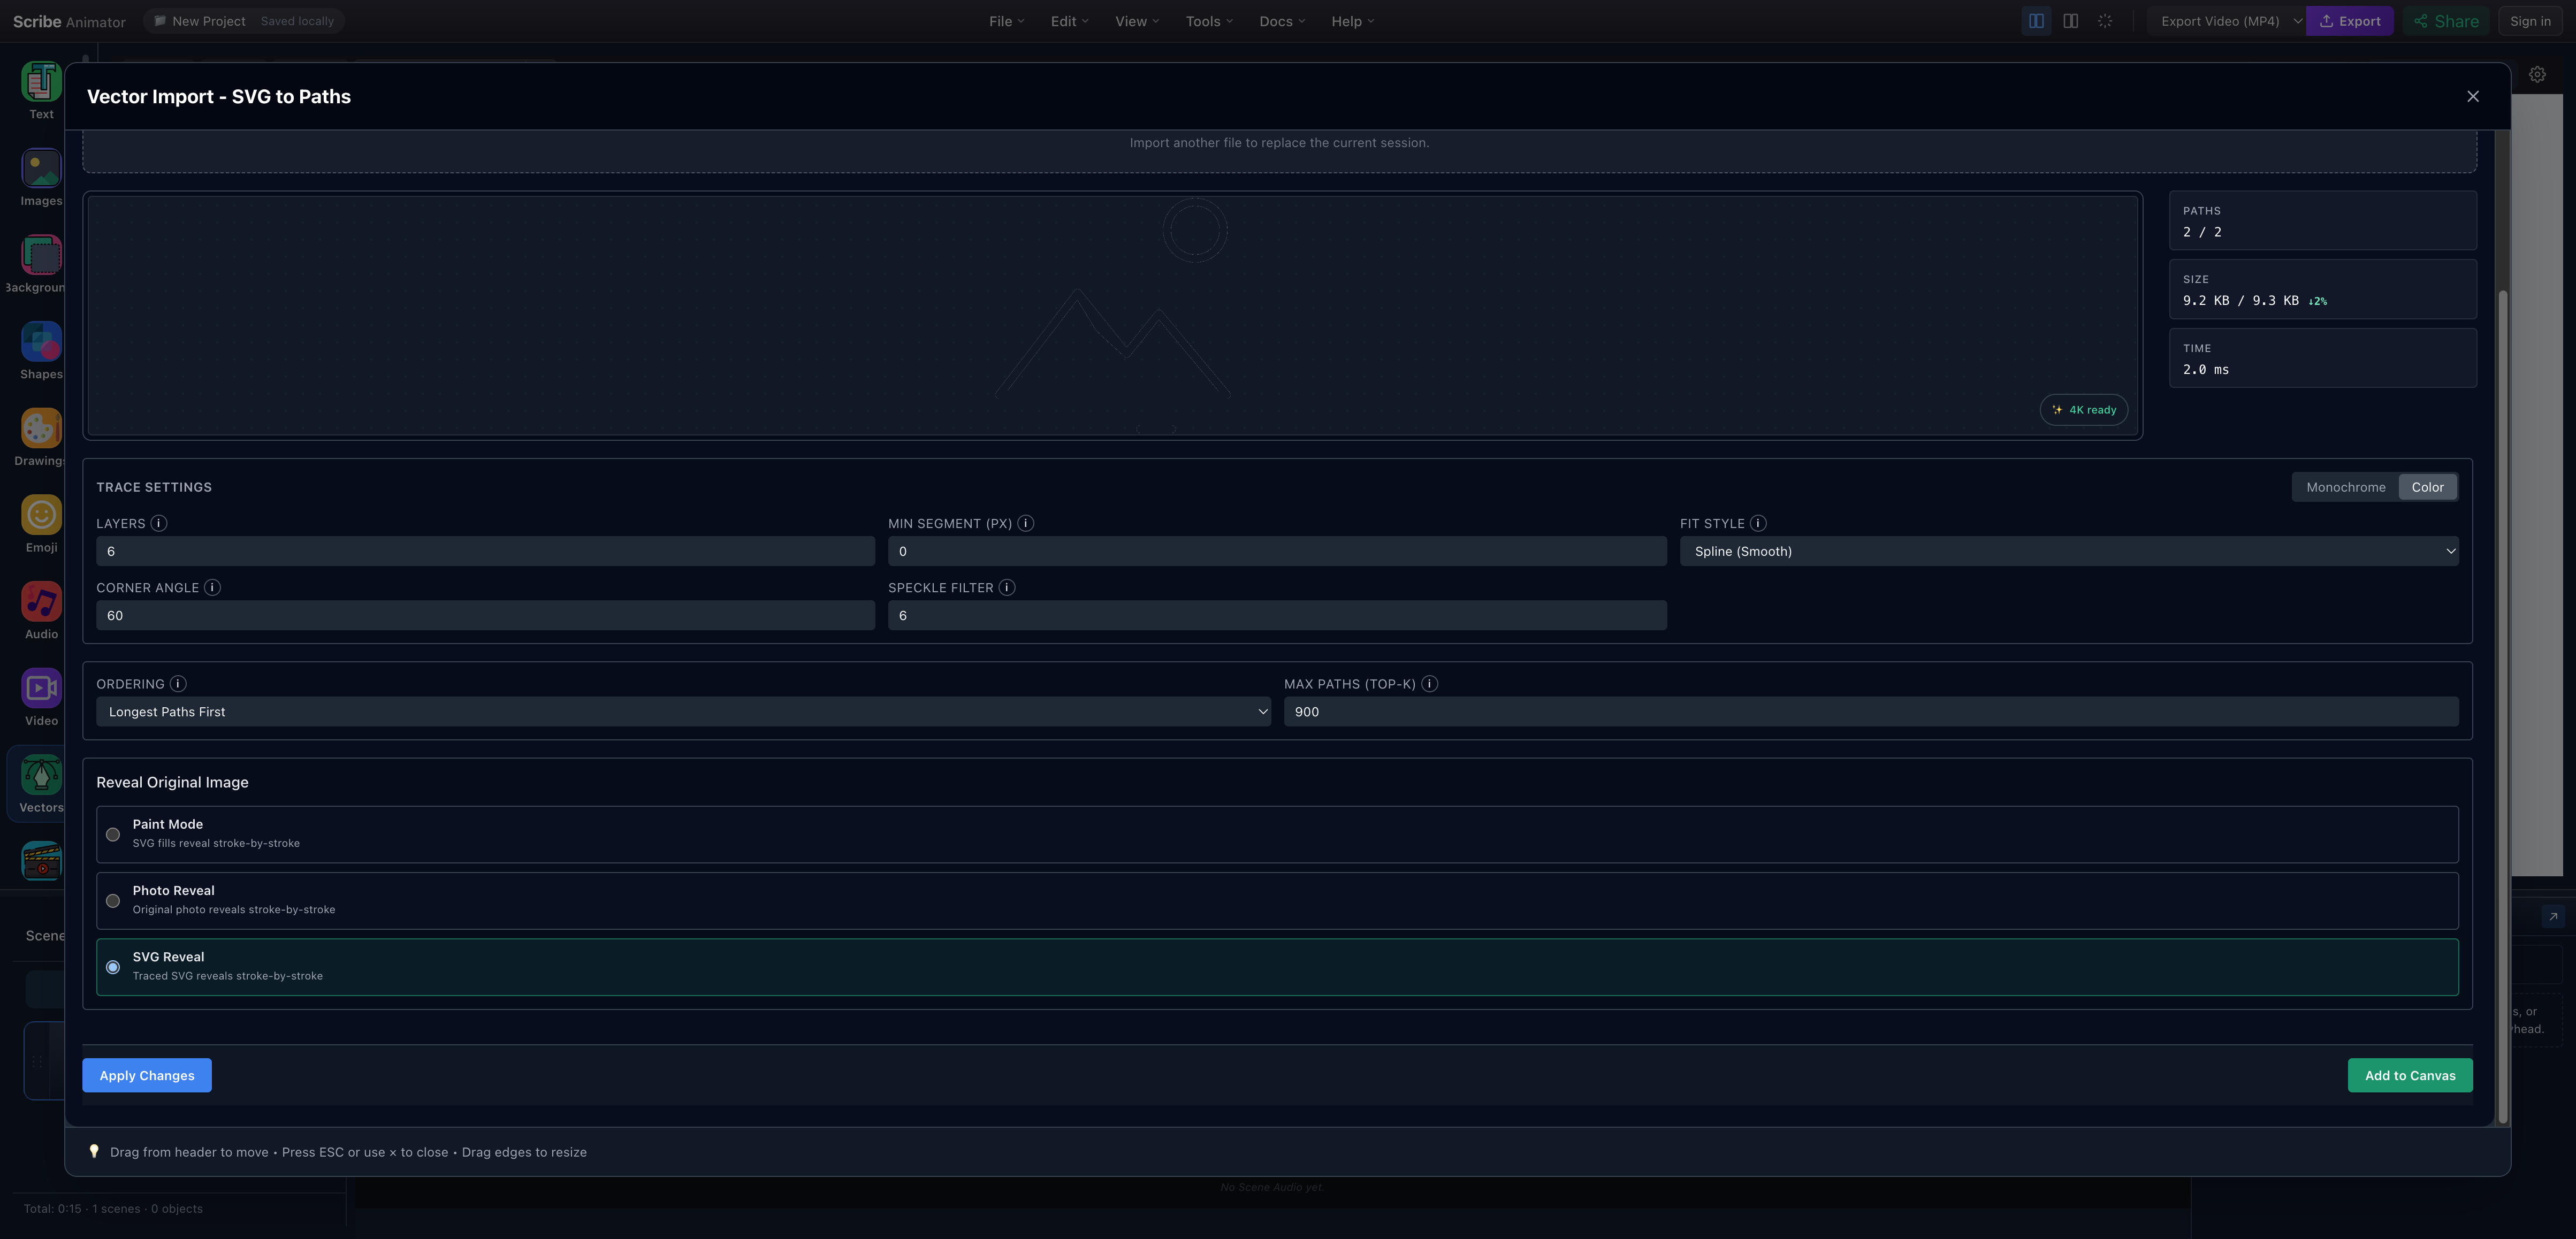
- Clean two-path resultThe preview still contains the mountain and sun after the budget adjustment.
- Top-K 900The tested cap stays below the device limit that the app reported during this session.
- Apply ChangesRe-run the trace after a setting change and re-inspect the result before placement.
- Add to CanvasOnly add the normalized result after the preview and warnings are acceptable.
Do not raise every cleanup setting merely to reduce path count. Heavy speckle filtering or a large minimum segment can remove real details. The correct result is the simplest trace that still communicates the original mark.
Read SVG and vector import for the supported raster formats, pipeline boundary, cloud-library limits, and current safety behavior.
3. Add the traced geometry and plan the reveal
Choose Add to Canvas, close the importer, and select the resulting vector. Rename it so the timeline remains understandable; this run used Traced mountain line art.
Open the timeline's DRAW drawer and choose AUTO-PLAN with only that object selected. The eligibility dialog reported one selected and one eligible vector. Confirming it produced one Draw Step from 0s for 3s, covering 0–100%.
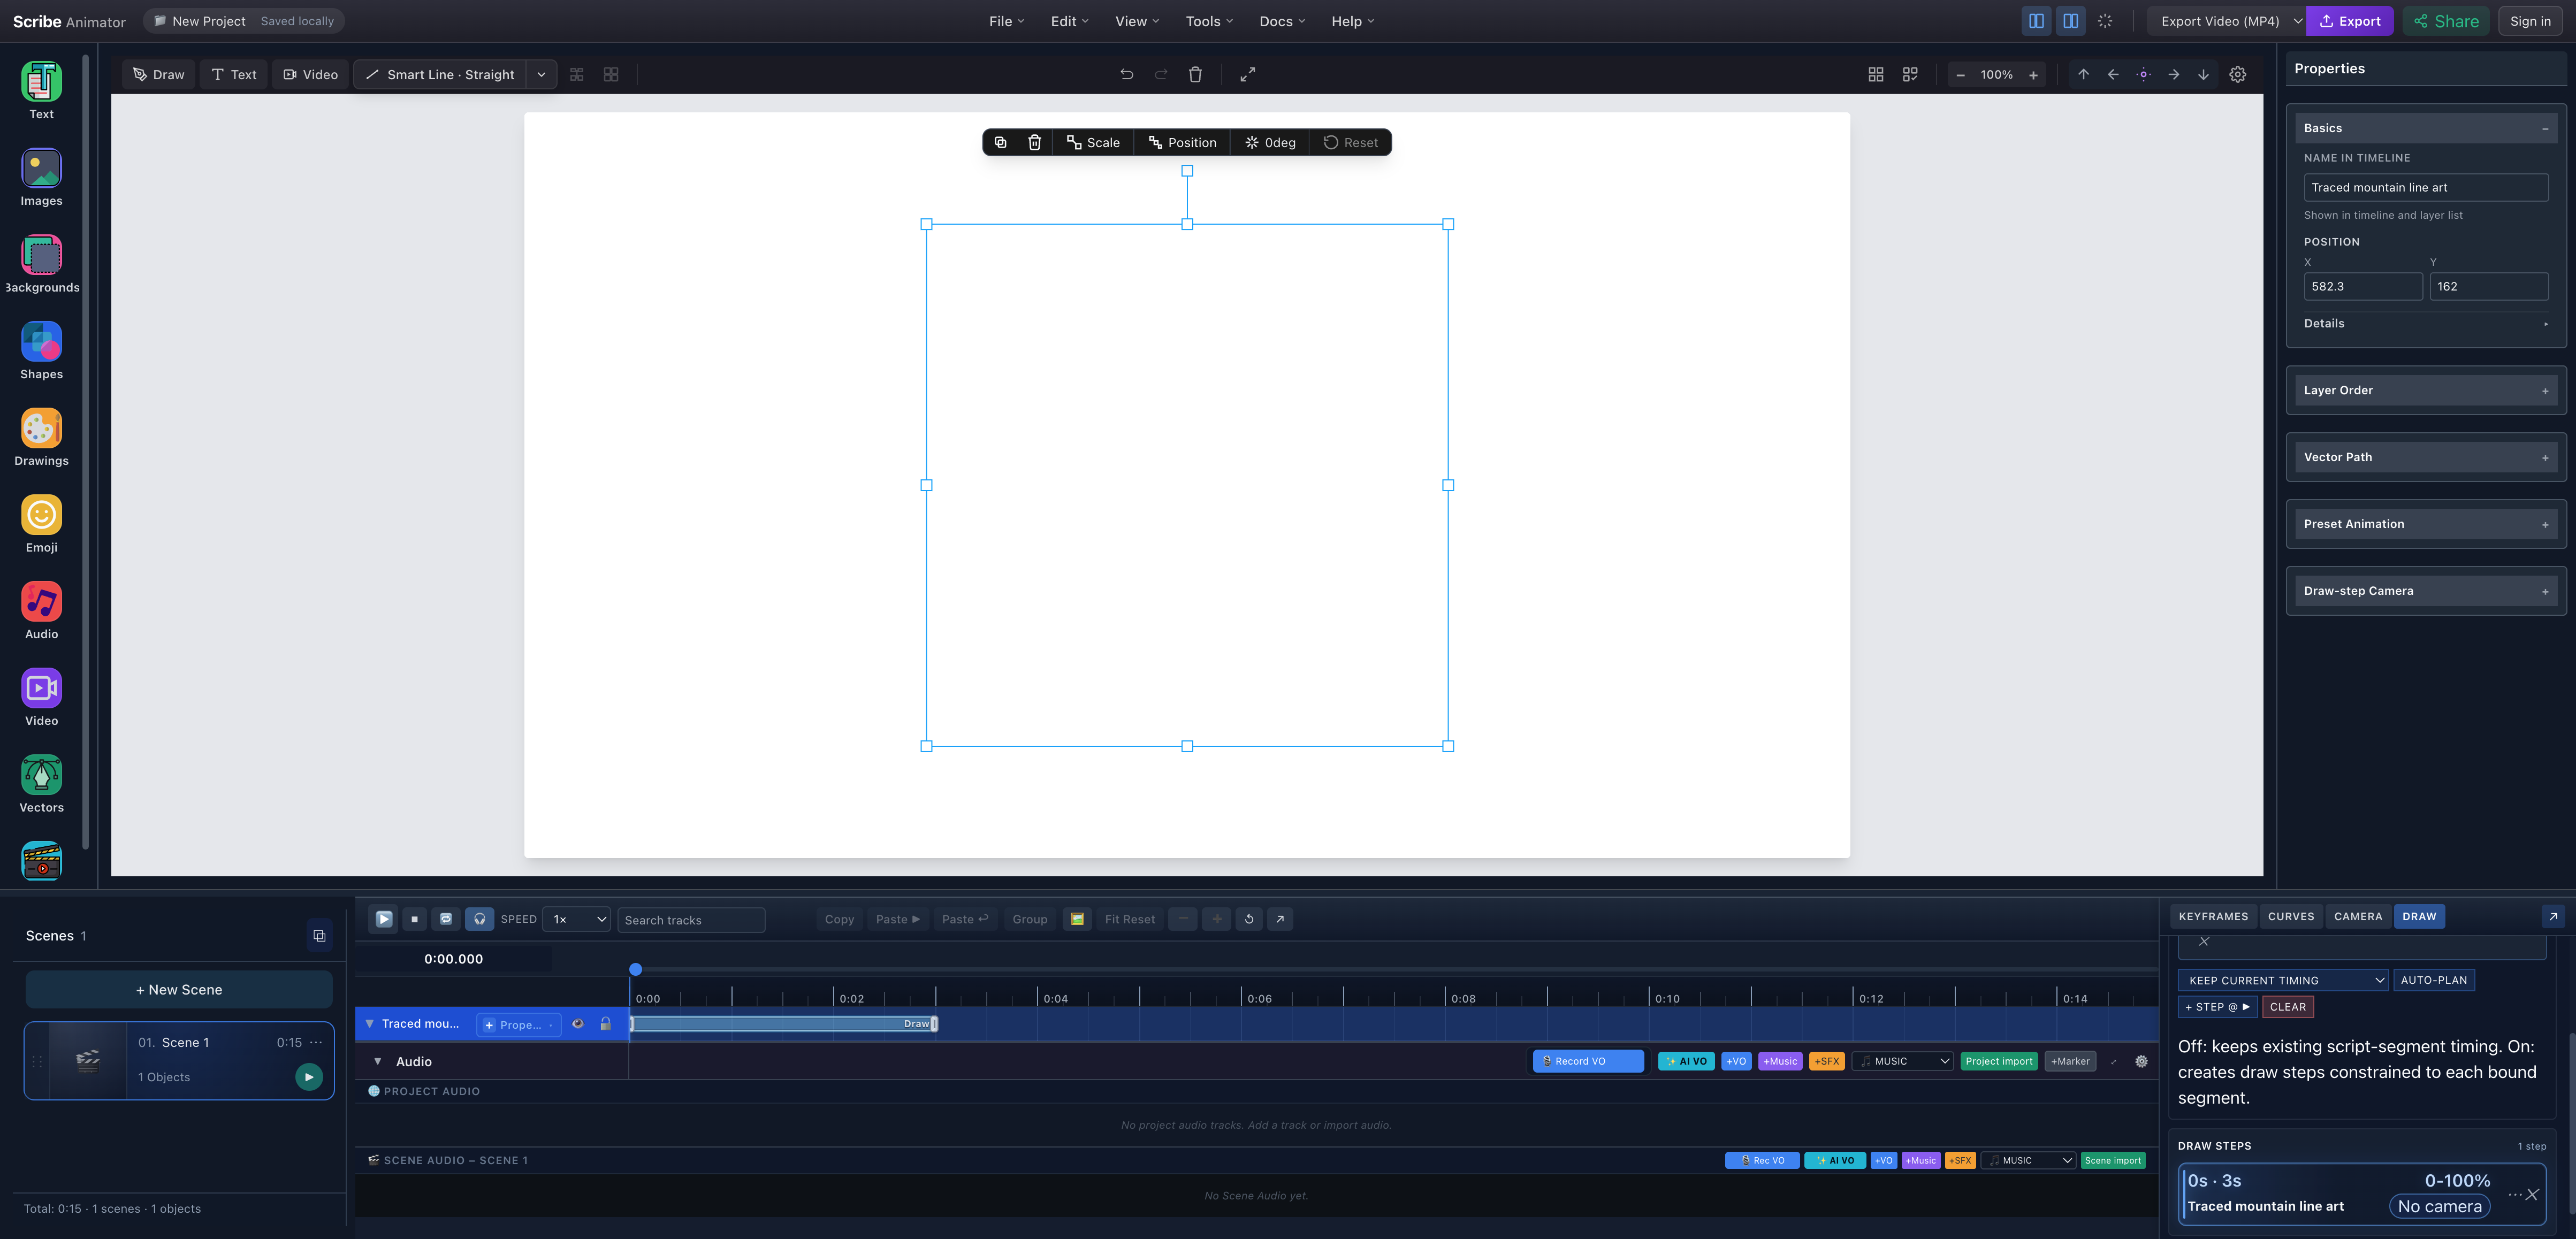
- Editable vector boundsAt zero reveal the selection bounds remain available even though the traced paths have not drawn yet.
- Named vector trackThe traced artwork is not a flat video clip; its object track remains editable.
- Three-second Draw StepThe drawer records one 0–3 second, 0–100 percent reveal for the traced vector.
The tracer produced compound filled geometry rather than reconstructing the original SVG's authored centerline strokes. That is expected: the PNG only contained pixels. Preview the route and appearance before deciding that the trace is suitable.
4. Preview the hand-following result
Seek to the start and press Play, or scrub inside the Draw Step. At 1.450s in the tested run, the mountain path was partially revealed and the project drawing hand followed the active contour.
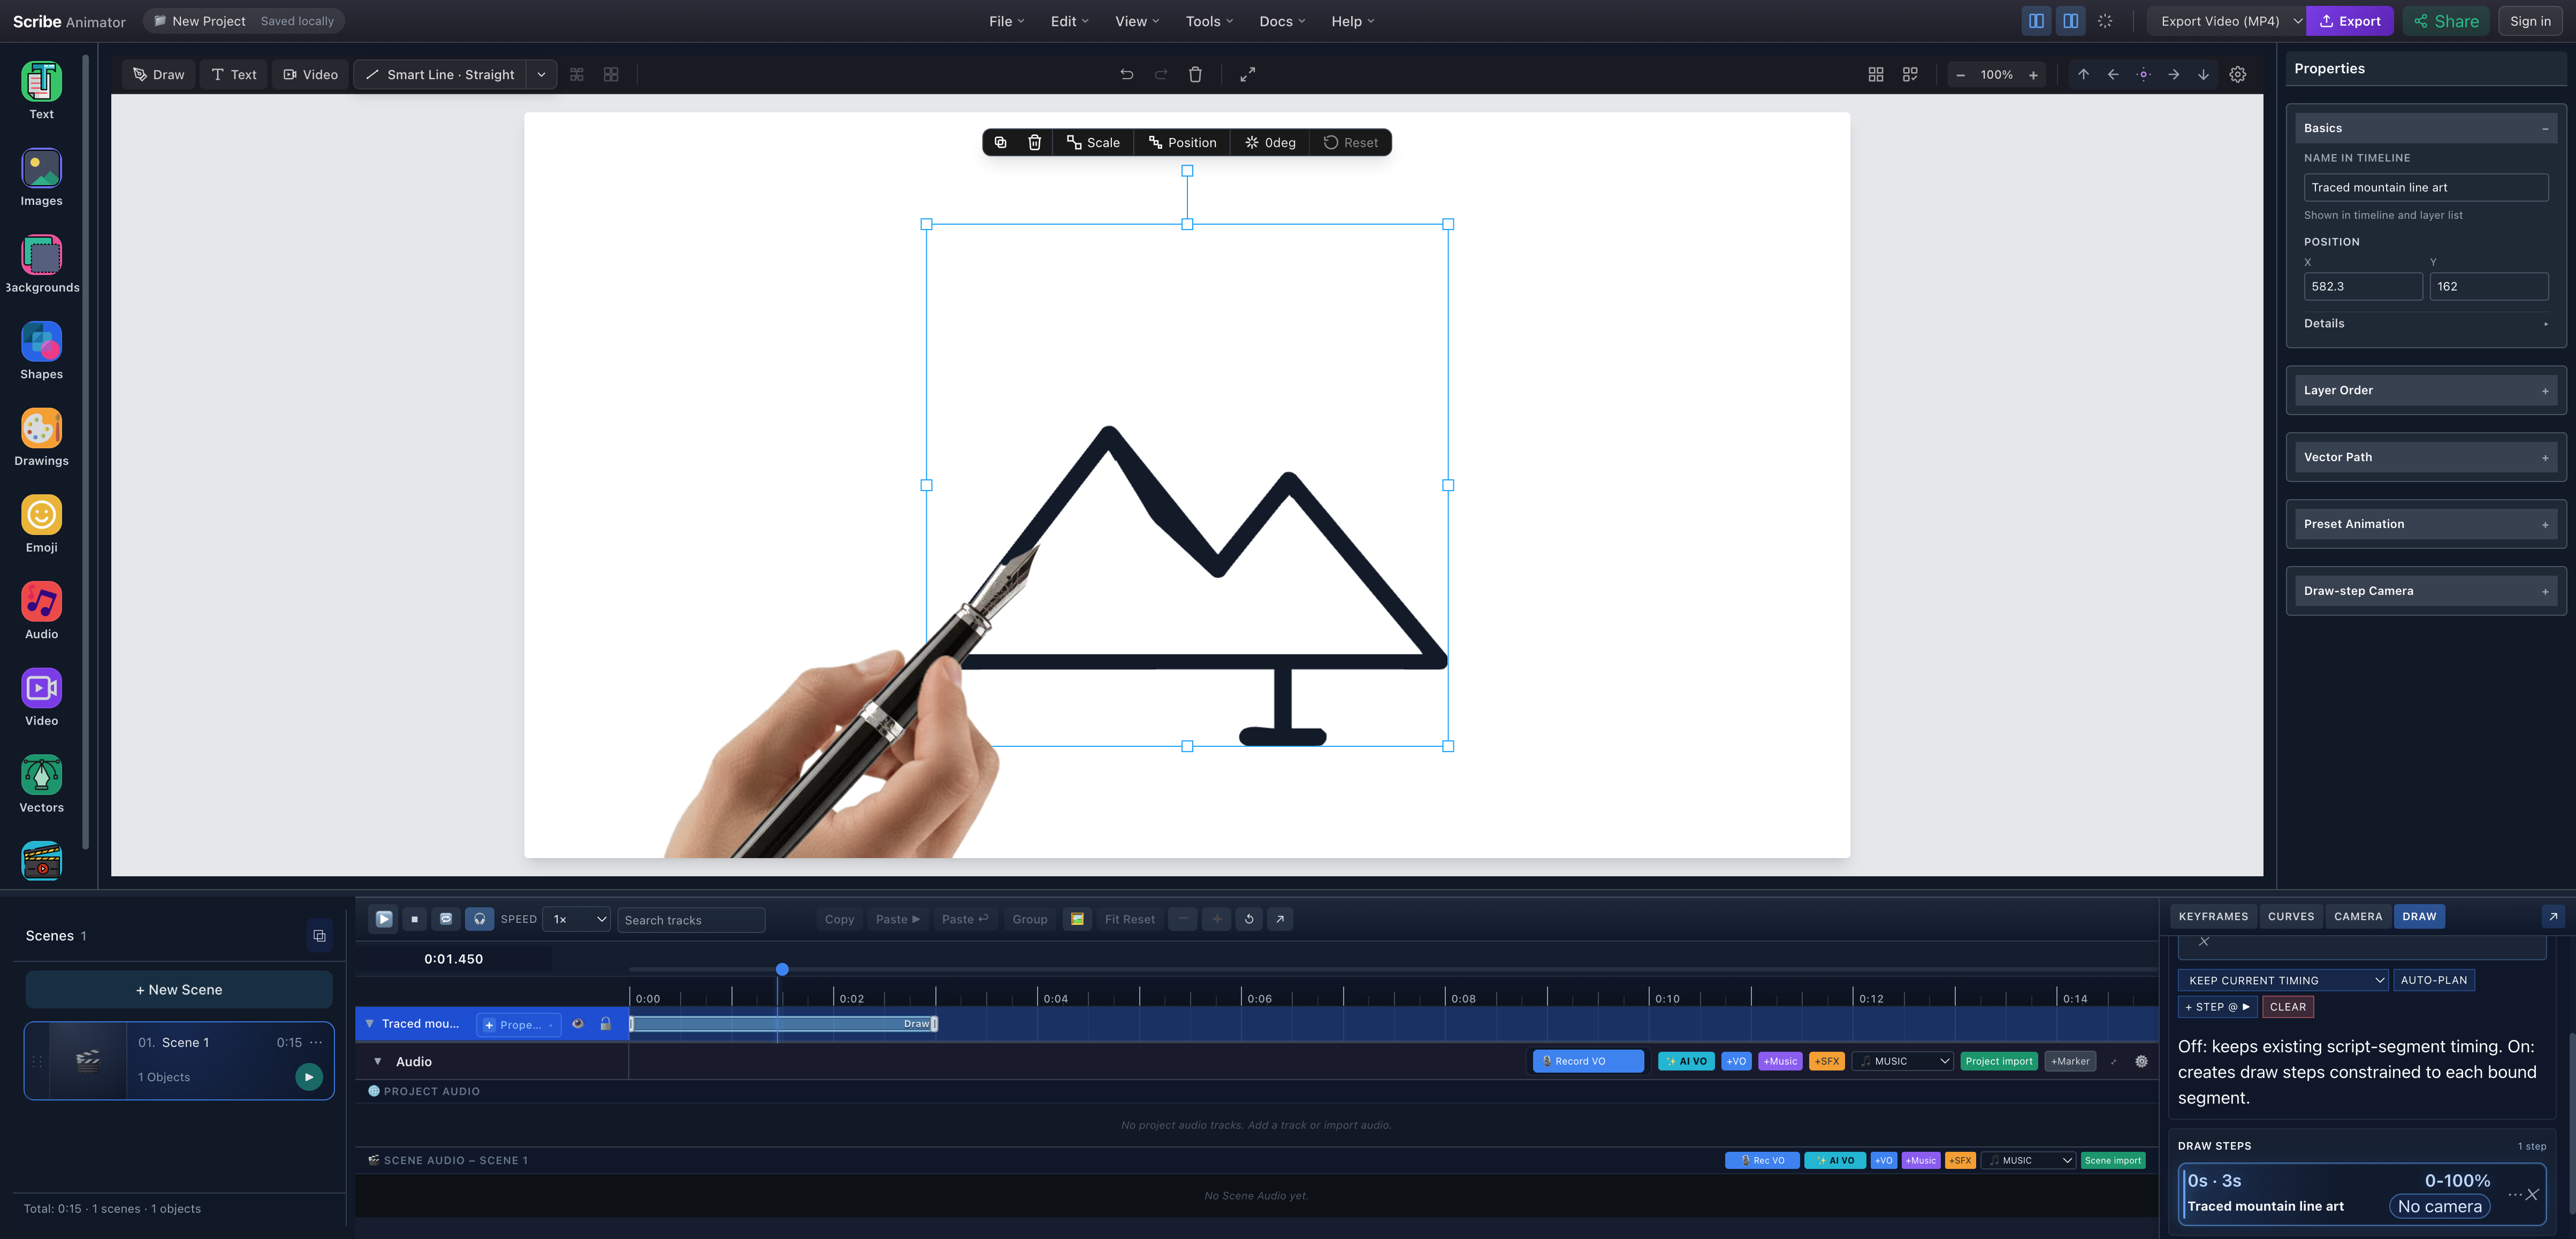
- Partial traced revealOnly the portion reached at 1.450 seconds is visible; the sun is scheduled later in the same step.
- Hand follows geometryThe hand overlay follows the active traced contour during preview.
- Verified playheadThe timeline records the captured running state at 1.450 seconds.
- Active Draw StepThe same 0–3 second step is visible while the route is inspected.
If the hand circles a thick outline twice or follows an unexpected contour, that is a tracing result—not proof that the input had a human-authored stroke route. Simplify the source or use a real SVG with purposeful path order when precise handwriting behavior matters.
5. Export and inspect the final file
Open Export Video (MP4), choose settings supported by your plan, and keep the editor tab open. The tested raster-tracing scene completed with 450 frames, 588.4 KB, and 0:15 in Scribe's dialog. Independent inspection of the downloaded stream reported H.264, 1280 × 720, 30 fps, 15.000 seconds, and 602,506 bytes.
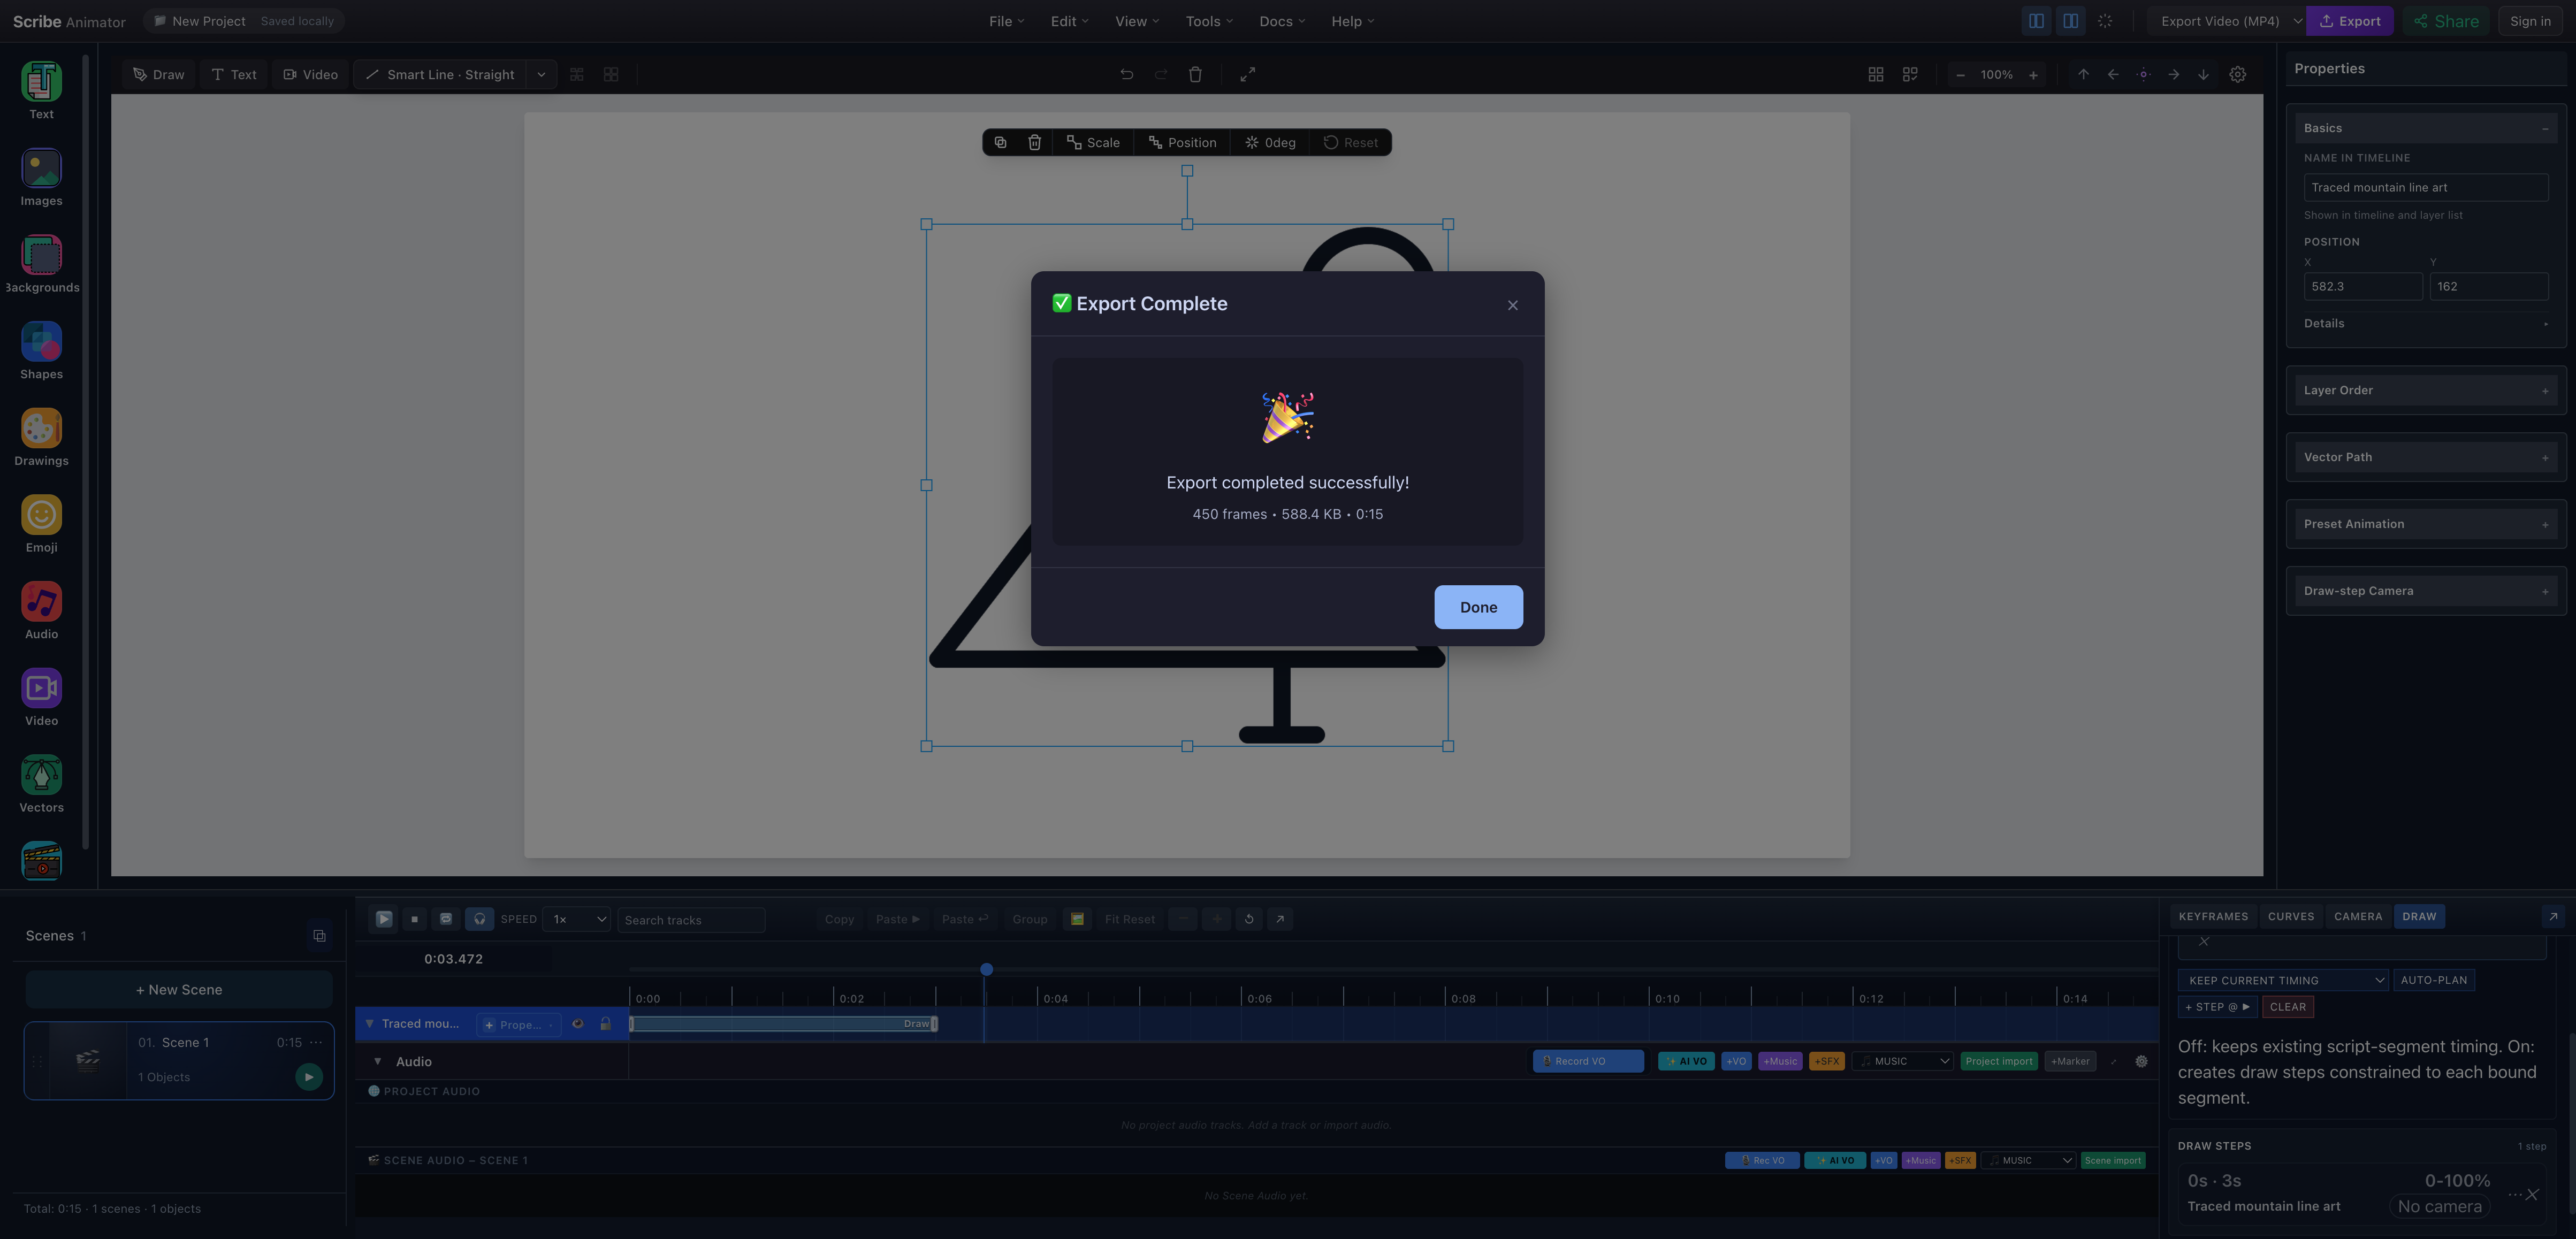
- Successful exportThe device-side exporter finished without closing or reloading the tab.
- Measured outputThe dialog records the frame count, app-reported size, and duration of this exact run.
Current limitations
- Tracing approximates visible pixels; it does not restore original vector semantics or missing detail.
- Photographs and noisy gradients usually produce too much or unhelpful geometry for a pen-like route.
- Thick raster lines can become filled outline regions rather than one centerline stroke.
- Color tracing can increase layers, paths, cleanup work, preview cost, and export cost.
- Auto-plan cannot understand which traced contour is narratively important.
- Device Top-K limits can change with available runtime resources.
- A hand can cover small artwork, and changing the hand does not repair poor tracing.
- This article verifies a PNG; JPG uses the same raster intake but was not separately published as a screenshot claim.
Troubleshooting
| Problem | What to change |
|---|---|
| Hundreds of tiny paths | Clean the source background, increase speckle filtering carefully, simplify the art, or use a better source. |
| Important small detail disappears | Reduce speckle/minimum-segment filtering and compare the preview again. |
| Curves look faceted | Use Spline fit; choose Polygon only when sharp segments are intentional. |
| Device-budget warning appears | Lower Top-K below the reported current limit, apply again, and confirm important paths remain. |
| Hand follows an outline strangely | The trace produced compound geometry; simplify the raster or obtain a purpose-built SVG. |
| Photograph looks like noise | Do not imply tracing can reconstruct it; use a simpler line-art source or a different visual treatment. |
| First frame is blank | A Draw Step beginning at zero has zero-percent reveal; seek into the step or press Play. |
Trace this practice PNG in Scribe
Download the first-party image, then open Scribe Animator and reproduce the two-path trace before trying a more complex source. Keep the preview simple enough that you can explain every path the hand will follow.
For related workflows, continue with animating a real SVG by hand and drawing hands and Draw Steps.