Create drawing-hand reveals
A convincing drawing reveal needs four parts: drawable vector paths, an intentional draw-step order, a compatible hand and tool, and enough time for viewers to understand the image. The Draw drawer coordinates those parts without converting the reveal into ordinary property keyframes.
The Draw drawer shown below was captured from the real Desktop editor at 1440 × 1000 on 26 July 2026. This static tutorial documents production controls and does not mount an interactive documentation canvas.
What can be drawn
| Content | Draw-ready? | Preparation |
|---|---|---|
| Imported SVG with extracted paths | Usually | Inspect the sanitized preview and detected paths |
| Raster image traced to vectors | After tracing | Simplify excessive path counts before planning |
| Text converted to outlines | After conversion | Duplicate the editable text before conversion |
| Freehand/vector path | Yes, when drawable paths are present | Confirm the object is unlocked |
| PNG, JPEG, WebP, or photograph | No | Trace it first, or animate it as an image instead |
| Filled illustration with no useful strokes | Technically limited | Use an entrance preset rather than forcing a stroke reveal |
Use a drawing hand when the act of drawing supports the explanation. Do not use it for every object: photographs, dense fills, or tiny decorative paths usually look slower and less natural.
Before you start
- Add one drawable object to the active scene.
- Select the object.
- Stop playback.
- Confirm the object is unlocked.
- Set a reasonable scene duration.
- If narration is the pacing source, import or generate it first.
- Open the timeline and choose DRAW.
Draw drawer anatomy
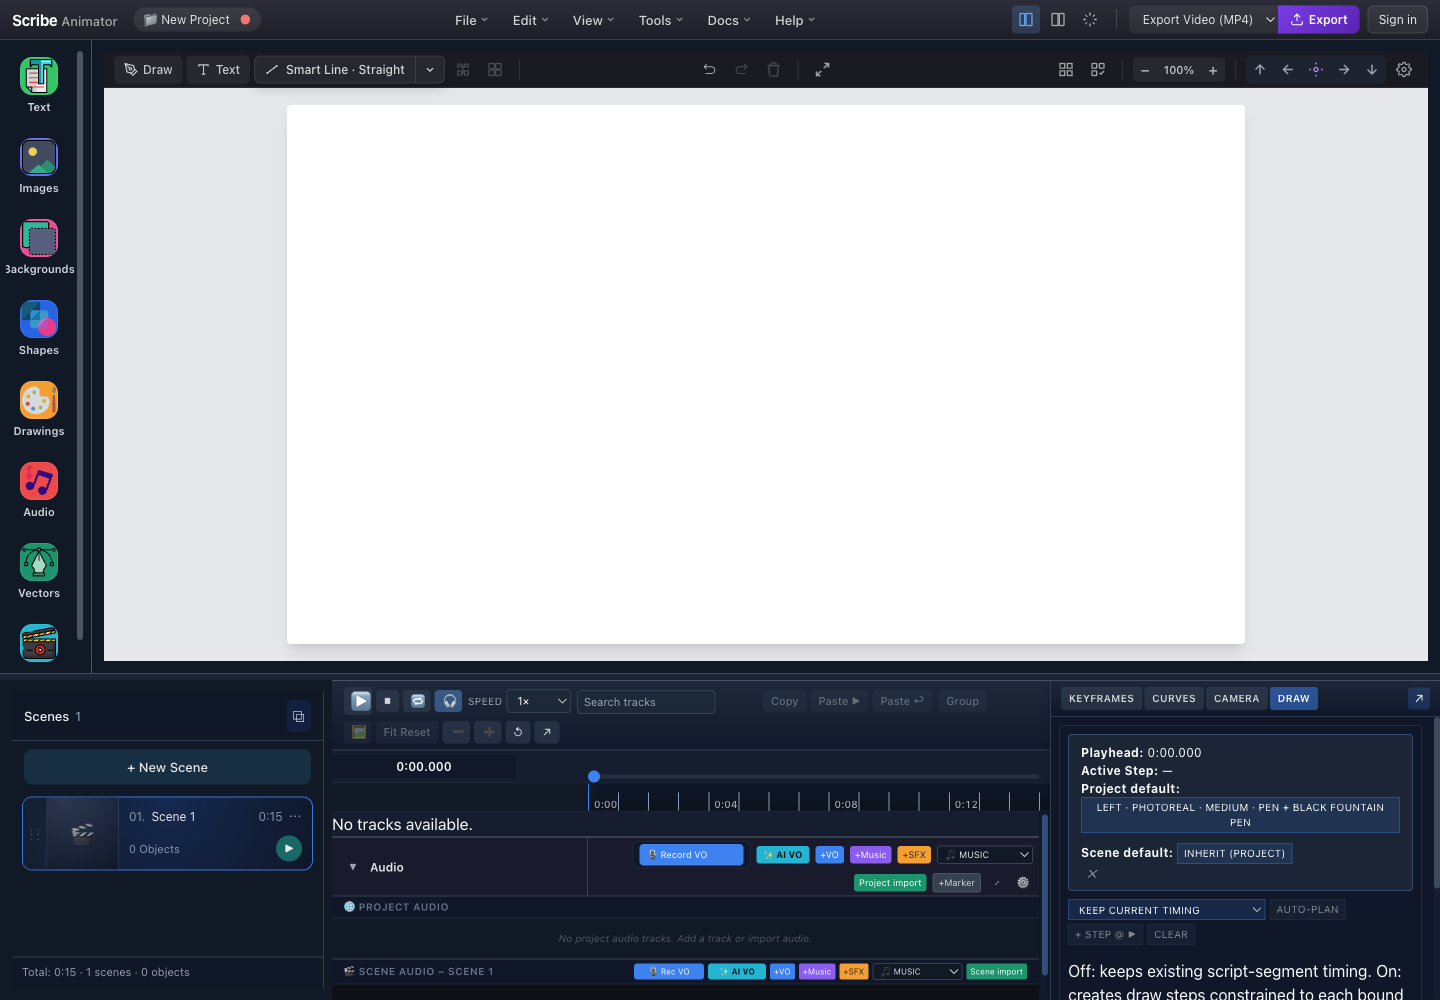
- DRAW tabOpens draw-step authoring beside the shared timeline.
- Playhead, active step, and defaultsShows scene-local time, the sampled step, and inherited project/scene hand-tool choices.
- Planning controlsChoose a planning strategy, generate a plan, add a step at the playhead, or clear editable steps.
- Shared time ruler and playheadStart-at-playhead and manual step creation use this current time.
- Audio timing referenceAudio-bound objects can preserve or regenerate steps inside their script segment.
Every Draw drawer control
| Control | Meaning |
|---|---|
| Playhead | Current scene-local time |
| Active Step | Step sampled at the playhead; a dash means none is active |
| Project default | Default hand, tool, scale, mirroring, and creation material for the project |
| Scene default | Optional scene-specific override; clear it to inherit the project default |
| Layer order — one by one | Plans complete drawable objects in layer order |
| Length — longest first | Prioritizes longer drawable routes |
| Round-robin — interleaved | Alternates segments across objects; its segment-count field controls the split |
| Keep current timing | Preserves existing visible timing while building useful draw steps |
| Start @ ▶ | Starts a generated non-preserve plan at the current playhead instead of scene start |
| Replan audio-bound objects | Rebuilds steps constrained to bound script segments; leave off to preserve existing audio-driven timing |
| Auto-plan | Builds a proposed plan for eligible selected objects, or eligible scene objects when no compatible selection is present |
| + Step @ ▶ | Adds a manual step at the current playhead |
| Clear | Removes editable scene steps; locked-object steps are retained |
| Draw Steps list | Shows start, duration, reveal range, target, camera status, lock state, details, and delete action |
| Precompute | Prepares hand LUT work for the next time window or complete scene |
Tutorial 1: generate a first draw plan
Choosing Draw In makes compatible geometry eligible for a stroke reveal, but it does not create Draw Steps by itself. Use Auto-plan or + Step @ ▶ to author the step plan. If the same object also has preset timing or property keyframes, read How timing sources combine before deciding which timing to keep.
- Select the drawable object.
- Open DRAW.
- Set the Project default hand/tool if the project does not already have one.
- Optionally set a Scene default when this scene needs a different presentation.
- Choose Keep current timing when object visibility already matches the intended narration.
- Otherwise choose:
- Layer order for predictable object-by-object drawing;
- Length when dominant long strokes should appear first; or
- Round-robin when several objects should develop together.
- For a non-preserve strategy, turn Start @ ▶ on if the plan should begin at the playhead.
- Choose Auto-plan.
- Review the confirmation before replacing or merging timing.
- Inspect the generated Draw Steps list.
- Press Play from before the first step.
Expected result: the vector reveals over the planned ranges, and the hand follows the active stroke with the inherited project or scene preset.
The planner understands geometry, route length, layer order, and timing constraints. It does not understand story emphasis. Always review what the viewer sees first.
Tutorial 2: edit an individual draw step
- Select a step in Draw Steps.
- Expand its details.
- Edit Start time (sec) and Duration (sec).
- Confirm the Target object.
- Set the reveal range:
From 0andTo 1reveal the full target;- a partial range reveals only that normalized portion.
- Choose Stroke Material only when this step should temporarily override the object's Solid, Marker, Chalk, Pencil, Crayon, Dry Marker, Ink Brush, or Highlighter appearance; choose Inherit otherwise.
- Open Step preset when one step needs a different hand/tool.
- Use Clear step override to return to scene/project inheritance.
- Use the step's delete action to remove only that step.
- Scrub into the step, then preview through its end.
Expected result: only the selected step changes; other steps keep their own targets, timing, and overrides.
Locked target objects cannot have their steps edited or deleted. Unlock the target first rather than recreating the plan.
Use multiple Draw Steps on one object
One drawable vector can own several sequential Draw Steps. Keep the same Target, then give each step a deliberate partial From/To range. Contiguous ranges are the safest progressive pattern because each step starts exactly where the previous one finished.
For example:
| Step | Start | Duration | From | To |
|---|---|---|---|---|
| 1 | 0s | 2s | 0.00 | 0.42 |
| 2 | 2s | 2s | 0.42 | 0.54 |
| 3 | 4s | 2s | 0.54 | 0.77 |
| 4 | 6s | 2s | 0.77 | 1.00 |
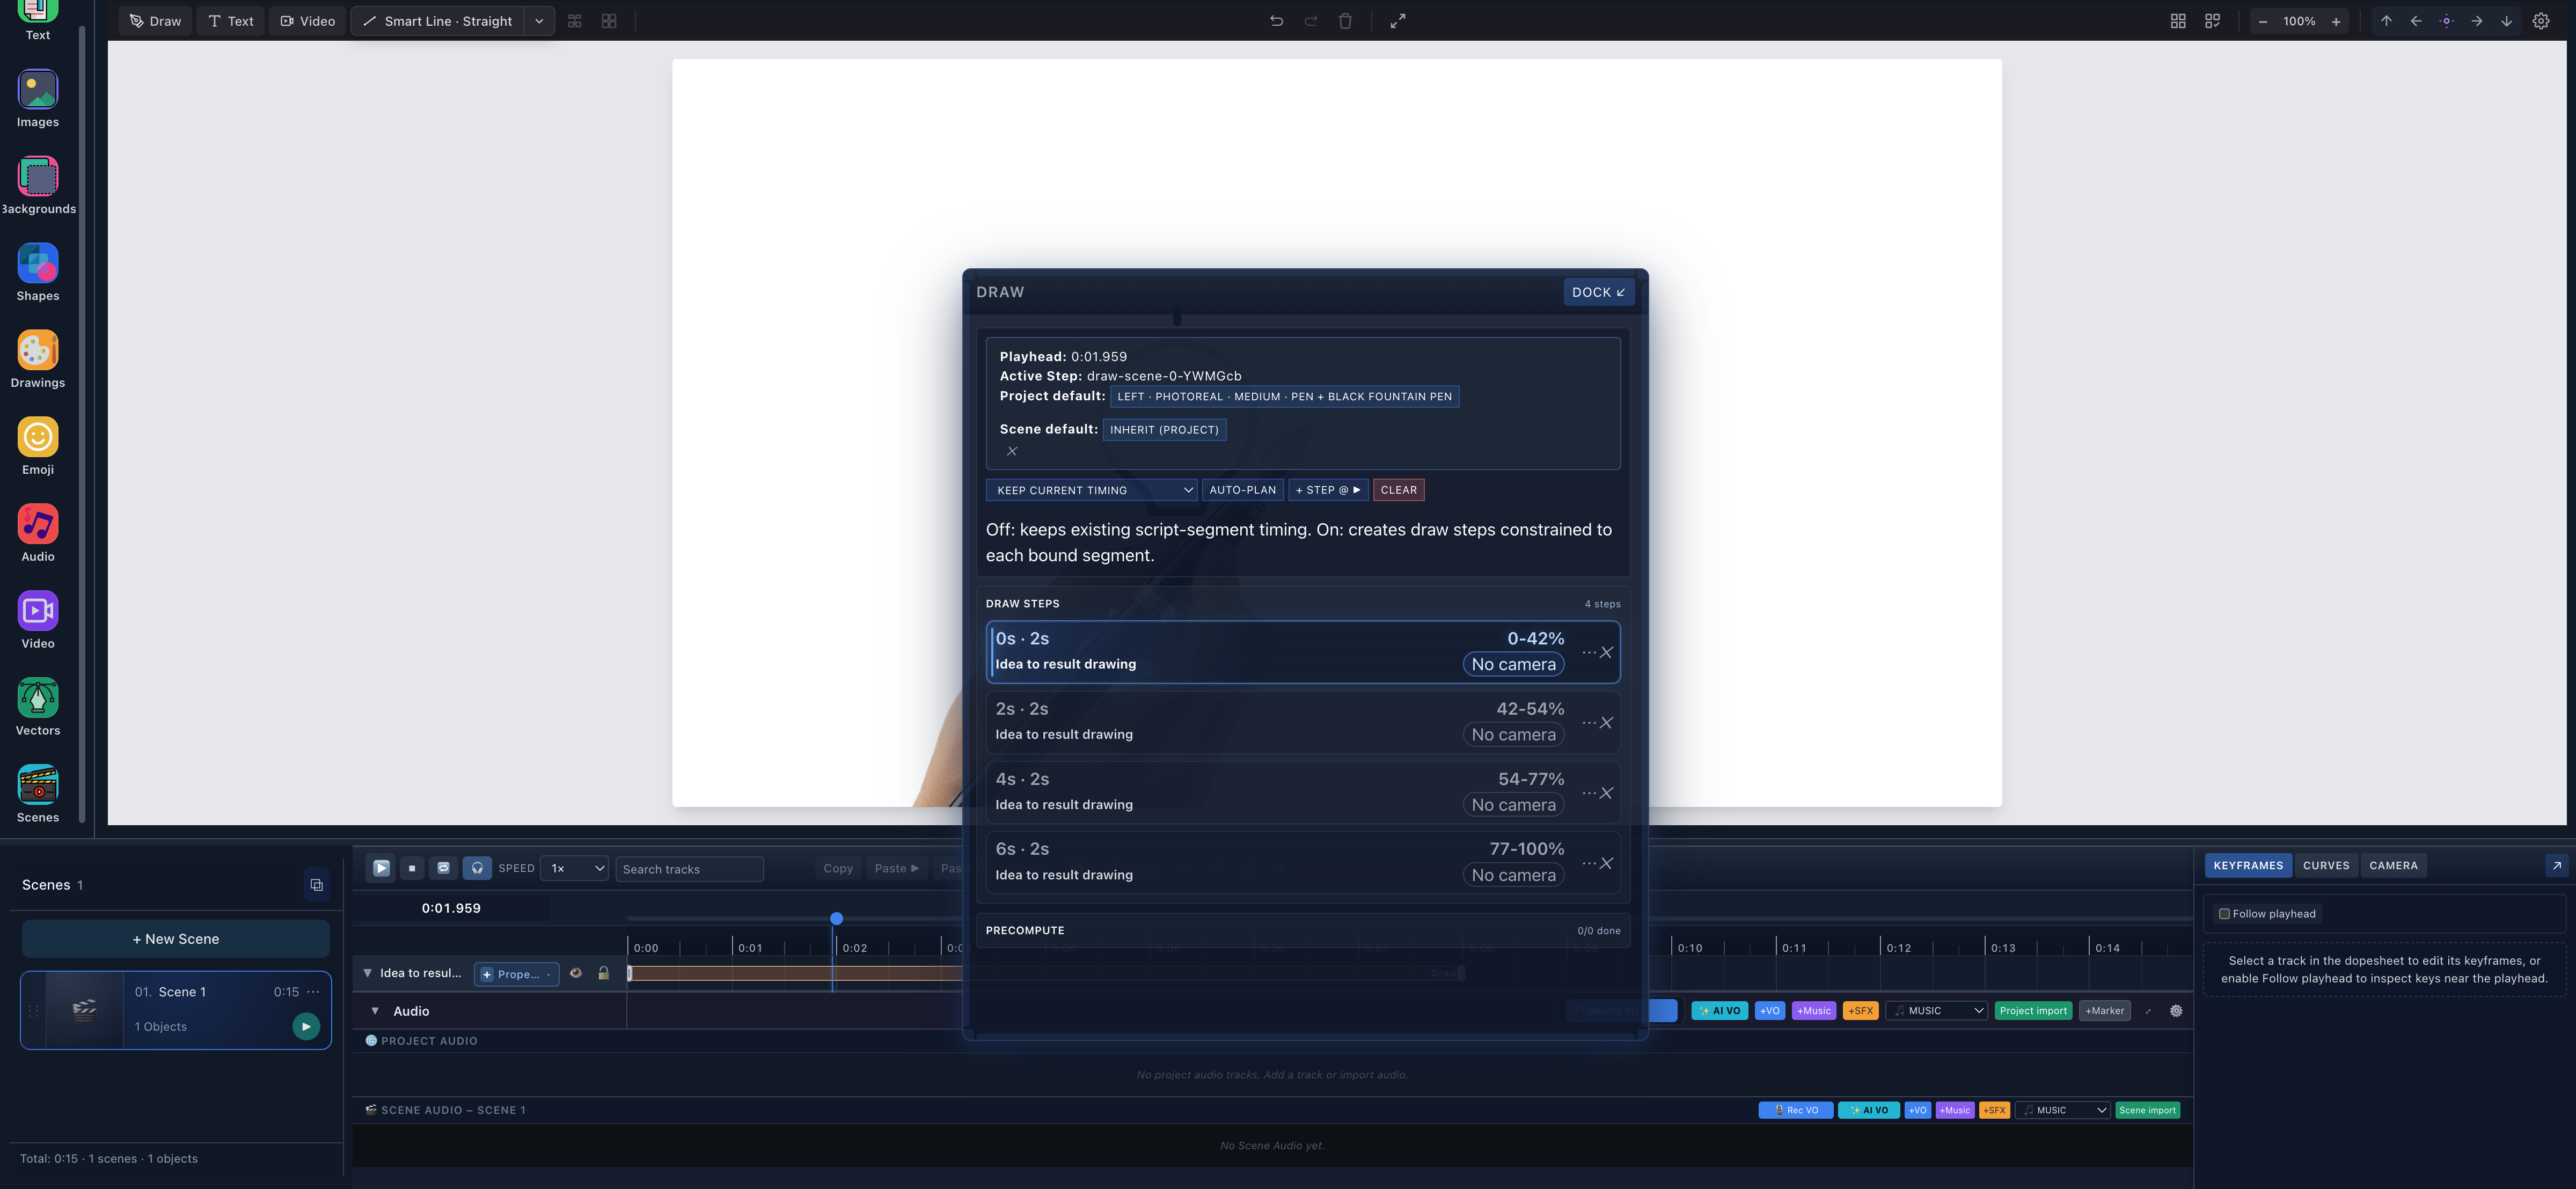
- One targetEvery row references Idea to result drawing.
- Contiguous rangesThe steps progress through 0–42, 42–54, 54–77, and 77–100 percent.
Each step can also use its own Step preset and Stroke material. Hand/tool precedence is Step → Object → Scene → Project. Choose Clear step override to return a custom step to the inherited source without deleting its timing or range. The visible hand/tool asset and the rendered stroke material are separate settings.
Manual + Step @ ▶ entries start with a full 0 → 1 range. Split those defaults intentionally; four unchanged full-range steps will redraw the complete route rather than progressively reveal four sections. Path percentages do not understand semantic regions, so preview the route and adjust boundaries to the source SVG's real path order.
Follow the complete one-object, multiple-hands tutorial for the downloadable practice SVG, authentic selector and playback screenshots, inheritance test, Round-robin comparison, and independently inspected MP4.
Tutorial 3: choose a hand and tool
The selector can be opened for the project default, scene default, or one step.
- Choose the scope:
- project for a consistent visual identity;
- scene for a temporary change;
- step for a deliberate exception.
- Choose a hand preset.
- Choose a compatible tool.
- Set scale and mirror options.
- Confirm the selection.
- Preview a curved and a straight stroke.
- If the nib does not meet the path, use the calibration workflow rather than compensating with object position.
Keep the tool appropriate to the art. A thick marker can cover fine lettering; a fine pen can look implausible on a broad filled route.
Stroke material is separate from the selected hand and tool. Blackboard recommends Chalk material and a chalk-type tool, Paper recommends Pencil, Kraft Paper recommends Ink Brush, Blueprint recommends a light Marker, and Whiteboard retains the clean Solid/Marker workflow. Other physical materials recommend the closest installed tool type, but you can deliberately mix them—for example, a chalk tool sprite with a Solid stroke—without changing project data semantics. See Choose board surfaces and stroke materials for the complete pairing matrix.
When you use Convert to outlines on text, the result becomes editable vector-path geometry and snapshots the current scene's drawing material. Its Draw In contour therefore supports every stroke material—including Crayon, Dry Marker, Ink Brush, and Highlighter—just like other vectors, and the material can be changed later in Vector Path → Stroke Material. Normal editable text remains clean and is not automatically textured.
Tutorial 4: frame an individual draw step
Expanded step details include Camera controls for eligible targets.
- Expand the step.
- Open its camera controls.
- Position the editor view so the active stroke and enough context are visible.
- Save the step framing.
- Repeat for later steps only when framing actually needs to change.
- Preview the complete sequence.
Avoid large pose changes between short steps. The viewer should follow the explanation, not chase the camera.
Tutorial 5: coordinate audio-bound drawing
Audio binding is a separate relationship between an object and an existing script or narration segment. Recording, importing, or placing an audio clip does not by itself create a segment or bind an object. Follow Bind objects to audio segments to establish and verify that relationship first.
- Create or confirm an eligible script segment, then bind the intended object to it.
- Return to DRAW.
- Leave Replan audio-bound objects off when existing segment timing is correct.
- Turn it on only when you intentionally want a new plan fitted inside each bound segment.
- Run Auto-plan and read the confirmation.
- Verify that no step begins before or ends after its audio-bound visible range.
- Preview with headphones.
If a bound segment is too short for understandable drawing, lengthen or reorganize the audio/scene rather than compressing all steps into an unreadable burst.
Tutorial 6: precompute for smoother playback
- Expand Precompute.
- Review worker and queue status.
- Set the prefetch window in seconds.
- Choose Precompute next for near-playhead work.
- Choose Precompute scene before reviewing the entire scene.
- Use cancel if the queued work is no longer relevant.
Precompute improves readiness; it does not change authored step order or duration.
Limitations
- Raster content is not drawable until converted to useful vectors.
- Automatic planning cannot determine narrative importance.
- Very high path counts increase planning, precompute, preview, and export cost.
- Hand/tool assets may differ by installed package or platform.
- Audio-bound timing constrains where associated steps can live.
- Locked-object steps are deliberately protected from bulk clearing.
- Camera, object transforms, and later geometry changes can make a previously calibrated hand appear misaligned.
- Mobile Lite condenses planning into focused sheets; large step-list editing is easier on Desktop.
Troubleshooting and recovery
| Problem | Recovery |
|---|---|
| Auto-plan is disabled or reports no targets | Select an unlocked object with drawable paths, or check that the active scene contains eligible artwork |
| No draw steps are generated | Inspect SVG path detection, unlock objects, and check whether audio-bound targets were intentionally skipped |
| Order looks wrong | Try another strategy, then reorder or split the meaningful steps manually |
| Hand is missing | Set a project/scene/step preset and verify the hand asset is available |
| Nib is offset | Recalibrate the hand/tool and preview after camera or geometry changes |
| Reveal is too fast | Increase step duration or scene duration; do not only slow preview speed |
| A step cannot be edited or cleared | Unlock its target object |
| Draw timing changed after audio work | Check the object-segment binding and whether replan mode was enabled |
| Playback stutters | Reduce path complexity and use Precompute next or Precompute scene |
| Public drawing library fails to load | Retry once, confirm connectivity, or import a local SVG; do not remove a working local object |
Related workflows
- Make multilingual handwritten text animations
- Animate an SVG like it is being drawn by hand
- Draw one SVG in multiple steps with different hands and tools
- Turn PNG or JPG line art into a hand-drawn animation
- Choose board surfaces and stroke materials
- Import SVG and vector artwork
- Create text, typography, and equations
- Compare preset, Draw, and keyframe timing
- Bind objects to audio segments
- Use camera moves and path following
- Draw and SVG Path reference