Draw & SVG Path - Complete Guide
Create professional "draw-in" animations with hand-following effects using the Timeline Draw Drawer and Inspector SVG Path panel. This guide covers the LUT-based hand draw system and SVG path animation settings.
Overview
The Draw & SVG Path system provides two key interfaces:
- Timeline Draw Drawer - Timeline-driven draw steps for hand animation scheduling
- Inspector SVG Path Panel - Per-object draw settings (mode, speed, stroke, filter)
These work together to create whiteboard-style animations where a hand draws paths that reveal vector objects.
Current visual orientation
The DRAW drawer edits scene-local draw steps against the same real timeline used by preview and export. It does not animate a separate documentation canvas.
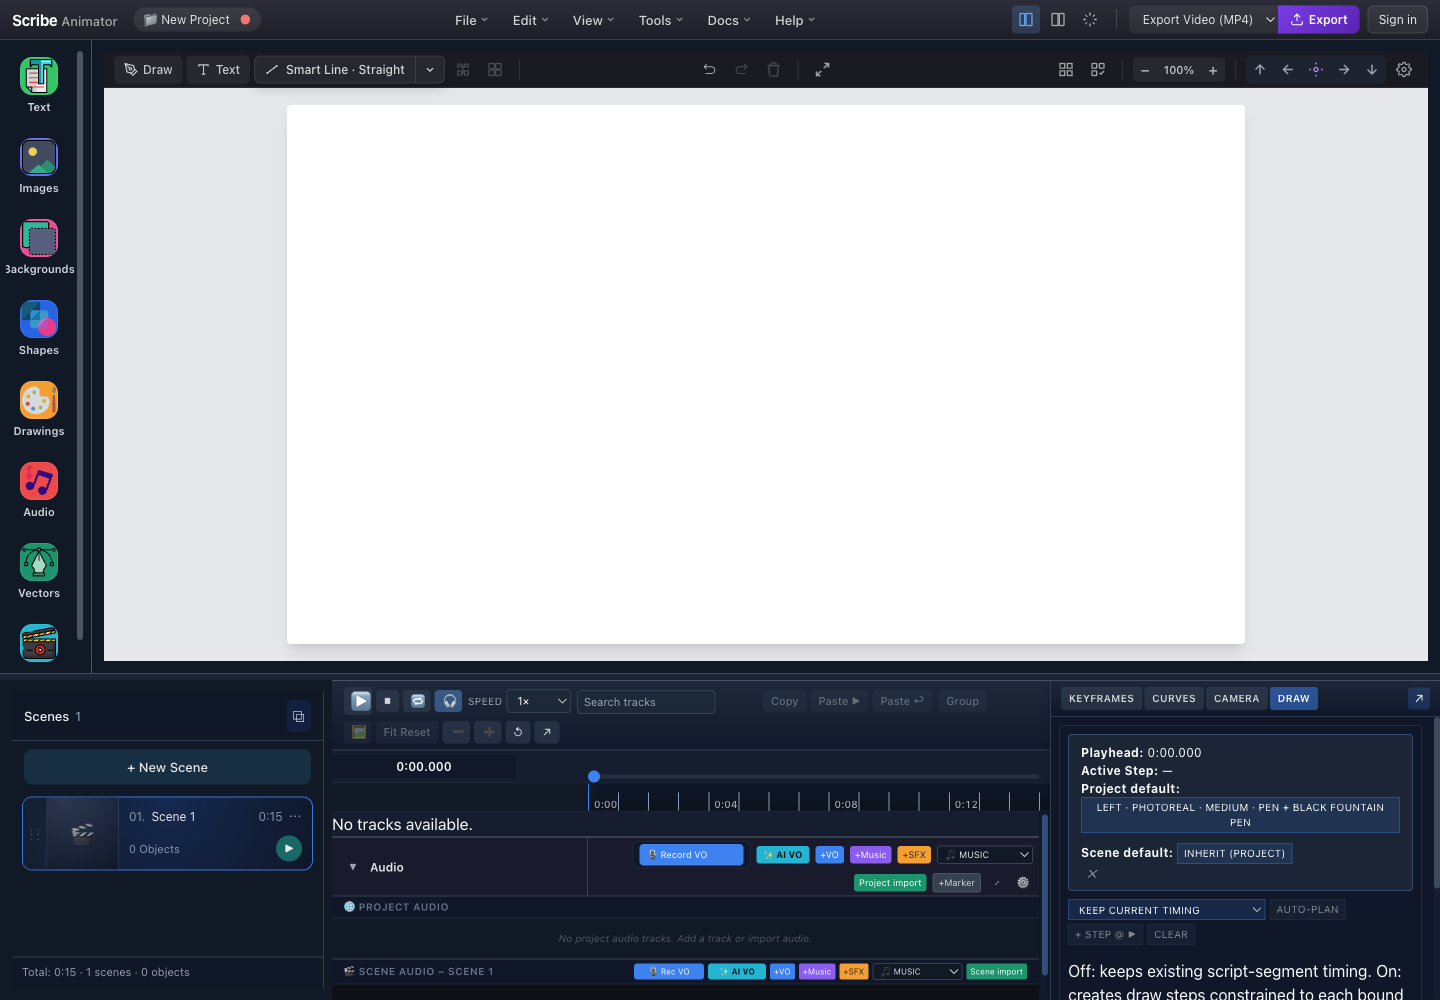
- DRAW tabOpens draw-step authoring beside the shared scene timeline.
- Status and defaultsShows scene-local playhead time, the sampled active step, and inherited project or scene hand/tool settings.
- Planning controlsChoose a strategy, auto-plan, add a step at the playhead, clear editable steps, or precompute.
- Shared ruler and playheadStart-at-playhead and manual-step commands use this real current time.
- Audio timing referenceAudio-bound objects can preserve or regenerate steps inside their script segment.
This capture and the marked controls were checked against the running Desktop editor with browser-based UI review on July 26, 2026. Auto-plan output still depends on eligible drawable geometry, scene timing, locks, and audio bindings. For the complete object-eligibility, planning, hand/tool, calibration, camera, precompute, troubleshooting, and limitation workflow, follow Draw paths with hands and tools.
Timeline Draw Drawer
Location
Open via the DRAW tab in the Timeline panel (next to CAMERA tab).
Draw Drawer Interface
The authentic drawer is shown in the annotated screenshot above. Read it from top to bottom:
- Confirm the scene-local Playhead and sampled Active Step.
- Review the inherited project hand and tool preset.
- Add a scene override only when this scene needs a different presentation.
- Choose a planning strategy and decide whether planning starts at the current playhead.
- Use AUTO-PLAN for eligible geometry or + STEP @ ▶ for a manual step.
- Inspect the generated rows before previewing or precomputing.
An empty DRAW STEPS area means no editable steps exist for the active scene. It does not prove that the selected object is eligible; check its SVG paths, animation type, locks, timing, and audio binding before retrying.
Setting an eligible object to Draw In does not automatically populate DRAW STEPS; use AUTO-PLAN or + STEP @ ▶ to author them. See How timing sources combine when preset animation, Draw timing, and keyframes coexist, and Audio binding before replanning an audio-bound object.
For an outcome-focused example that keeps one SVG target while splitting it into four partial ranges with different step hands, tools, and materials, follow How to animate one drawing in multiple steps. This reference explains the fields; the tutorial provides the tested route boundaries, live switching evidence, Round-robin comparison, and verified MP4.
Header Controls
| Control | Description |
|---|---|
| Playhead | Current scene-local time (read-only) |
| Active Step | Step ID currently active at playhead (read-only) |
| Preset | Project default hand + tool selection |
| Scene | Scene-level override (or INHERIT from project) |
Preset Selection
Click the Preset button to open the Hand & Tool Selector modal:
- Choose hand style (Photoreal, Cartoon, Sketch)
- Choose handedness (Left/Right)
- Choose skin tone (Light, Medium, Dark)
- Choose tool type (Pen, Pencil, Marker, Brush)
- Use Calibrate… for fine-tuning nib offset
Preset hierarchy: Step Override > Object > Scene > Project
Auto-Plan Strategies
| Strategy | Description |
|---|---|
| Layer Order | Draws objects in scene stacking order |
| Length | Starts with longer paths first |
| Round-robin | Interleaves drawing across objects (A1→B1→A2→B2…) |
When Round-robin is selected, a segment count input appears (2-16 segments).
Start @ ▶ Toggle
| State | Behavior |
|---|---|
| ON | Auto-plan starts from current playhead time |
| OFF | Auto-plan starts from time 0 of the scene |
Action Buttons
| Button | Action |
|---|---|
| AUTO-PLAN | Generate draw steps from drawable objects |
| + STEP @ ▶ | Add single step at current playhead |
| CLEAR | Remove all draw steps for current scene |
Draw Steps Table
Each step in the table shows:
| Example time | Example duration | Example target | Reveal range | Available actions |
|---|---|---|---|---|
0:00 | 1000 ms | Object 1 | 0.0 to 1.0 | Override, Camera, delete |
0:01 | 800 ms | Object 2 | 0.0 to 1.0 | Override, Camera, delete |
0:01.8 | 1200 ms | Object 3 | 0.0 to 1.0 | Override, Camera, delete |
| Column | Description |
|---|---|
| Time | Start time (ms or m:ss.mmm) |
| Dur | Duration in milliseconds |
| Target | Target object to draw |
| From/To | Reveal progress range (0.0-1.0) |
| ⋯ | Expands step override and Draw-step Camera controls |
| ✕ | Delete step |
Step Override (⋯)
Collapsed by default to avoid clutter:
- Step preset - Opens Hand & Tool Selector for this step only
- Clear overrides - Removes step-level overrides (inherits from scene/project)
Draw-step Camera
Draw-step Camera generates framing for one drawing step. It is not the same as Follow Hand, and it is not edited as a general object camera.
- Switch CAMERA → Camera Mode to Track.
- Open DRAW and expand the owning step with ⋯.
- In the step's Camera area, choose Tight, Medium, or Wide.
- Set the start offset and move duration.
- Choose Continue, or choose Revert and set a hold.
- Resolve any blocking Object Camera overlap.
- Choose Add Camera, then inspect the generated
Drows in CAMERA.
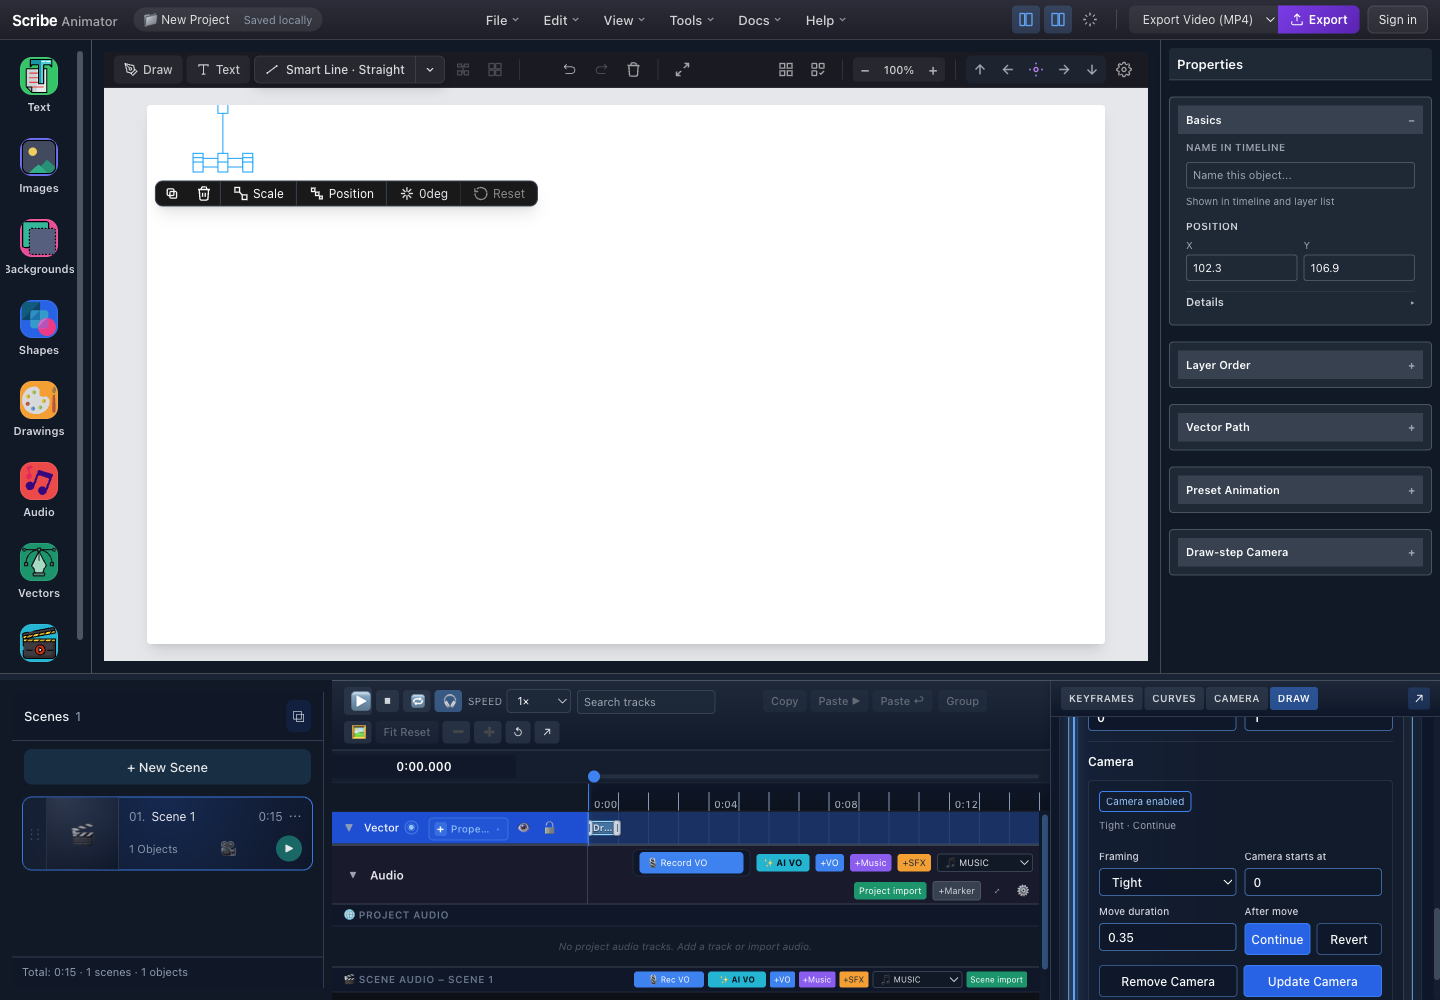
- DRAW drawerDraw-step Camera is authored from the owning step in DRAW.
- Step CameraFraming and timing are scoped to this drawing step.
- Enabled recipeThe saved step recipe has generated Track keys.
- Update or removeChange generated camera behavior from its source step.
AUTO-PLAN creates Draw steps but does not enable their cameras. Step camera timing is constrained by the step, the next configured camera action, and the scene end. If Add Camera or Update Camera is disabled, confirm Track mode, shorten the move/hold, or separate the action from an overlapping Object Camera range.
Properties shows Draw-step Camera as read-only for drawable objects so ownership stays unambiguous. See How the camera systems interact for the Object Camera comparison, M/O/D precedence, and conflict recovery.
Inspector SVG Path Panel
Location
Select an SVG Path object → Inspector Panel → SVG Path section
SVG Path Interface
The expanded SVG Path section groups controls in this order: draw mode, speed model and value, preview-stroke color and width boost, minimum-path and maximum-path filters, then the hand-following toggle. The tables below describe each control without approximating the inspector's layout.
Mode Options
| Mode | Description |
|---|---|
| Standard | Fill at end of animation |
| Preview | Fill per path (live preview) |
| Batched | Fill in batches |
Speed Settings
| Type | Description |
|---|---|
| Duration | Fixed duration in seconds |
| PPS | Pixels per second (auto-calculates duration) |
Stroke Settings
| Setting | Description |
|---|---|
| Color | Preview stroke color |
| Width | Stroke width (Width boost factor) |
Filter Settings
| Setting | Description | Default |
|---|---|---|
| Min | Minimum path length to include | 3px |
| Max | Maximum paths to keep | 400 |
Hand Following
Enable Show hand following path to display hand animation during draw-in.
Hand following requires objects to have animationType = "drawIn" and valid SVG path data in properties.paths[].d.
Hand Tool Calibration Modal
Fine-tune hand and pen alignment with the calibration modal.
Calibration Interface
Use the preview canvas to judge where the tool tip meets the path while changing the controls:
- Adjust Along Tangent and Left Normal until the nib reaches the path head.
- Set the nib anchor to the tool tip in the hand image.
- Tune Tool Rotation and Tip Backtrack.
- Choose
none,damped, orfullrotation. - Enable Mirror Hand only for the intended handedness; Nib Lock remains active to pin the tip to the path.
- Use Reset to restore defaults or Cancel to leave without applying the current adjustment.
Calibration Controls
| Control | Description | Range |
|---|---|---|
| Along Tangent (X) | Shifts hand along path direction | -500 to 500px |
| Left Normal (Y) | Shifts hand perpendicular to path | -500 to 500px |
| Tool Rotation | Rotates pen relative to hand | -360° to 360° |
| Tip Backtrack | How far behind the path head the tip sits | 0 to 500px |
| Nib Anchor X | Horizontal nib position on hand image | Pixels |
| Nib Anchor Y | Vertical nib position on hand image | Pixels |
Rotation Modes
| Mode | Description |
|---|---|
| none | Fixed orientation, no rotation |
| damped | Smooth rotation clamped to ±max degrees (5°-90°) |
| full | Full tangent-following rotation |
Additional Options
| Option | Description |
|---|---|
| Mirror Hand | Flip hand horizontally (left-handed look) |
| Nib Lock | Always active - keeps pen tip pinned to path |
Draw Step Properties
Each draw step contains:
| Field | Example | Meaning |
|---|---|---|
id | draw-scene1-0-abc123 | Unique step identifier |
time | 0 | Scene-local start time in milliseconds |
durationMs | 1000 | Step duration |
targetObjectId | obj-123 | Object whose geometry is revealed |
from | 0 | Reveal start in the 0 to 1 range |
to | 1 | Reveal end in the 0 to 1 range |
overrides.presetId | hand-left-dark | Optional step-level hand preset |
overrides.toolId | pen-black | Optional step-level tool preset |
overrides.scale | 1.0 | Optional hand scale |
overrides.mirror | false | Optional mirrored-hand state |
Precompute (Performance)
For heavy scenes, precompute LUTs to improve playback:
Worker Status
- Worker busy count - Workers currently processing
- Queue size - Jobs waiting in queue
Precompute Options
| Option | Description |
|---|---|
| Prefetch Window | Lookahead window in seconds |
| Precompute Next | Build LUTs for upcoming steps |
| Precompute Scene | Build all LUTs for current scene |
| Cancel | Stop precompute processing |
SVG Draw Options Reference
| Option | Accepted value or example | Purpose |
|---|---|---|
mode | standard, preview, or batched | Select the overall draw and fill behavior |
speed.kind | duration or pps | Choose fixed duration or pixels-per-second timing |
speed.durationSec | Number, when kind is duration | Set fixed draw duration in seconds |
speed.pps | Number, when kind is pps | Derive duration from path length |
previewStroke.color | #3b82f6 | Set the preview stroke color |
previewStroke.widthBoost | 1 | Multiply the preview stroke width |
fillStrategy.kind | afterAll, perPath, or batched | Decide when fills appear |
fillStrategy.batchesN | 4 | Set the number of fill batches in batched mode |
filter.minLen | 3 | Ignore paths shorter than this pixel length |
filter.maxKeep | 400 | Cap the number of retained paths |
Prerequisites
Requirements for hand draw animation:
- Drawable objects must have SVG path data in
properties.paths[].d - Animation type should be
drawInfor hand-following overlay - Worker flags must be enabled:
perf.workerizedSamplingplugins.animator.handLut.worker.enabled
Keyboard Shortcuts
| Shortcut | Action |
|---|---|
| Space | Play/Pause timeline |
| Escape | Close modal dialogs |
Best Practices
For Smooth Playback
- Use Precompute Scene before playing heavy animations
- Keep Filter Max reasonable (100-400 paths)
- Use Prefetch Window of 3-5 seconds
For Natural Hand Animation
- Select appropriate hand style (Photoreal for realistic, Cartoon for stylized)
- Use damped rotation mode with 30-45° max
- Fine-tune calibration offset for precise tip alignment
For Multiple Objects
- Use Auto-plan with appropriate strategy
- Layer Order for sequential reveal
- Round-robin for interleaved drawing effect
Troubleshooting
Hand Not Visible During Draw
- Enable Show hand following path in SVG Path panel
- Verify object has
animationType = "drawIn" - Check that worker flags are enabled
Draw Steps Not Generated
- Ensure objects have valid SVG path data
- Check that paths have sufficient length (above Filter Min)
- Use CLEAR then AUTO-PLAN to regenerate
Jerky Hand Animation
- Switch rotation mode from "full" to "damped"
- Reduce number of paths (increase Filter Min)
- Use Precompute before playback
Misaligned Pen Tip
- Open Hand Follower Calibration modal
- Adjust Along Tangent (X) and Left Normal (Y)
- Fine-tune Nib Anchor position
- Use Reset to restore defaults if needed