Create with Mobile Lite
Mobile Lite is Scribe Animator's touch-first editing workspace for narrow screens. It uses the same project, scene, timeline, animation, camera, drawing, audio, and export domains as the desktop editor, but presents one focused sheet at a time.
Use Mobile Lite when you want to create or revise a short project on a phone or tablet. Use the desktop editor when you need several panels visible at once, very precise pointer work, or prolonged editing of a large project.
Before you start
- Rotate to portrait for the layout shown in this guide.
- Allow file, microphone, or download permission only when you deliberately use that feature.
- Keep large imports, model downloads, and exports in the foreground.
- Save or export a
.scribebackup before device cleanup, reinstalling, or clearing site data. - Start with the demo project if you want to explore without changing your own work.
Tour the workspace
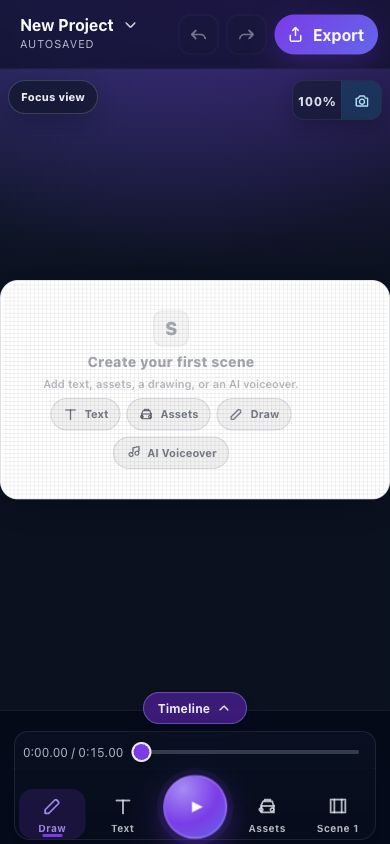
- Project menuTap the project name to create, open, save, configure, or get help.
- Undo and redoRevert or restore the latest supported editing command.
- ExportOpen the mobile video export settings.
- CanvasSelect, move, resize, rotate, or inspect visible scene objects.
- Timeline handleExpand the timing workspace when you need object or draw timing.
- Play and scrubPreview the project or drag the playhead to inspect a time.
- Primary toolsOpen Draw, Text, Assets, or the current Scene; the center action controls playback.
Top bar
- Project name and chevron: opens project-wide actions.
- Save state:
AUTOSAVEDmeans the current local change queue has settled;UNSAVED CHANGESmeans the latest edit still needs saving. - Undo / Redo: operates on supported editing history. A disabled button means there is no matching history entry.
- Export: opens video settings without leaving the project.
Canvas controls
- Focus view: fits the useful scene area into the available viewport.
- Zoom percentage: shows the current canvas zoom.
- Camera icon: opens camera controls or camera preview behavior where available.
- Object selection: tap an object once. The selection box and object toolbar expose the actions valid for that object.
- Transform: drag an object to move it; use selection handles to resize or rotate when the selected object supports them.
- Blank-canvas shortcuts: Text, Assets, Draw, and AI Voiceover are quick entry points. They open the same feature owners used elsewhere in Mobile Lite.
Stop playback before selecting or precisely transforming objects.
Manage the project
Tap the project name in the top-left corner.
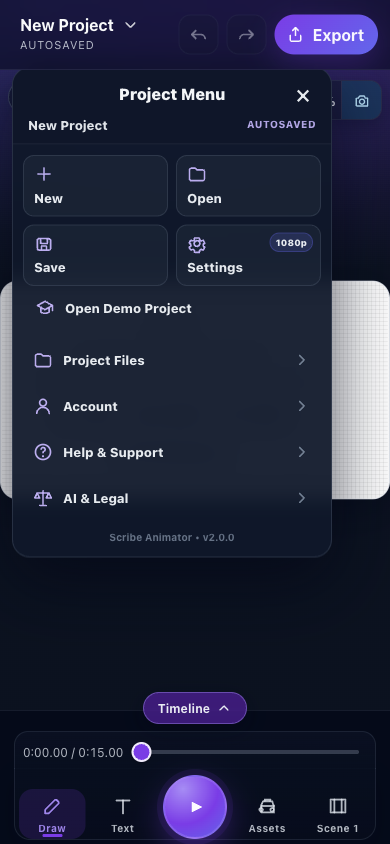
- NewStarts a new project after any applicable unsaved-work confirmation.
- OpenOpens an existing project through the supported picker.
- SaveSaves the project through the current local workflow.
- SettingsChanges project-level properties such as canvas/output settings.
- Demo and project filesOpen the demo project or enter project-file import, export, and library actions.
- AccountOpens sign-in, plan, and account actions.
- Help and legalSupport, tutorial, privacy, terms, and AI/legal information.
- Use New only after protecting work you want to keep.
- Use Open for a project exposed by the current device picker.
- Use Save before a risky import, scene deletion, or long export.
- Use Settings before arranging many objects; changing the canvas later can affect framing.
- Use Open Demo Project for a deterministic learning project.
- Open Project Files for local/library and
.scribeimport or export actions. - Open Account for sign-in and entitlement state.
- Use Help & Support for tutorials, support, or bug reporting.
- Use AI & Legal to review terms relevant to generated content and app usage.
Add and edit text
Tap Text in the bottom bar or on the empty canvas.
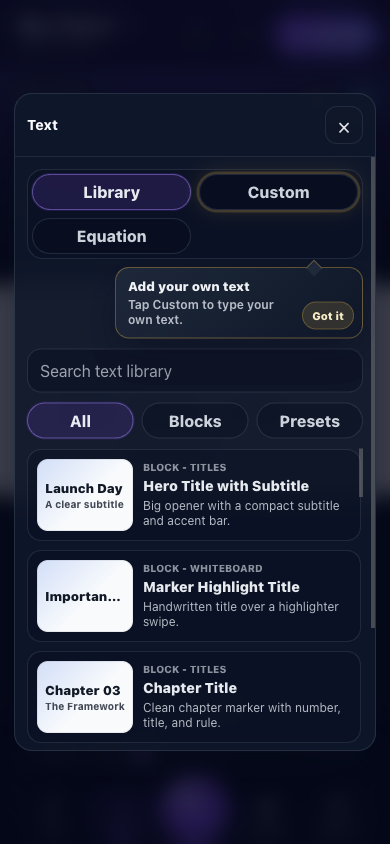
- LibraryBrowse ready-made text blocks and presets.
- CustomType your own text and configure it directly.
- EquationOpens mathematical equation authoring.
- SearchFilters library entries by supported title or metadata.
- CategoriesSwitch among All, Blocks, and Presets.
- Text cardTap a card to add that designed text object or group to the scene.
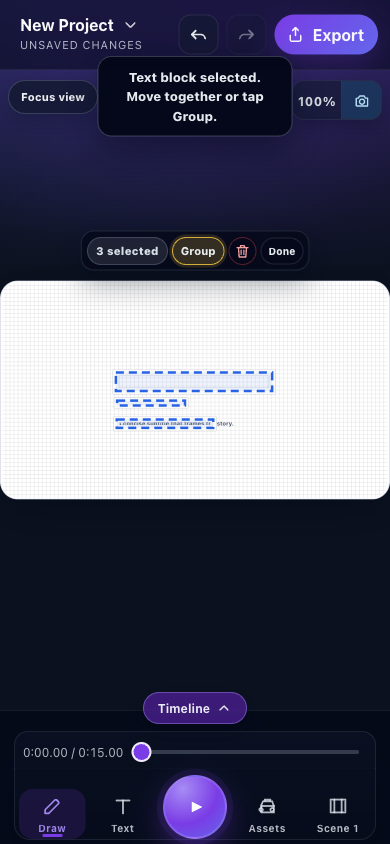
- Context guidanceExplains what the current selection represents and the safest next action.
- Selection countConfirms that the inserted block currently consists of three independently selected objects.
- GroupCombines the selected members so subsequent move and transform gestures preserve their relationship.
- Selected text-block membersThe dashed bounds show each constituent object. Verify all intended members are selected before grouping.
Add library text
- Leave Library selected.
- Search or choose All, Blocks, or Presets.
- Tap a card such as a title/subtitle block.
- Close the sheet if it remains open.
- Tap the inserted object on the canvas.
- Move and resize it while watching the canvas edges.
- Open the selected object's text controls to edit content, typography, alignment, or color where supported.
Some cards insert a group containing several text and vector elements. The group moves as one unit. Use Ungroup only when you need to edit members separately; grouping again may not recover the original semantic block.
Add custom text or an equation
- Choose Custom, type the content, then use the available typography controls before or after insertion.
- Choose Equation for mathematical notation. Verify the rendered equation at the final export size because thin symbols can become hard to read.
Add images, backgrounds, audio, vectors, and shapes
Tap Assets. The active category determines which browser or import controls appear.
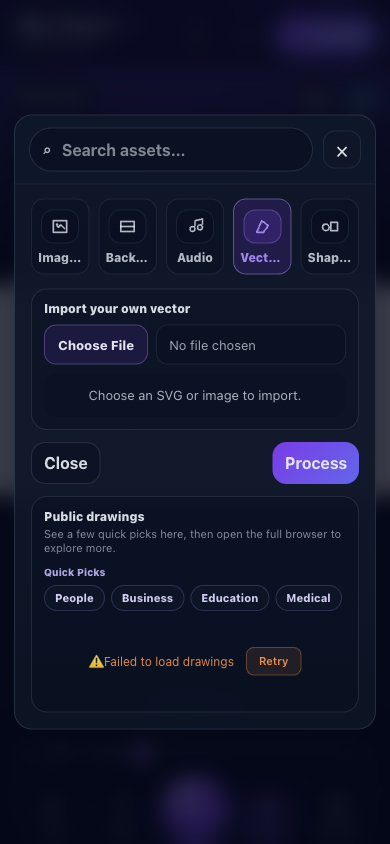
- SearchFilters the active asset library.
- Asset categoriesSwitch among Images, Backgrounds, Audio, Vectors, and Shapes.
- Choose FileSelect a supported SVG or image from the device.
- ProcessRuns the validated import/processing flow for the selected file.
- RetryRetries a failed remote or packaged library request without discarding the project.
Use a packaged asset
- Select Images, Backgrounds, Audio, Vectors, or Shapes.
- Search or browse the shown categories.
- Tap the desired asset.
- Wait for it to appear on the canvas or in the audio workflow.
- Select and transform visual objects; preview audio objects.
Import a local vector or image
- Choose the relevant category.
- Tap Choose File.
- Select only a file you trust.
- Confirm the selected filename.
- Tap Process.
- Wait for validation and preprocessing.
- Inspect the imported result at several zoom levels.
Do not repeatedly tap Process during a large import. A malformed SVG, unsupported encoding, very large bitmap, low device memory, or plan limit can prevent import.
If a public library displays Failed to load:
- keep the sheet open;
- confirm the device is online;
- tap Retry once;
- use a packaged or local asset if the service remains unavailable; and
- do not reload until the current project is saved.
Build the story with scenes
Tap Scene in the bottom-right navigation.
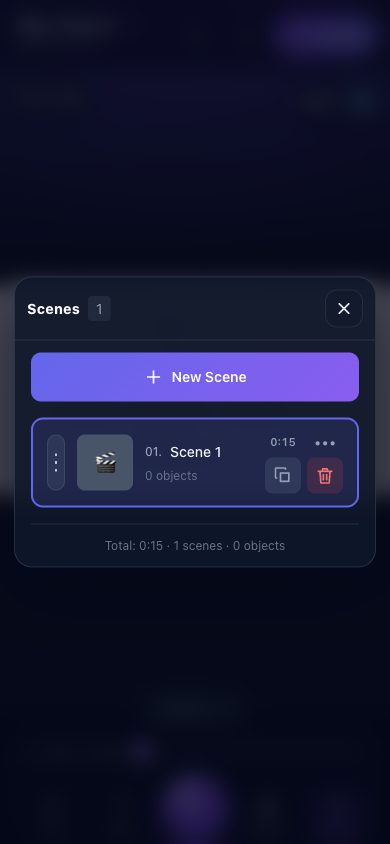
- New SceneAdds a separate scene after the existing sequence.
- Scene cardTap to activate a scene and edit its canvas objects.
- Reorder handleDrag to change scene order where touch reordering is available.
- DuplicateClones the scene and its supported object/timeline data.
- DeleteRemoves the scene after confirmation and cleans up its timing data.
- Use New Scene when the story, layout, background, or camera framing changes.
- Use Duplicate when the next scene should begin from a similar composition.
- Use the scene's overflow controls to adjust supported metadata such as duration.
- Reorder only after checking narration and transition timing.
- Delete carefully: scene objects, timeline tracks, keys, and scene bindings can be removed together.
The footer reports total duration, scene count, and object count. Use it as a quick sanity check after duplicating or deleting.
Preview and use the timeline
The large center button plays or pauses. Drag the scrubber to inspect a precise time. Tap Timeline to expand the timing area.
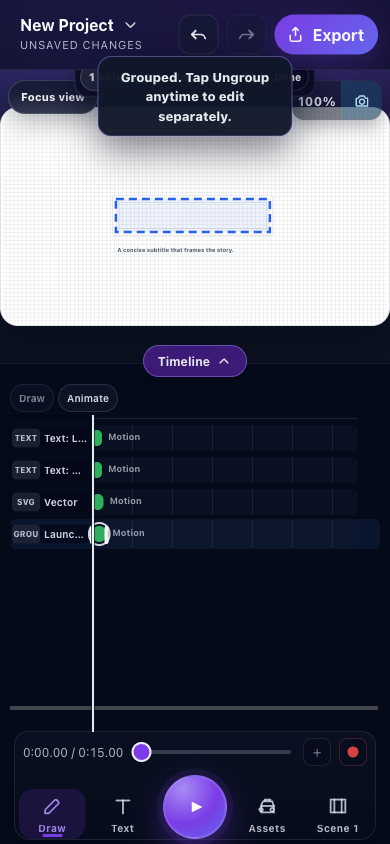
- Selected objectThe dashed box identifies the current canvas selection.
- Draw and AnimateOpen the shot planner or object motion editor.
- Object timing rowsEach row represents an object or group with its motion/draw timing.
- PlayheadShows the inspected project time across the timeline.
- ScrubberDrag to seek; the time display shows current and total duration.
- TransportPlay/pause from the current time; it restarts when playback has completed.
Timing workflow
- Add and select an object.
- Expand Timeline.
- Tap the matching row if selection needs to be restored.
- Scrub to the intended start time.
- Open Animate for motion or Draw for reveal planning.
- Preview from before the change.
- Collapse the timeline to regain canvas space.
A grouped text design appears as both member rows and a group row. Edit the group for whole-block motion. Ungroup only when individual members need independent motion.
Animate a selected object
Select an object, expand the timeline, and tap Animate.
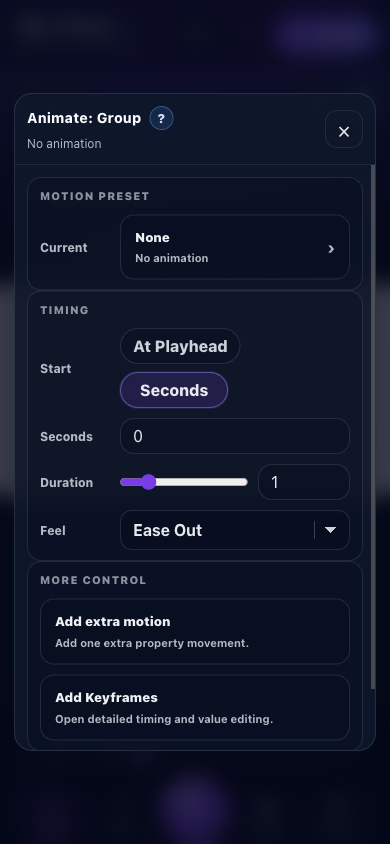
- Motion presetChoose an entrance or motion recipe; None removes the preset.
- StartBegin at the playhead or at an explicit time in seconds.
- DurationControls how long the preset takes.
- FeelSelect easing such as Ease Out to shape acceleration.
- Extra motionAdds another property movement to the selected object.
- KeyframesOpens detailed time-and-value editing.
- Choose a Motion preset.
- Set At Playhead to align it with the current scrubber time, or choose Seconds and enter an exact start.
- Set Duration.
- Choose the Feel (easing).
- Preview the result.
- Use Add extra motion only if the story needs a second property change.
- Use Add Keyframes for precise values instead of stacking many presets.
Avoid simultaneous large position, scale, rotation, camera, and draw changes unless the effect is intentional. Motion should clarify the story.
Plan drawing animation
Open Draw from the expanded timeline.
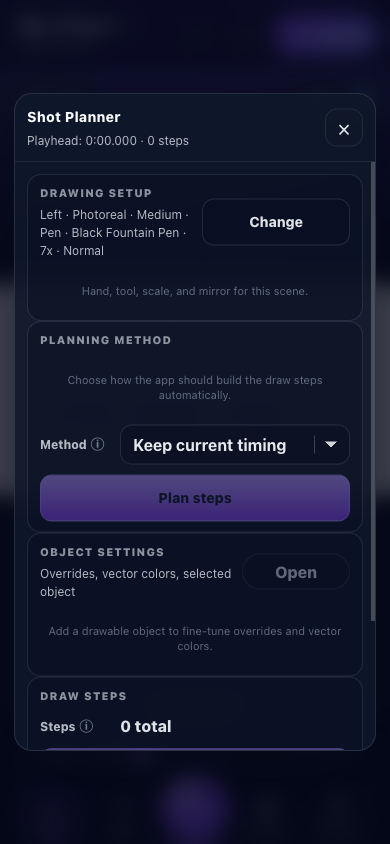
- Drawing setupReview or change hand, tool, scale, mirror, and related scene settings.
- Planning methodChoose how automatic planning should distribute the draw steps.
- Plan stepsGenerates or updates draw steps from eligible content.
- Object settingsOpens overrides for a selected drawable object.
- Draw stepsShows the generated step count and detailed schedule below.
The planner needs eligible drawable vector content. Raster images and ordinary text may not produce useful stroke steps unless converted or represented by supported drawing data.
- Add or select a drawable vector.
- Open Draw.
- Review Drawing setup and tap Change if the hand/tool presentation is wrong.
- Pick the planning method.
- Tap Plan steps.
- Confirm the non-zero step count.
- Open supported object overrides only when one object needs a different treatment.
- Preview from the start.
Configure the scene camera
Open the camera action from the canvas/timeline controls.
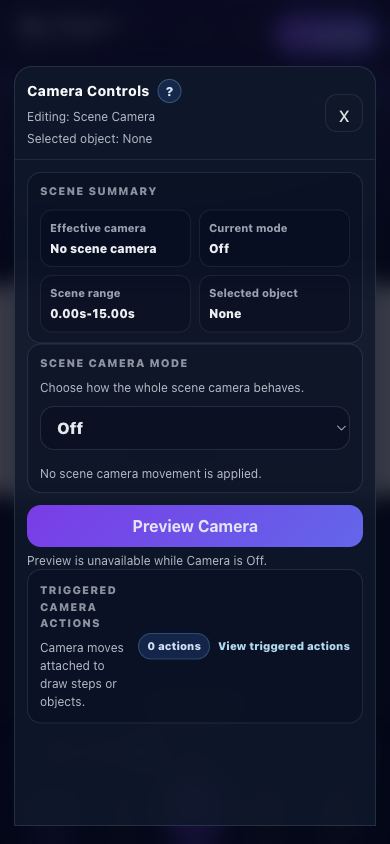
- Scene summaryShows effective camera, current mode, scene range, and selected object.
- Scene camera modeChoose Off or an available fixed/tracking/follow behavior.
- Preview CameraPreviews committed camera behavior; it is unavailable while mode is Off.
- Triggered actionsLists camera moves attached to draw steps or objects.
- Check the scene range.
- Select a camera mode.
- Configure the mode-specific target and framing controls that appear.
- Use Preview Camera.
- Review triggered actions so automatic step-based moves do not conflict with the scene camera.
- Return to Off when you need a static frame.
If no object is selected, object-follow modes cannot resolve a target. If Preview Camera is unavailable, first choose a mode and commit valid settings.
Generate AI voiceover
Tap AI Voiceover from the blank canvas or audio/asset surface.
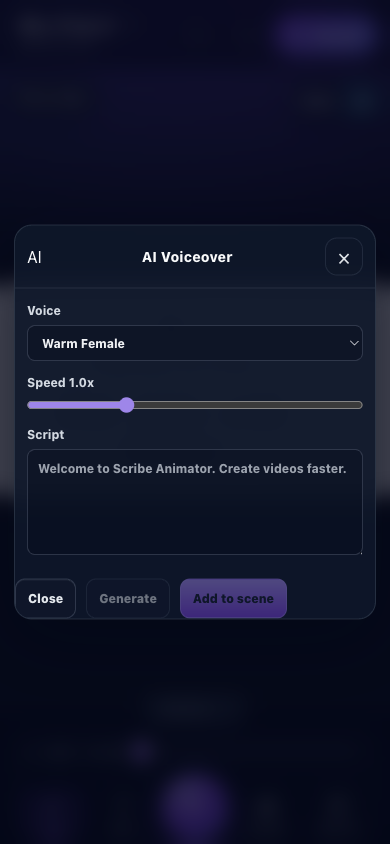
- VoiceChooses an available local or configured synthesis voice.
- SpeedAdjusts speaking rate before generation.
- ScriptEnter only the narration that should be spoken.
- GenerateCreates a preview; disabled until requirements are satisfied.
- Add to sceneAdds the reviewed generated audio to the active scene.
- Choose a voice.
- Set the speaking speed.
- Enter the script without secrets or personal data.
- Tap Generate and wait for model/audio processing.
- Preview the result when offered.
- Tap Add to scene.
- Open the timeline, play through the scene, and adjust visual timing to narration.
Voice and model availability depends on platform assets, configuration, memory, and download state. Generated voice is not a substitute for consent when imitating a real person.
Export from Mobile Lite
Tap the top-right Export button.
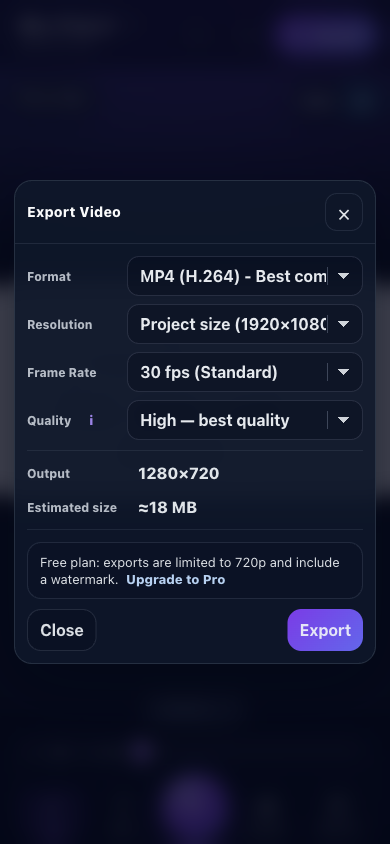
- FormatSelect the available video container and codec.
- ResolutionChoose project size or a standard size subject to plan limits.
- Frame rateChoose the playback frame rate.
- QualitySets compression quality and estimated bitrate.
- Effective outputReview actual dimensions and estimated file size before export.
- Plan limitExplains a resolution clamp or watermark before rendering.
- ExportStarts the local render; keep the app open until completion.
Review Output rather than assuming the requested resolution will be used. The current free plan limits export to 720p and includes a watermark. Export a short test, play the downloaded file, and only then make the final render.
Mobile limitations and safer alternatives
- Only one focused sheet is normally visible, so close it before selecting something hidden behind it.
- Touch transforms are less precise than desktop pointer/keyboard editing.
- Desktop keyboard shortcuts do not apply.
- Very large images, complex SVGs, long timelines, local AI models, and high-frame-rate exports can exceed mobile memory.
- File pickers, downloads, sharing, microphone access, and native encoding differ across mobile web, iOS, and Android.
- Remote asset libraries need network access; local/package assets can remain usable when already available.
- Some desktop inspector controls are condensed or omitted. Reopen the project on desktop for advanced adjustments.
- Do not background the app during import, generation, or export.
Recovery checklist
| Problem | Recovery |
|---|---|
| Sheet covers the object | Close it with X or system back, select the object, then reopen the feature |
| Timeline will not expand | Close the current modal/editor; the handle can be intentionally disabled while another editor owns the screen |
| Object-specific action is disabled | Stop playback and select a compatible object |
| Group members cannot be edited | Tap Ungroup only if separate editing is required |
| Asset library fails | Tap Retry once, check connectivity, or use a packaged/local asset |
| Import stalls | Wait, avoid repeat taps, then try a smaller supported file after saving |
| Camera preview is unavailable | Choose a valid mode and target; Off has nothing to preview |
| AI Generate is disabled | Enter a script, choose an available voice, and allow required model assets to load |
| Export is interrupted | Keep the app foregrounded and retry at 720p/30 fps after saving |
| Work appears unsaved | Stop editing briefly, use Save, then export a .scribe backup |
Every screenshot in this guide was captured from the running Mobile Lite application with browser-based UI review at a real narrow viewport. The controls are authentic product surfaces, not a documentation playground.