Animate motion and opacity with keyframes

A keyframe stores an exact property value at an exact time. Put an image at Position.X = 220 at one second and Position.X = 1200 at seven seconds, and Scribe Animator calculates the positions between them. Add Scale, Rotation, and Opacity tracks and the same object can move, emphasize, turn, and fade without being duplicated.
This tutorial proves both authoring surfaces in the current Desktop editor: the KEYFRAMES drawer for exact values and the timeline/dopesheet for fast visual timing, multi-selection, and grouped moves. Both edit the same underlying property tracks and keys.
This workflow was reproduced on 9 August 2026 in the Desktop web editor on macOS with frontend@2.0.0. The test scene used real Text, Image, SVG/vector, and Smart Arrow objects. Key insertion, editing, dragging, selection, grouping, Undo/Redo, Save/Restore persistence, playback, and H.264 export were checked in the running product.
Keyframes Drawer vs direct timeline editing
Scribe does not have two competing keyframe engines. It has one property-keyframe system with two editing surfaces:
                         PROPERTY KEYFRAMES

                  same underlying track + keys
                           /           \
                          /             \
                         /               \
             KEYFRAMES DRAWER          TIMELINE / DOPESHEET
             exact editing             fast visual editing

             + ADD @ PLAYHEAD          right-click empty lane
             exact time/value          double-click at playhead
             interpolation             drag keys in time
             easing                    Shift/Cmd/Ctrl selection
             filters                   marquee selection
             copy/paste/delete         group and ungroup
Use the drawer when a value must be exact. Use the timeline when the relationship between several keys matters more than typing a number. It is normal to switch between them during one animation.
Build the practice scene
The verified 15-second scene contains four objects:
- a Text object named Motion title;
- a first-party local Image named Local Scribe image;
- one drawable SVG/vector named Keyframe vector diagram;
- one Smart Arrow named Keyframe smart arrow.
The image was first selected through the real Images library. After Save/Restore, that temporary asset reference no longer rendered, so the final deterministic project uses Scribe's same-origin first-party app image instead. The keyframe behavior and Image property menu are unchanged.
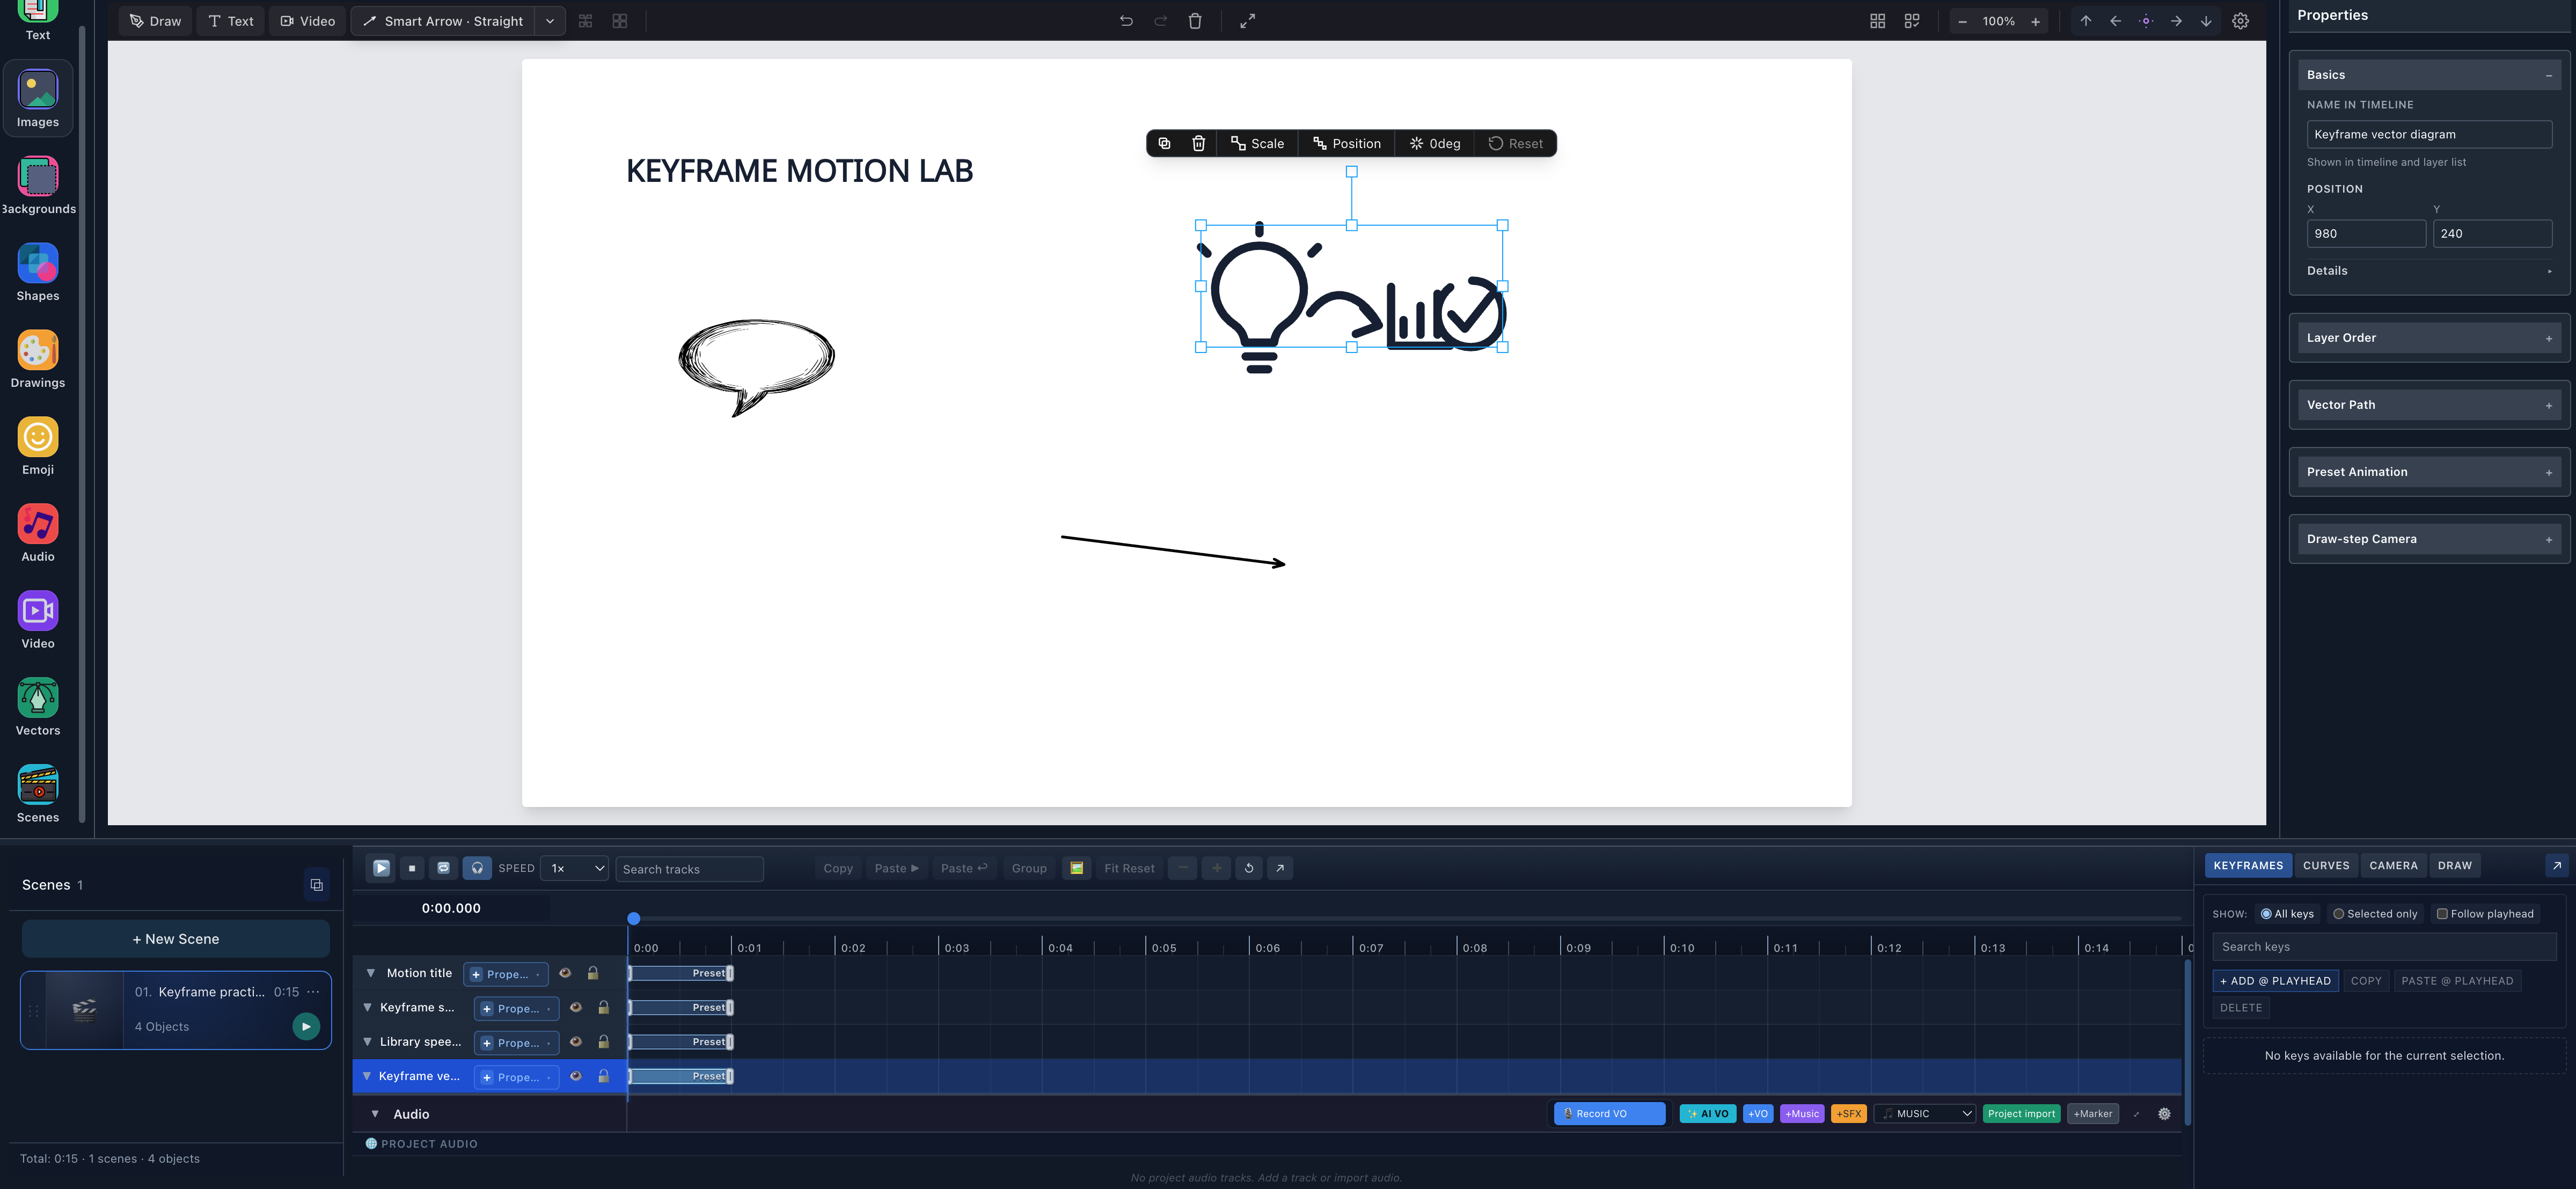
- Four object typesText, image, vector, and Smart Arrow are separate selectable objects in one scene.
- One shared timelineEach object expands into only the property tracks that its capability supports.
- Keyframes DrawerThe exact editor remains connected to the selected timeline property.
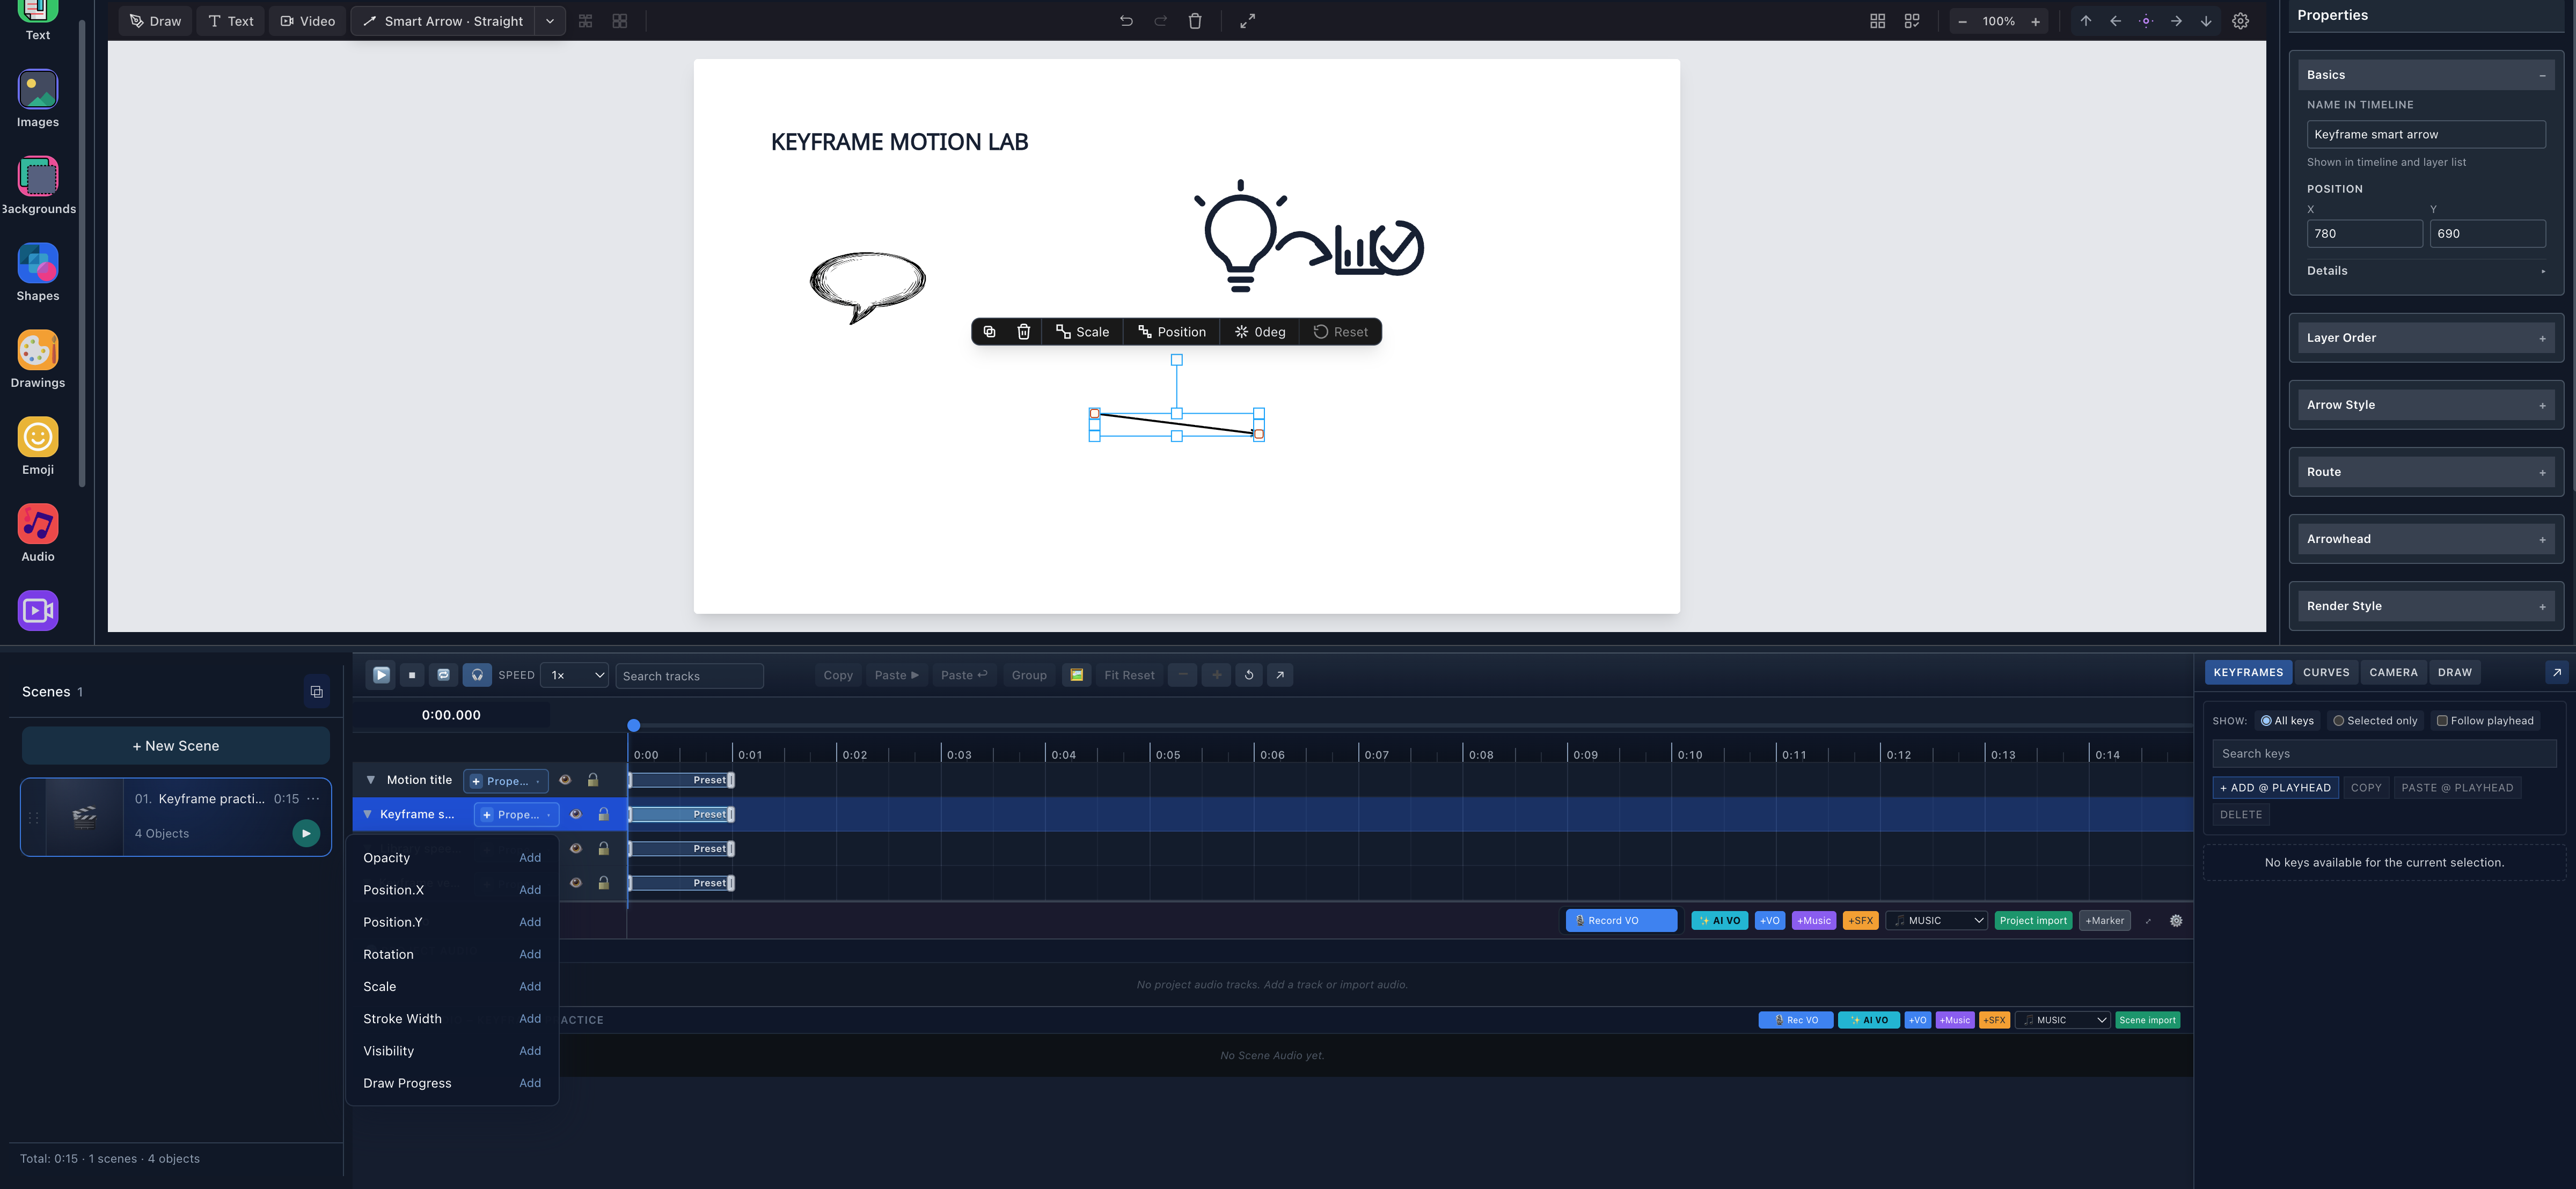
Which properties can each object animate?
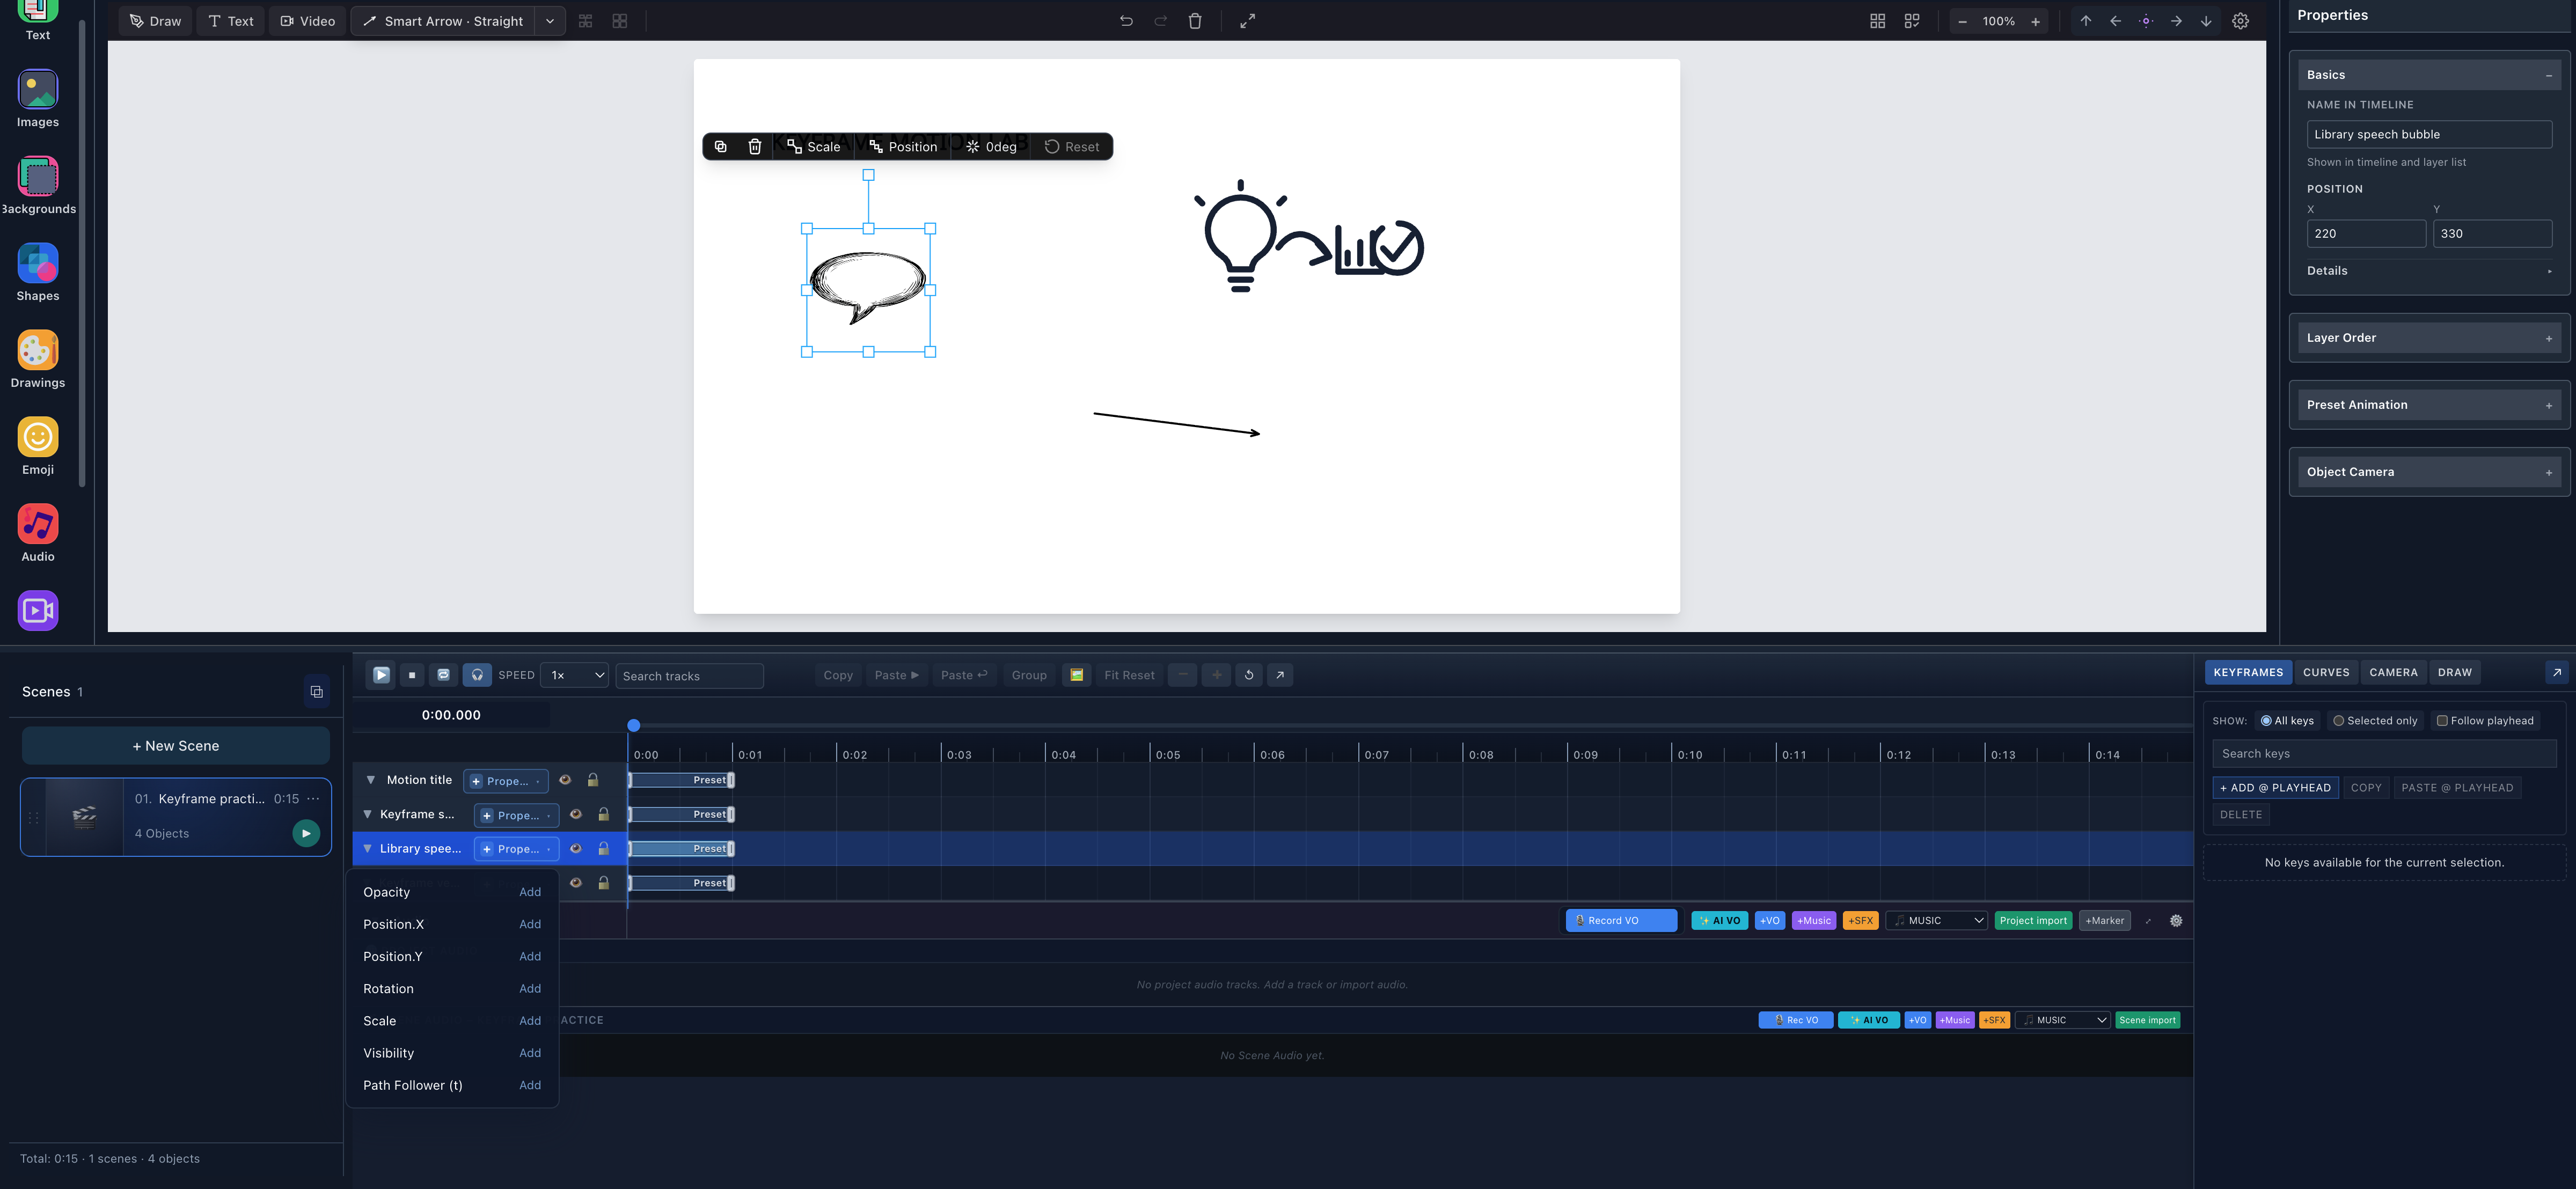
Scribe derives the + Property menu from the selected object's capability. That is why a photo does not offer Draw Progress and ordinary editable text does not offer Stroke Width.
| Object type | Opacity | Position | Rotation | Scale | Visibility | Draw Progress | Stroke Width | Typewriter | Path Follower |
|---|---|---|---|---|---|---|---|---|---|
| Text | Supported | X and Y | Supported | Supported | Supported | Not available | Not available | Supported | Supported |
| Image | Supported | X and Y | Supported | Supported | Supported | Not available | Not available | Not available | Supported |
| Drawable SVG/vector | Supported | X and Y | Supported | Supported | Supported | Supported | Supported | Not available | Supported |
| Smart Arrow | Supported | X and Y | Supported | Supported | Supported | Supported | Supported | Not available | Not available |
“Supported” means the property appeared in the real + Property menu and shared capability implementation. The properties used in the practice scene were also previewed at real timeline times. Path Follower was inventoried but was not part of the public motion example.
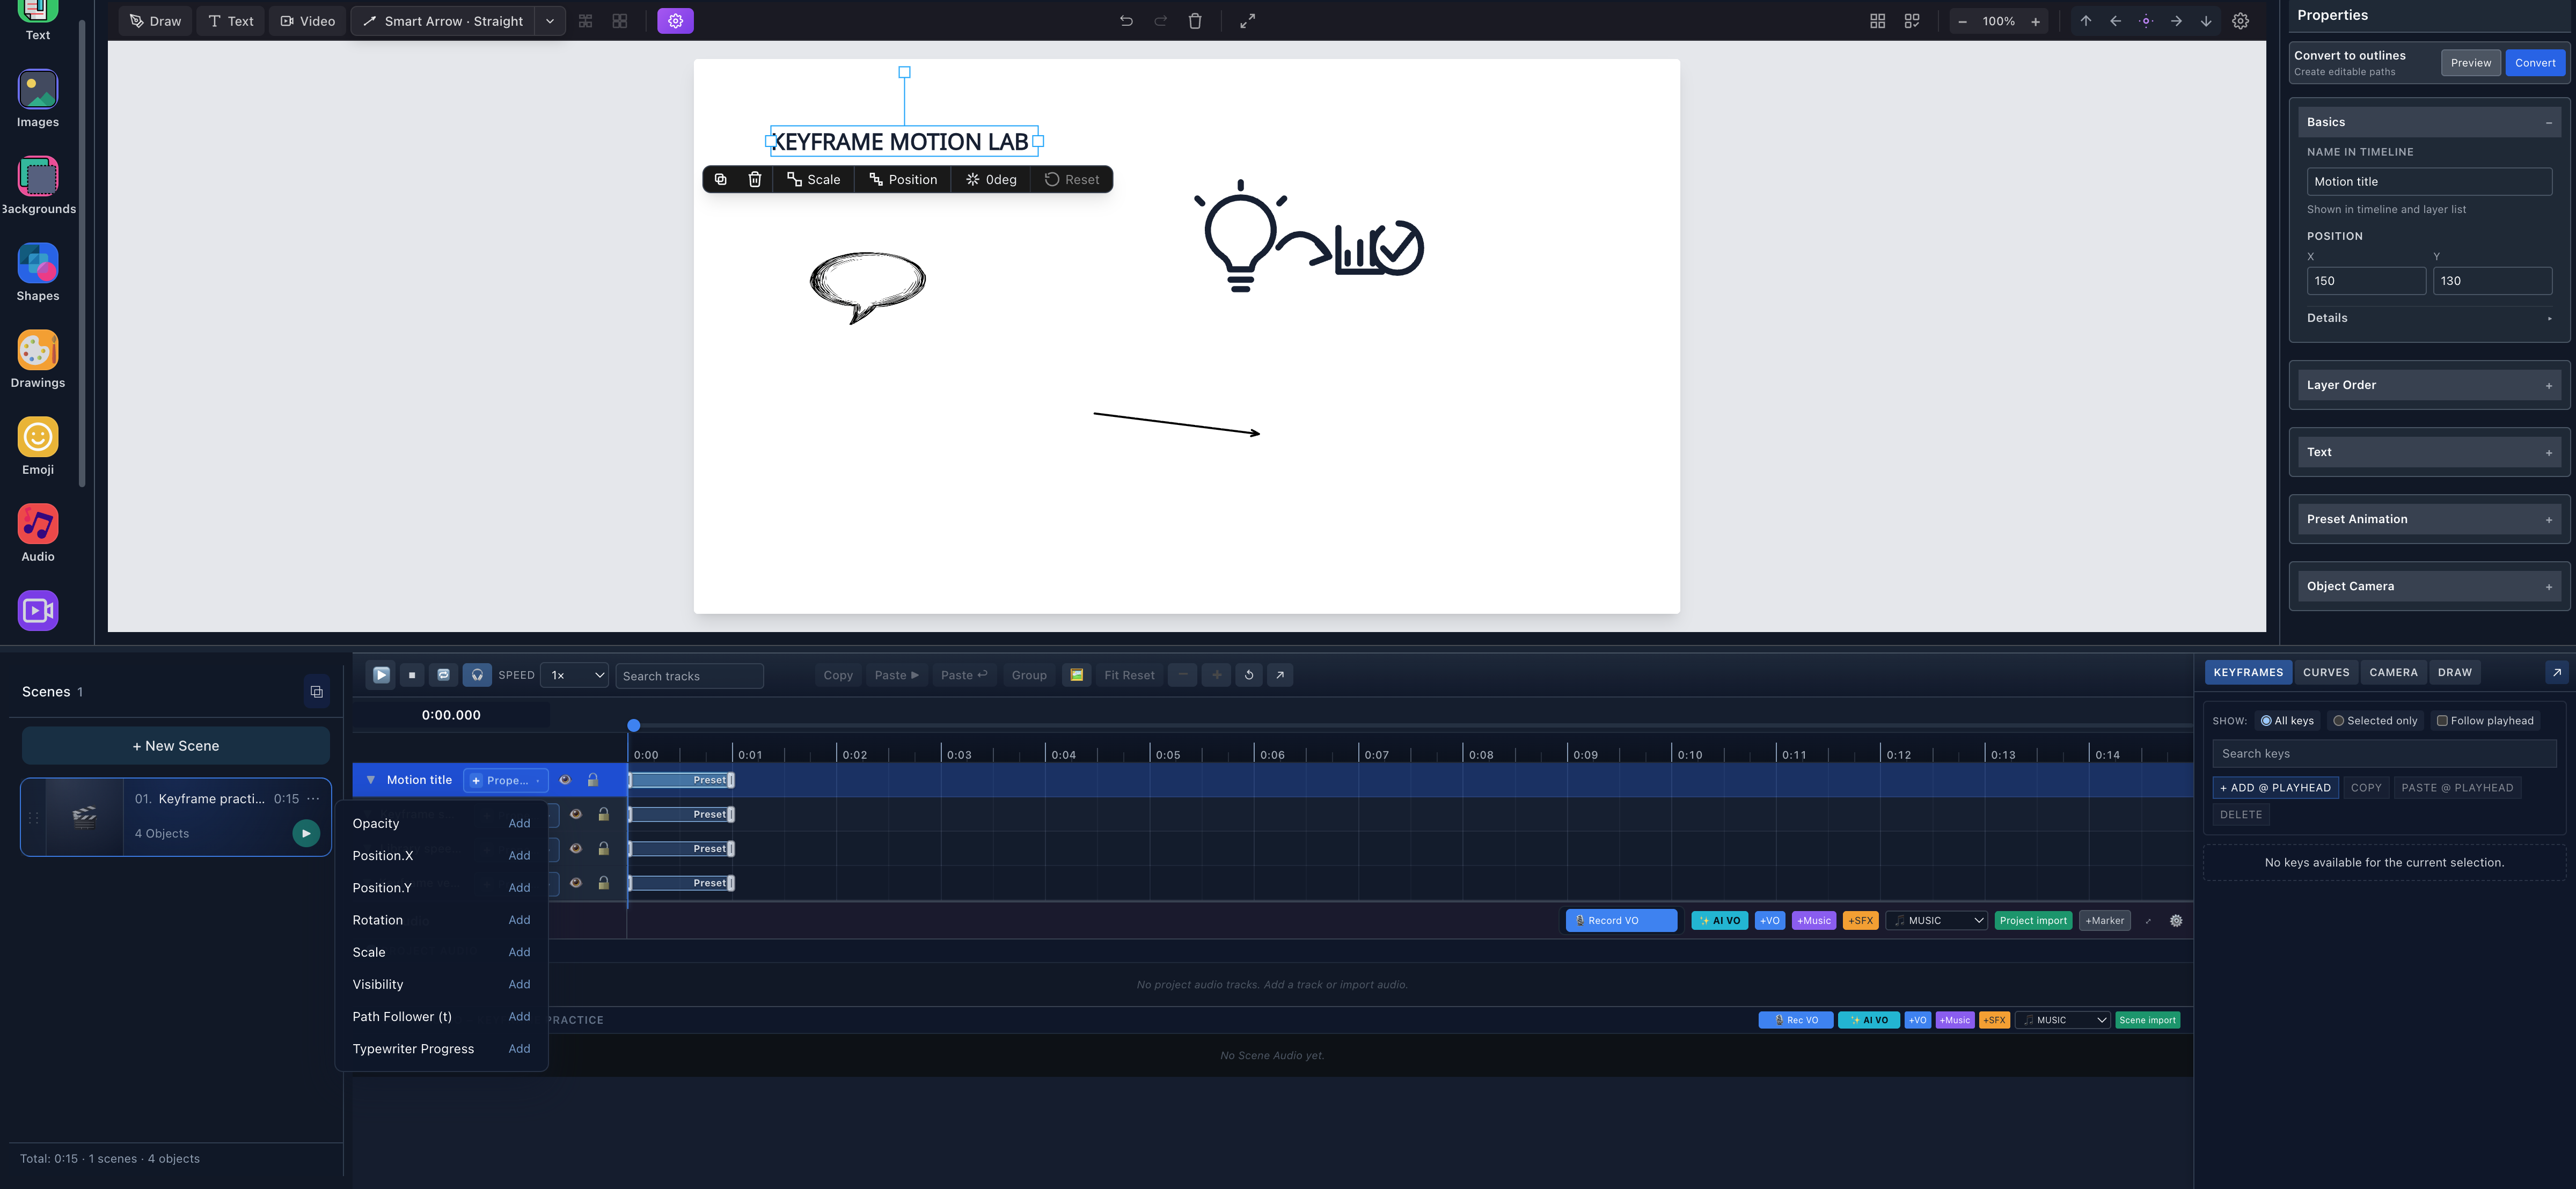
- Typewriter ProgressThis 0-to-1 progress property reveals editable text characters.
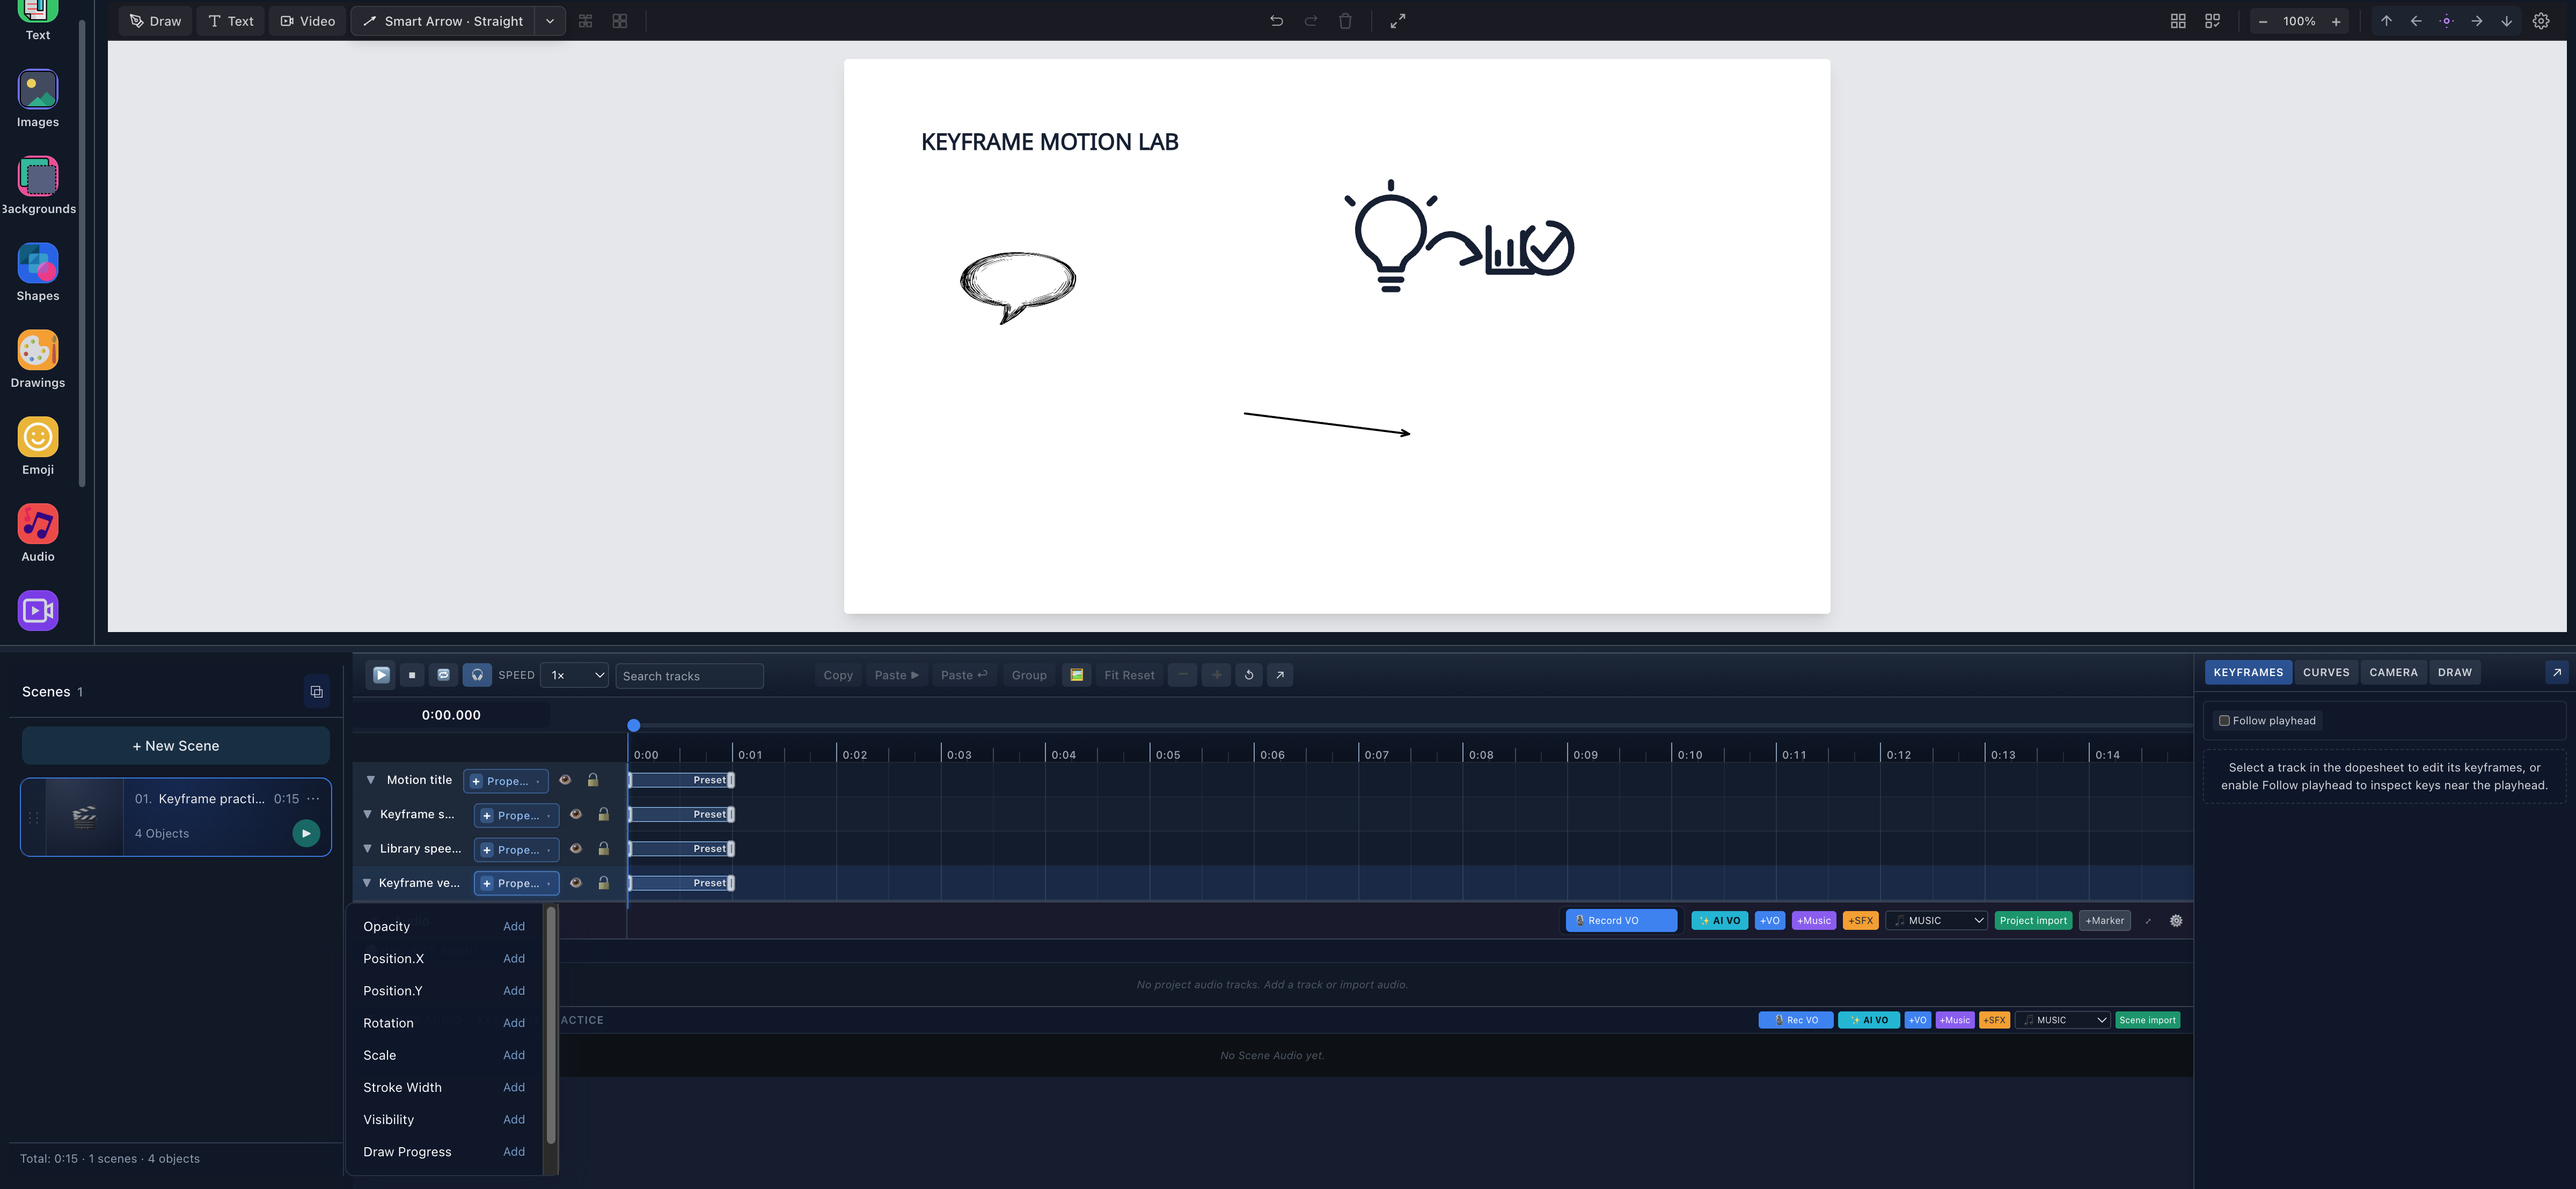
- Path-specific propertiesDraw Progress controls partial reveal; Stroke Width controls eligible path weight.
See the Image and Smart Arrow menus
Add your first property track
- Select the object on the canvas or its object row.
- Expand that object in the timeline.
- Choose + Property.
- Choose a property that appears for that object, such as Position.X.
- Select the new property row before adding or editing its keys.
Position is currently split into Position.X and Position.Y tracks. This lets you retime horizontal and vertical motion independently—or group their keys when one animation beat should stay synchronized.
Method 1: create keys in the Keyframes Drawer
Select the property row and open KEYFRAMES. The verified drawer exposes:
- filters: All keys, Selected only, and Follow playhead;
- actions: + ADD @ PLAYHEAD, COPY, PASTE @ PLAYHEAD, and DELETE;
- exact columns: Time (s), Value, Interpolation, Easing, plus Clamp on eligible bounded spans and a group badge when assigned.
Move the playhead, choose + ADD @ PLAYHEAD, and edit the new key's Time and Value. Add at least two keys before judging the motion; interpolation exists between keys, not after a final key with no outgoing span.
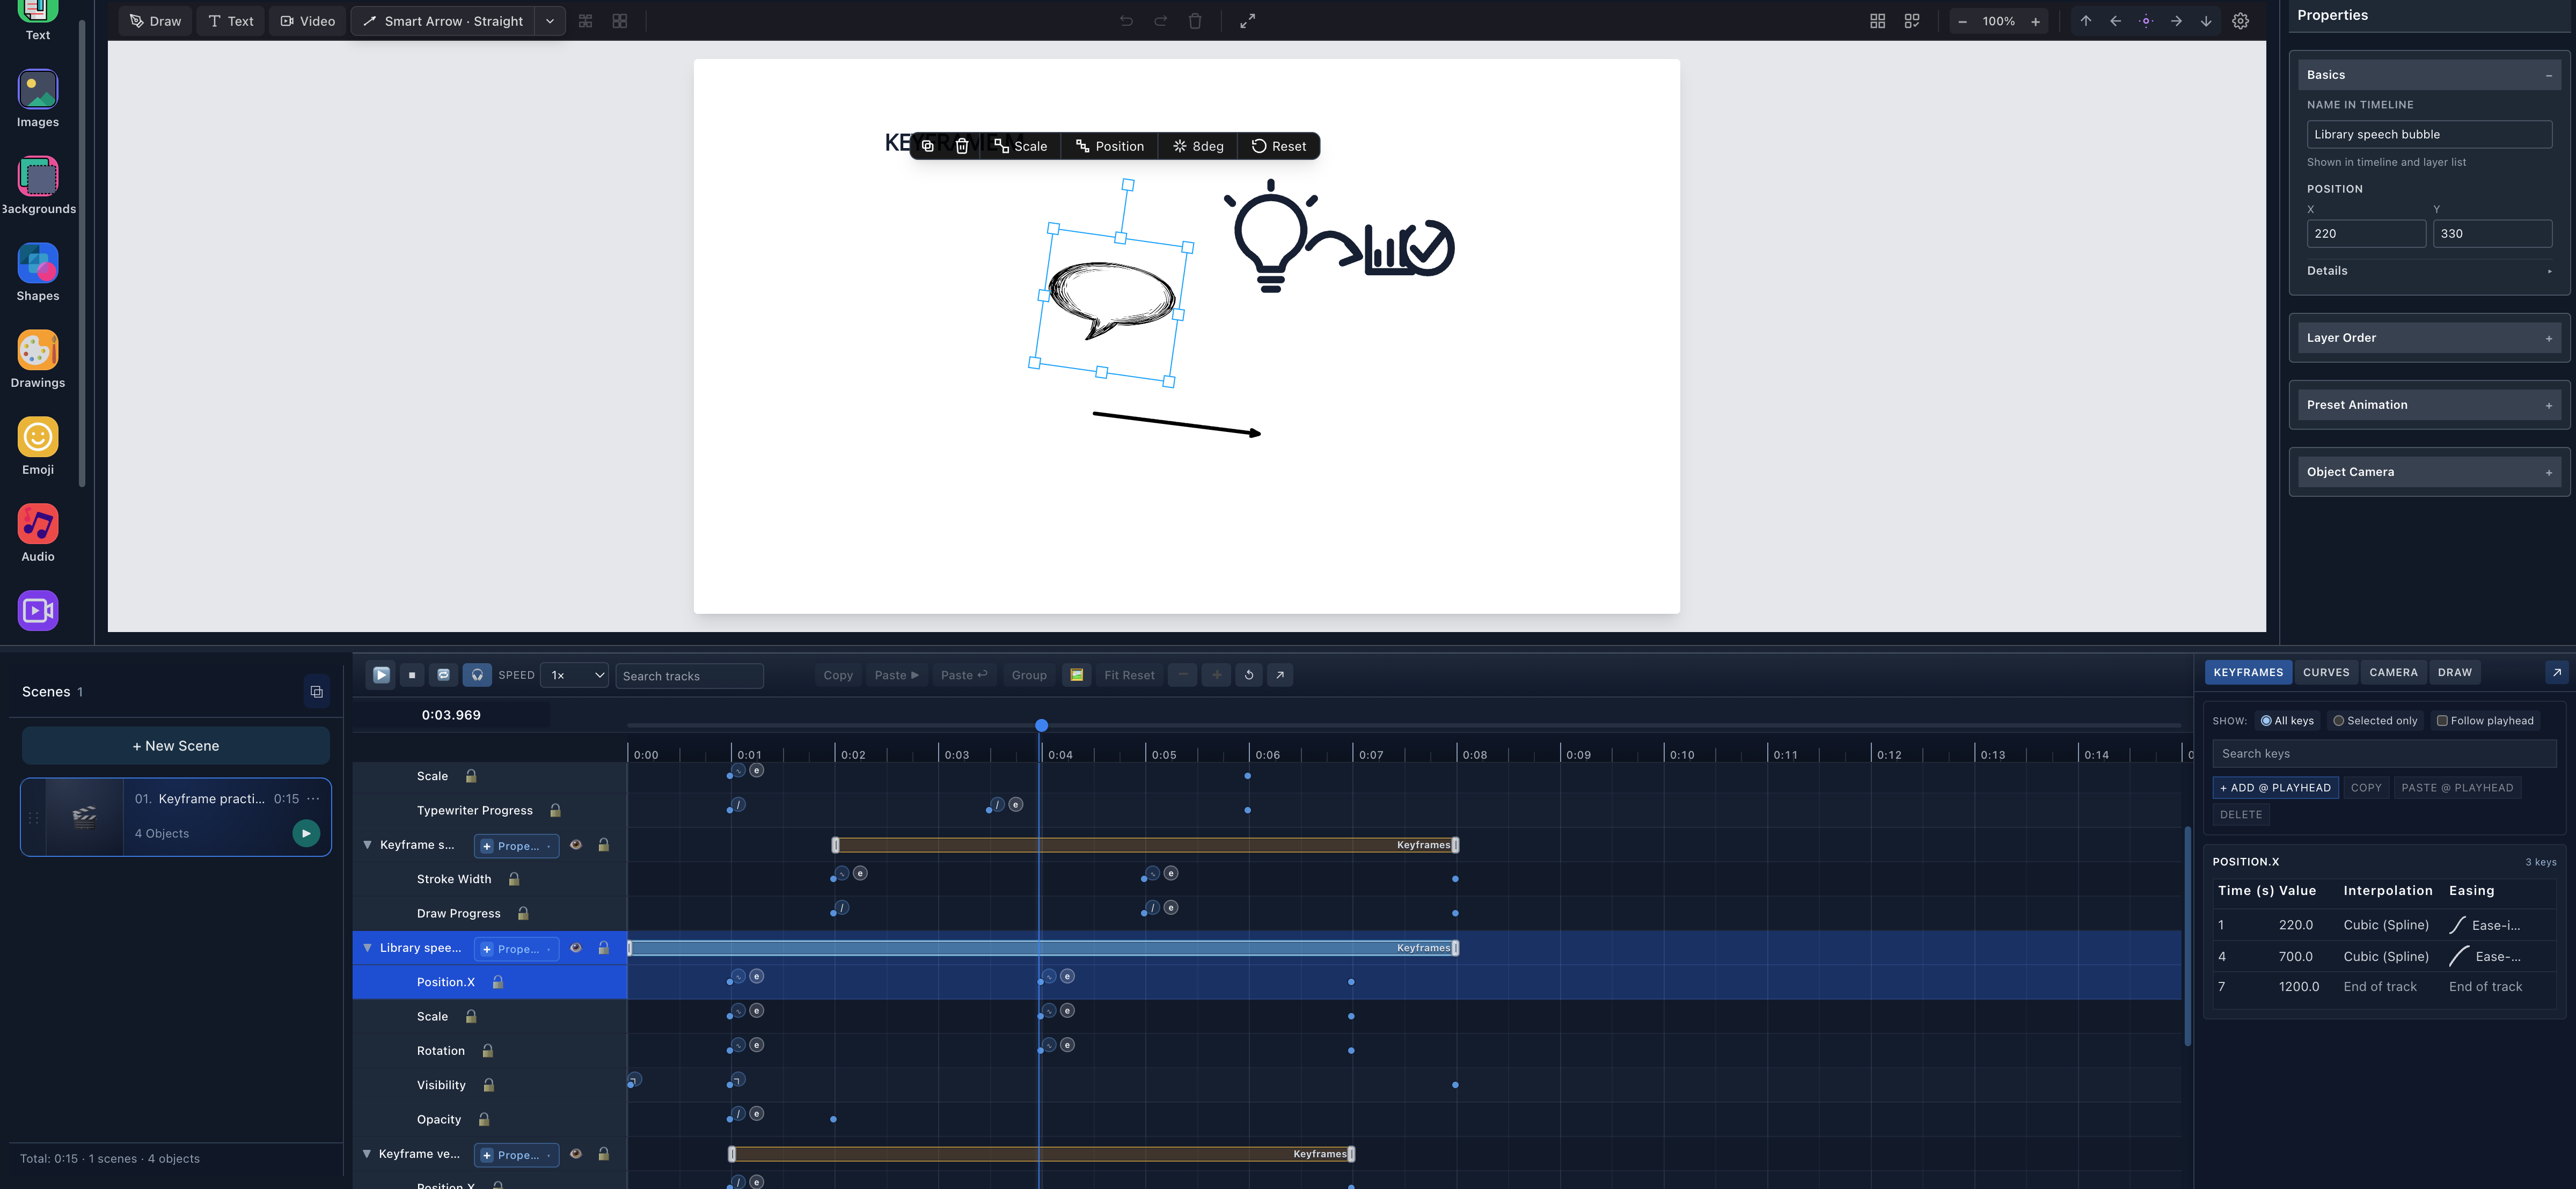
- Inspection filtersSelected only reduced the verified drawer to one selected row; All keys restored the complete property table.
- Exact key dataTime and value are stored per key; interpolation and easing describe the outgoing span.
Click a Time or Value cell to type an exact number. In the live test, the middle Position.X key was temporarily changed from 4.000s to 4.200s; the timeline marker moved at the same time, and the value stayed 700.
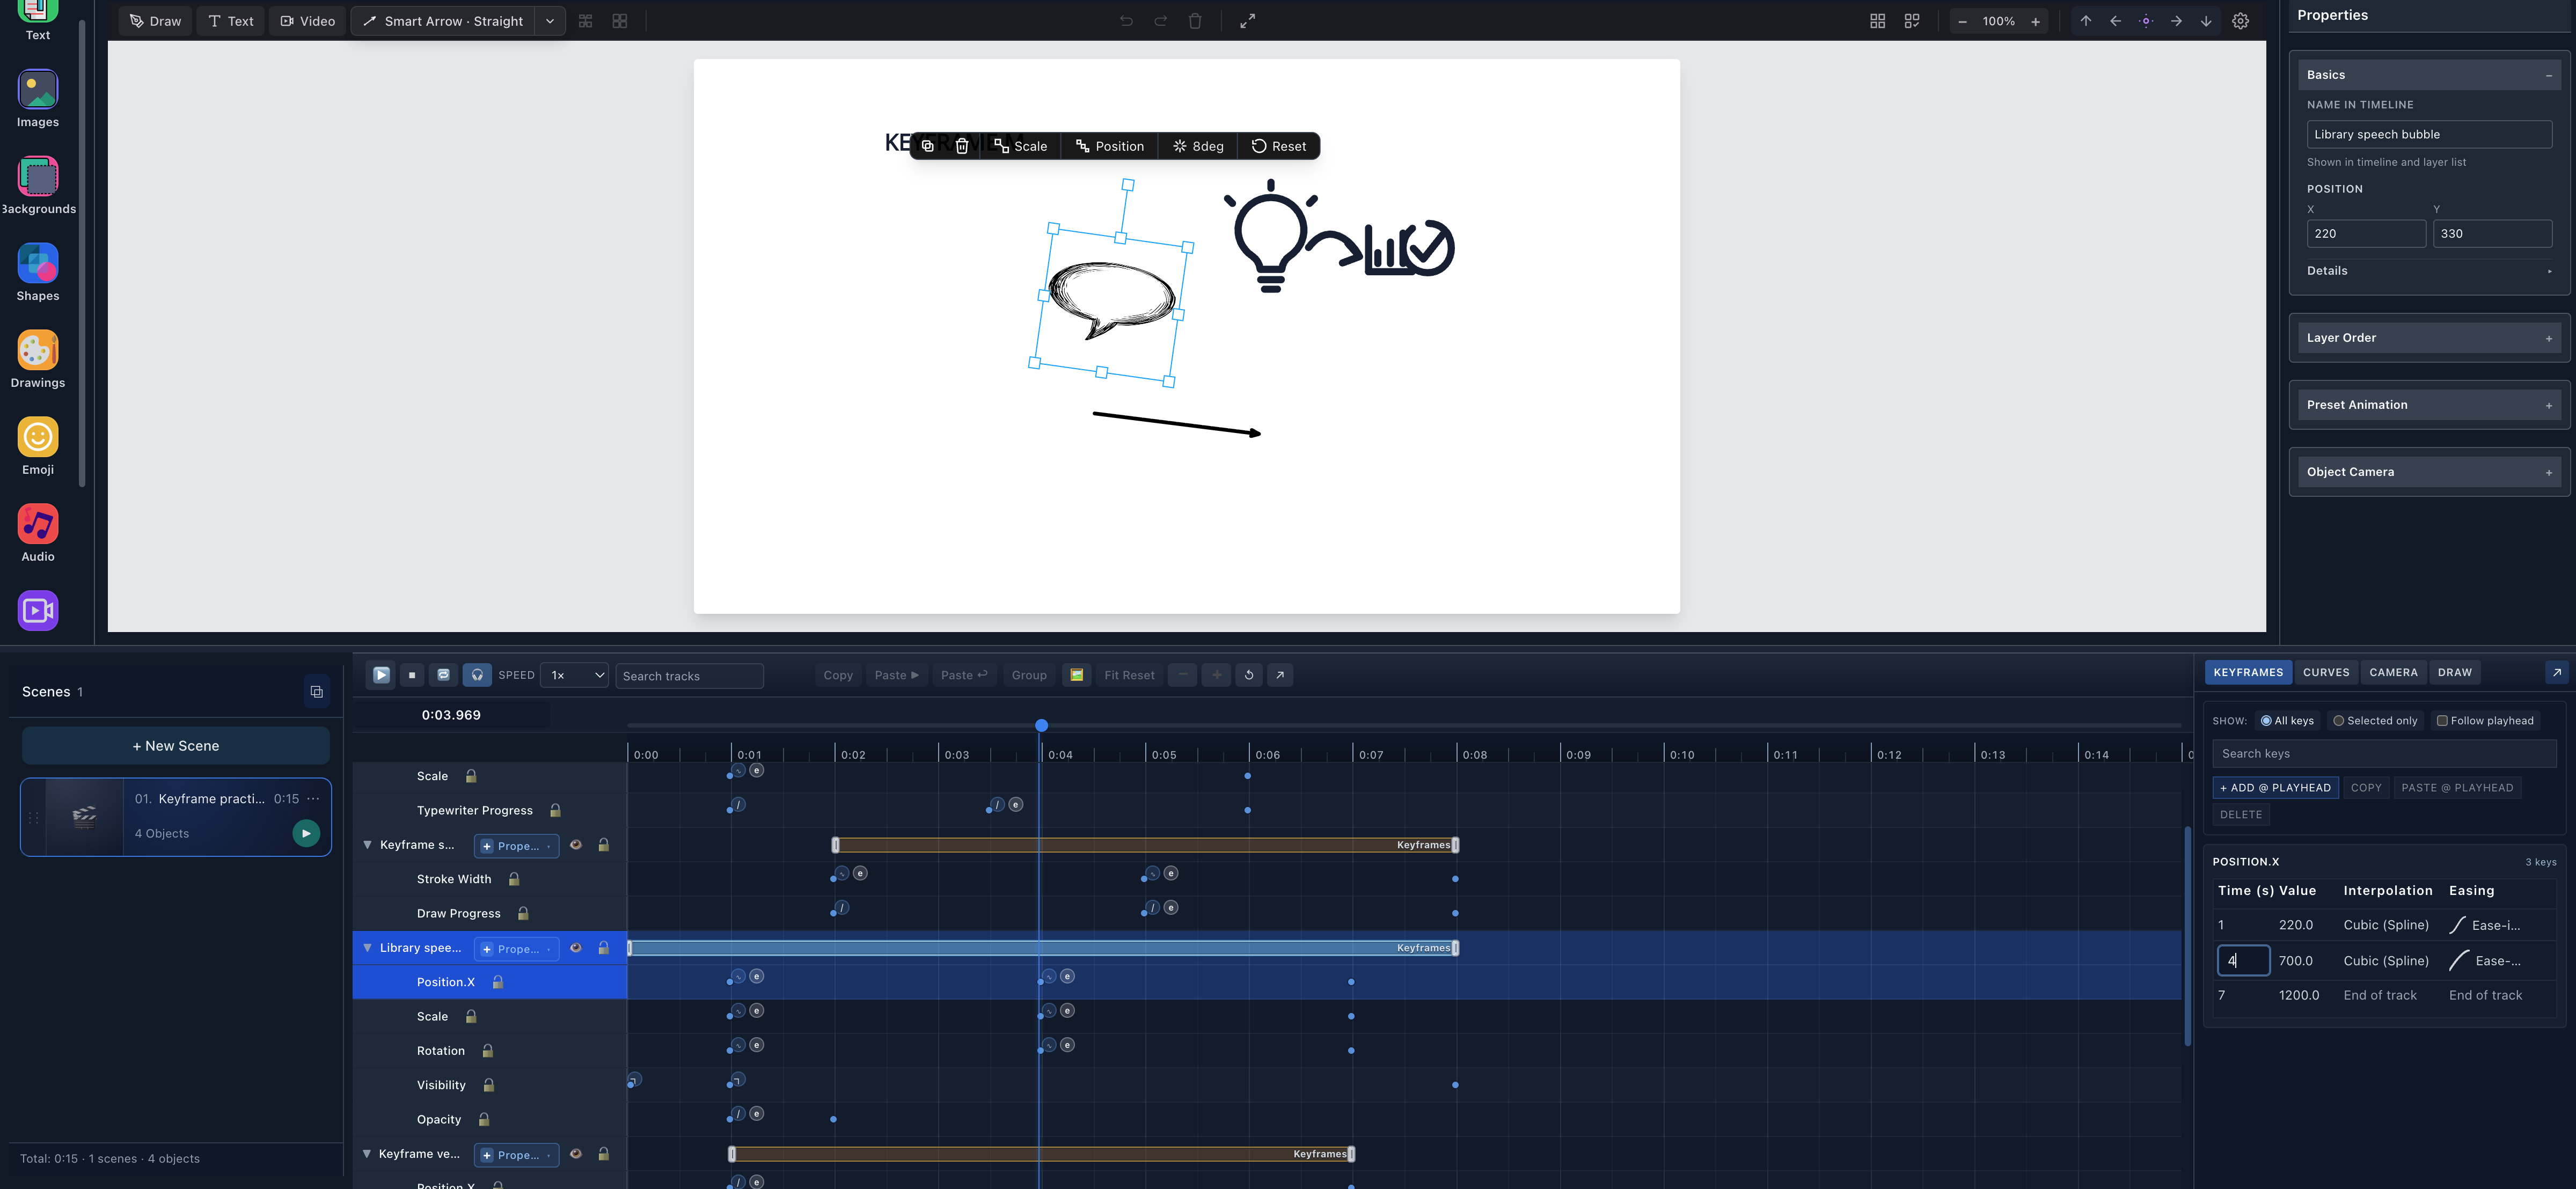
- Exact time inputUse seconds for deterministic timing instead of estimating the marker position.
With a child property selected, + ADD @ PLAYHEAD adds one key to that property even when its owner row is also part of the timeline selection. In the post-fix browser check, Position.X increased from two keys to three while the parent-object row stayed at zero keys.
Method 2: add keys directly on the timeline
You can author without keeping the drawer open.
Right-click an empty lane
Right-click a property lane at the intended time. The current menu contains Add Key, Paste Here, Paste at Playhead, Paste In Place, and Remove Track.
The live result matters: Add Key uses the pointer time. In the test, the playhead was at 3.969s, but right-clicking near 9.499s inserted the key near 9.499s.
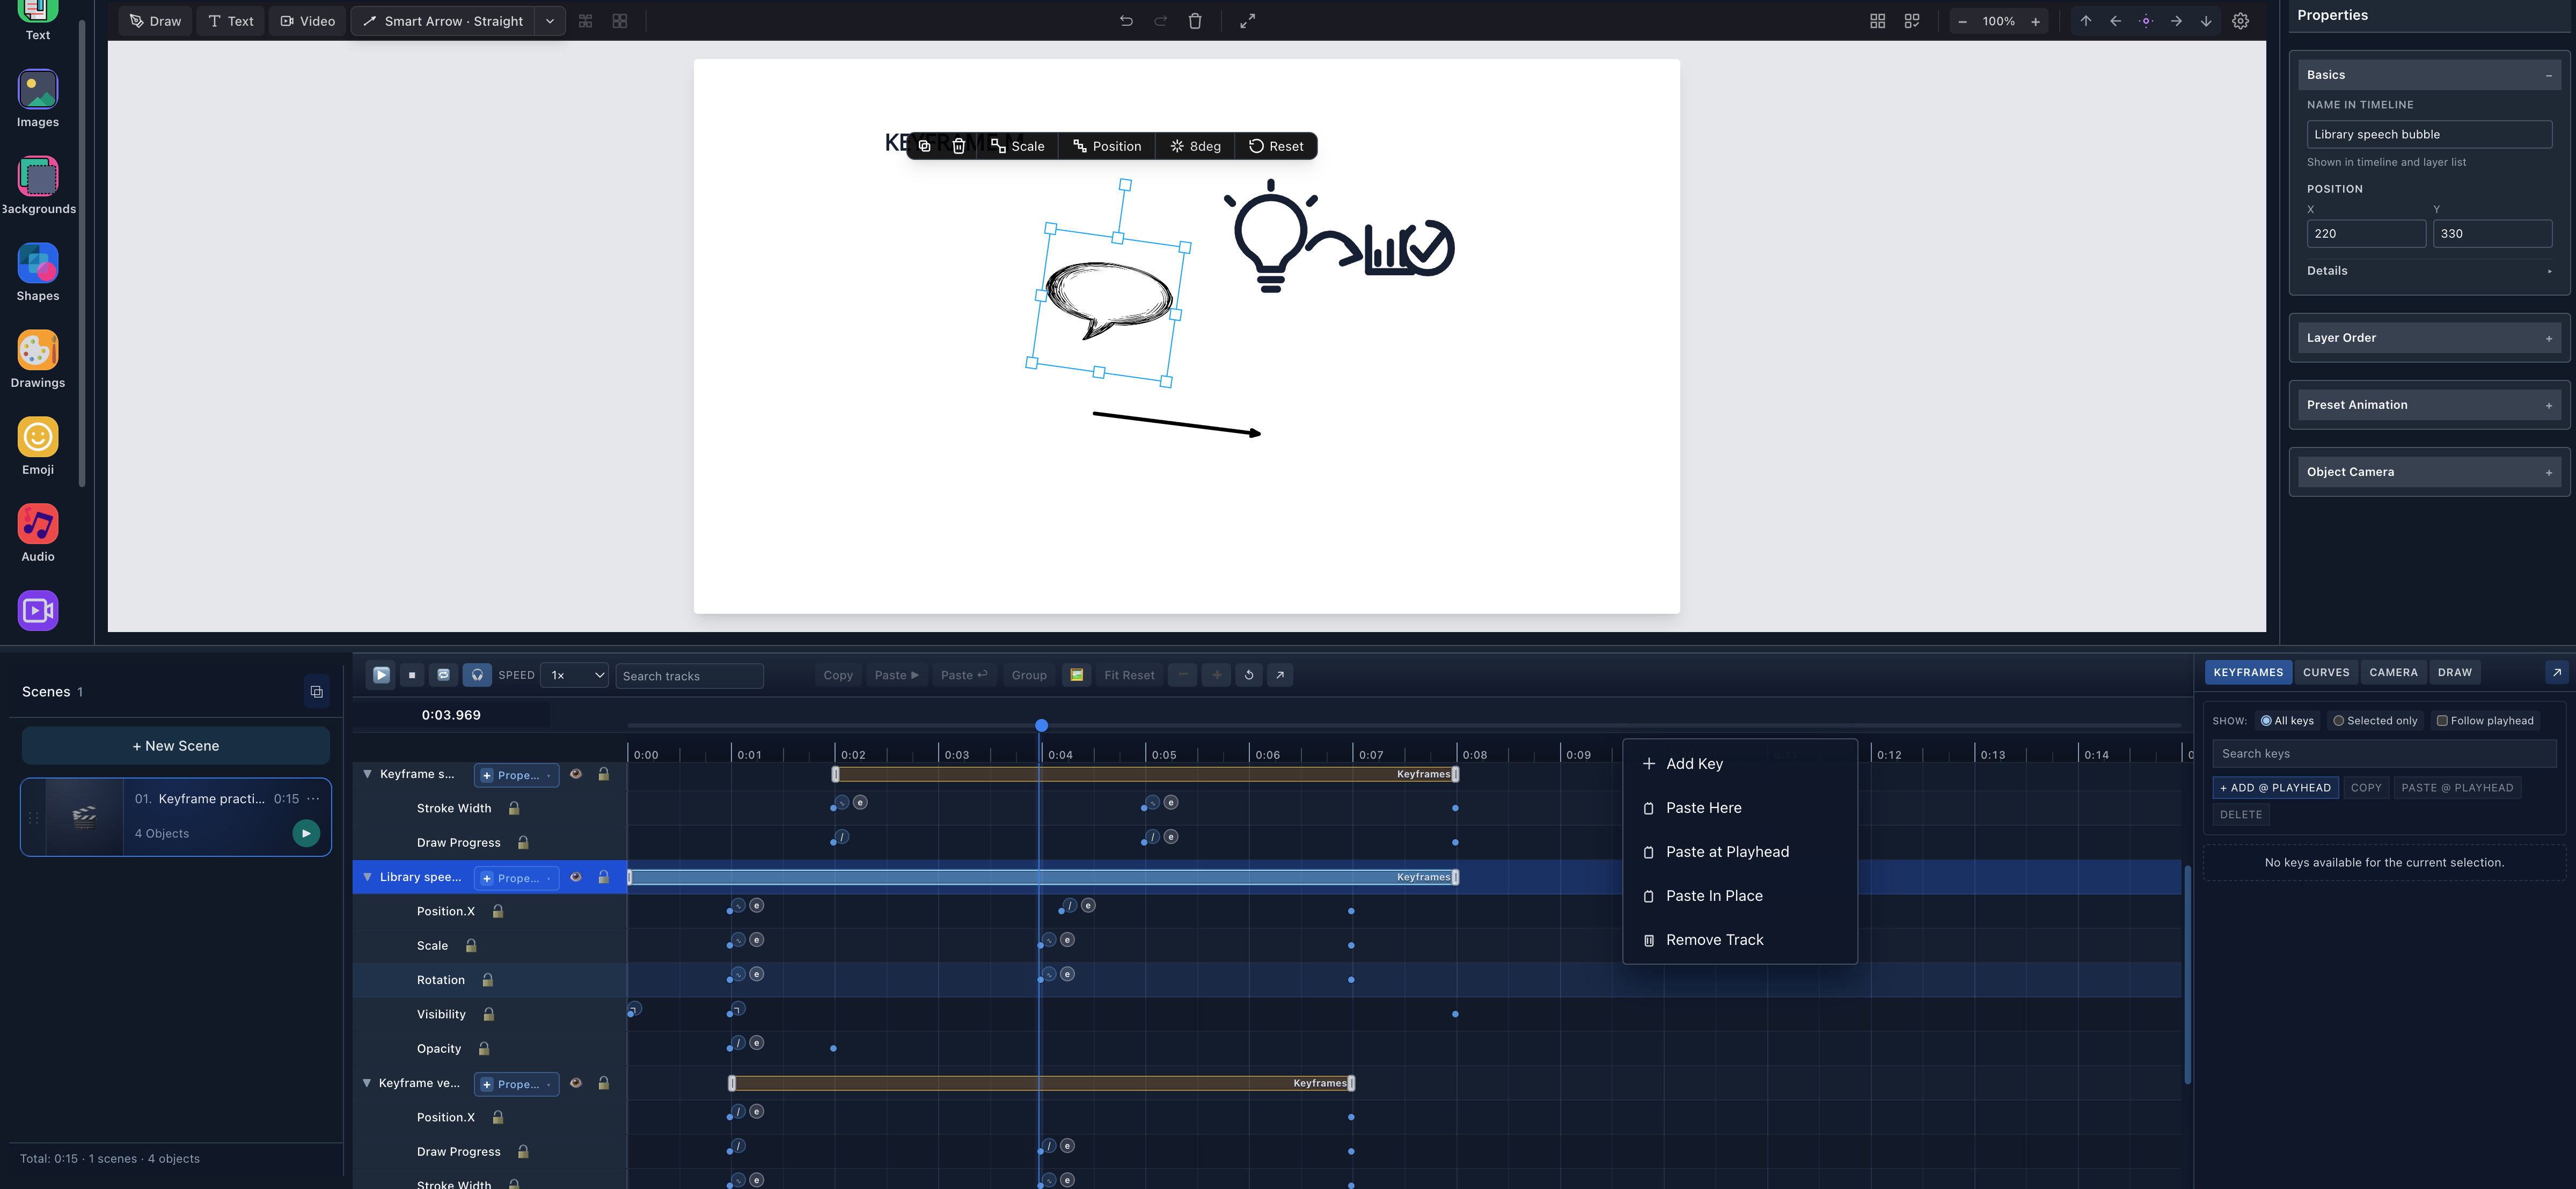
- Add Key at pointerThe context position decides the new key time.
- Three paste meaningsHere, playhead, and in-place are intentionally different timing operations.
Double-click an empty lane
Double-click also adds a key, but the verified behavior is different: it adds at the current playhead, not at the double-click pointer. This makes double-click useful when the playhead is already your timing reference. It is not a pointer-time shortcut.
Right-click an existing key
The current key menu is grouped under Interpolation, Easing, Tangents, and Selection. For one editable key, Selection exposes Delete Key, Copy Key, Edit Value…, and Clamp Overshoot when the key/property is eligible.
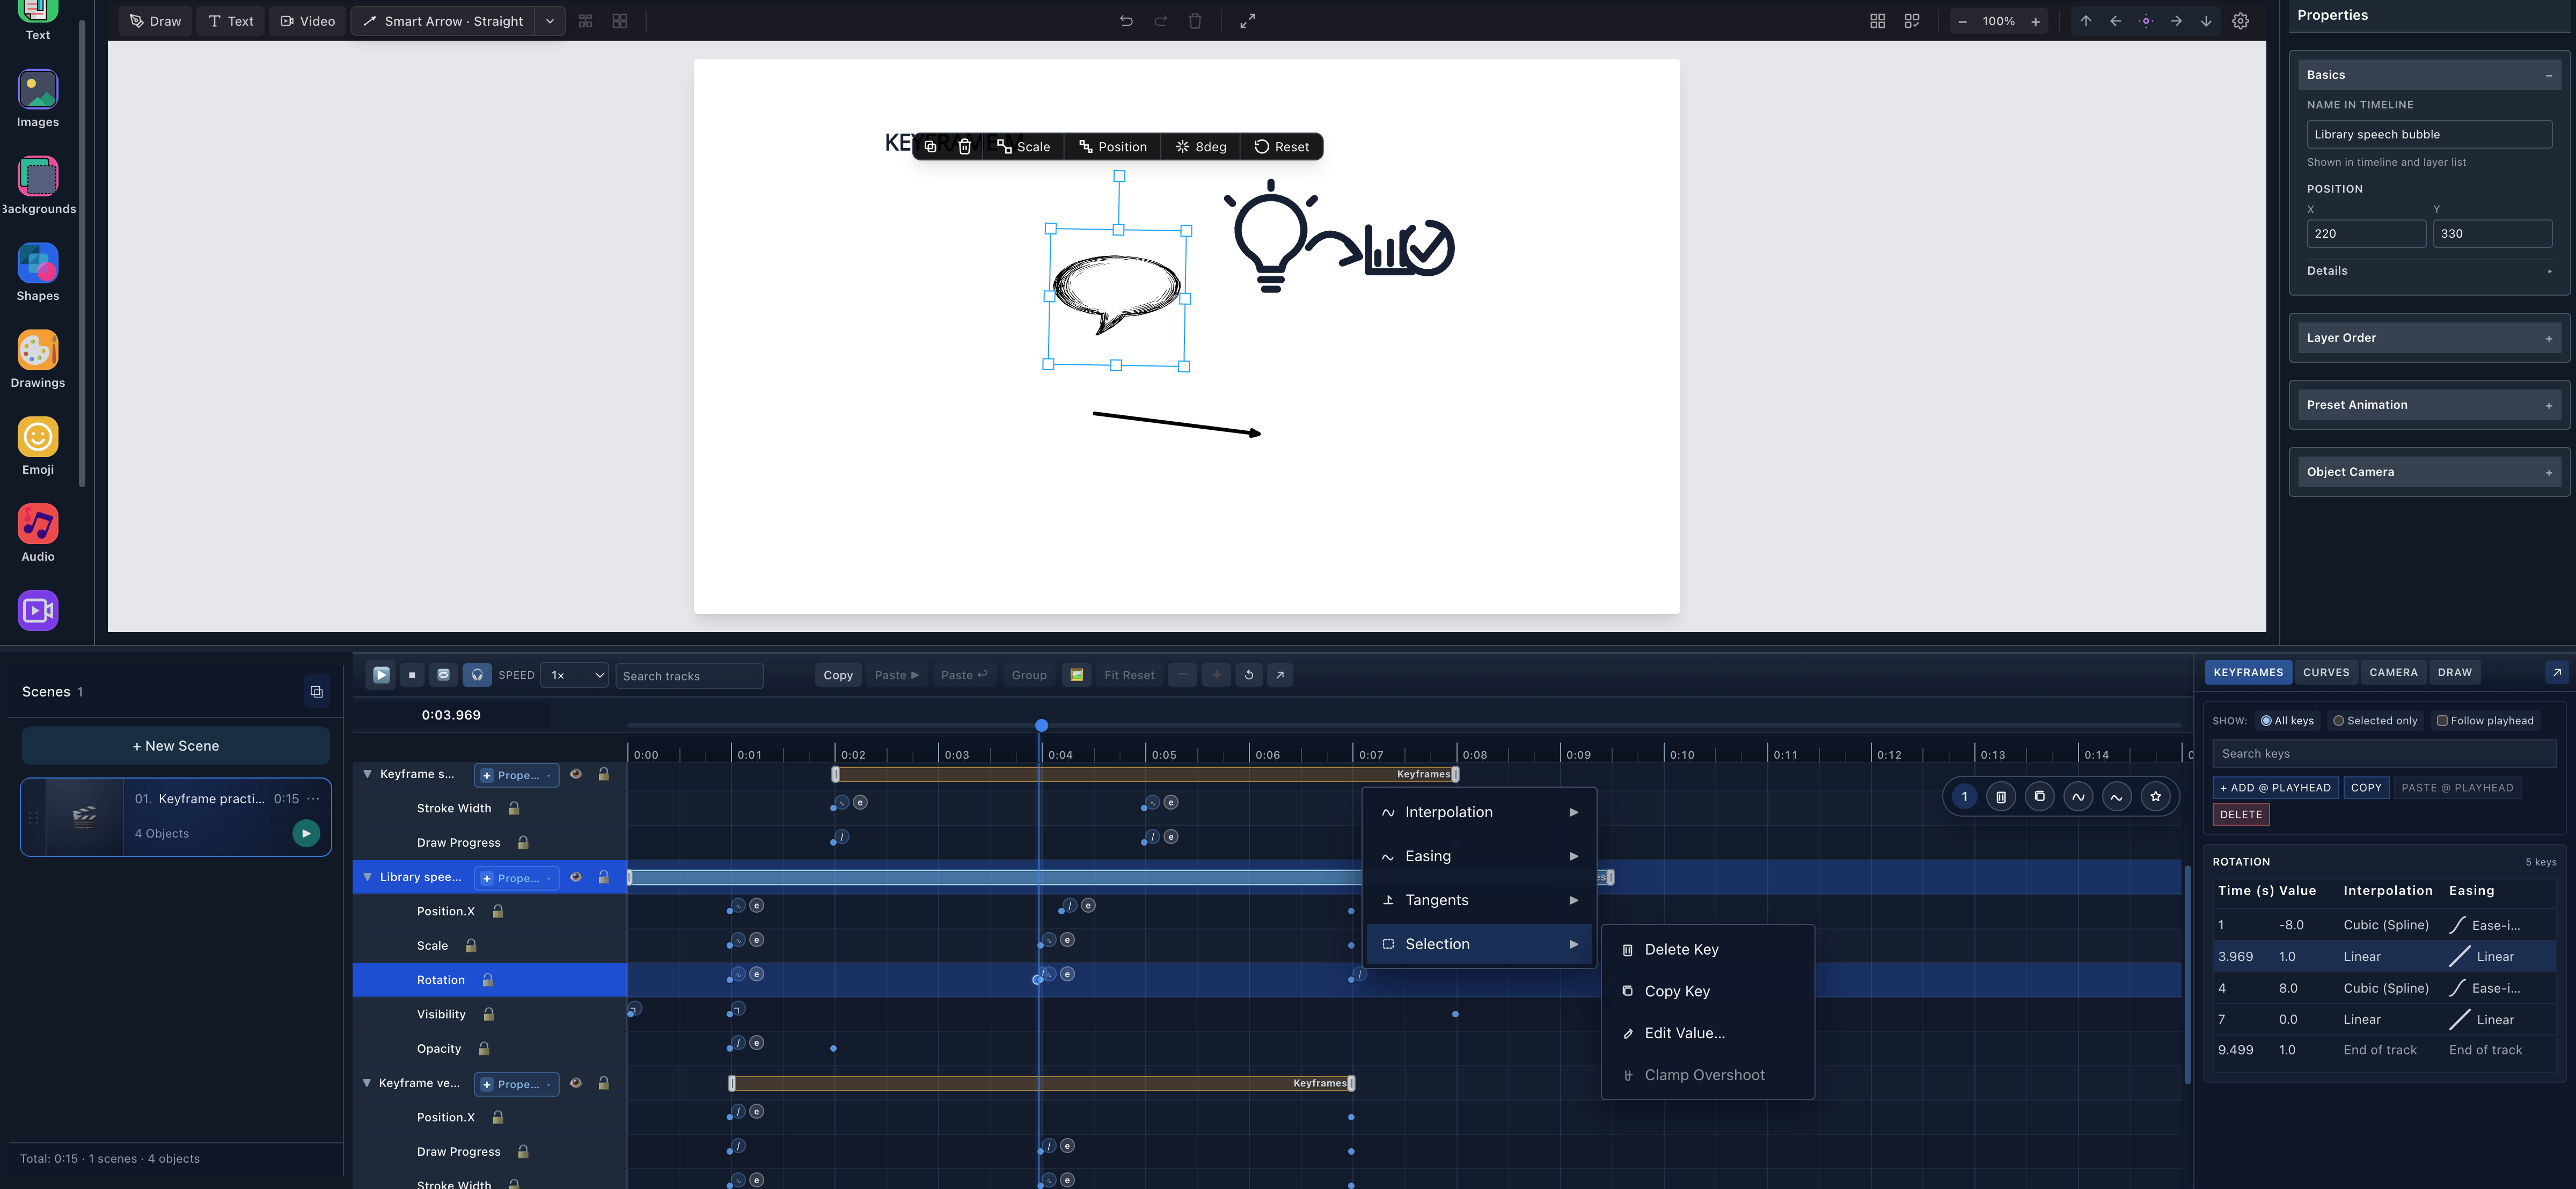
- Single-key actionsCopy and paste replaces an ambiguous Duplicate action with an explicit destination time.
Move a key by dragging it
Drag a key horizontally to change its time. The live Rotation key moved from 7.000s to 7.497s; its stored value remained 0. Scribe did not treat vertical pointer motion as a value editor in this timeline workflow.
Undo and Redo operate on the timing edit. For precise final placement, drag visually and then type the final Time in the drawer.
Select several keyframes
The tested Desktop selection methods are:
- Shift-click to extend a settled selection;
- Command-click on macOS or Ctrl-click on Windows/Linux to toggle individual keys;
- drag a marquee across visible lane markers.
Cmd/Ctrl + A is not wired as a Desktop key-selection shortcut in the current keyframe shortcut hook, so this tutorial does not claim it.
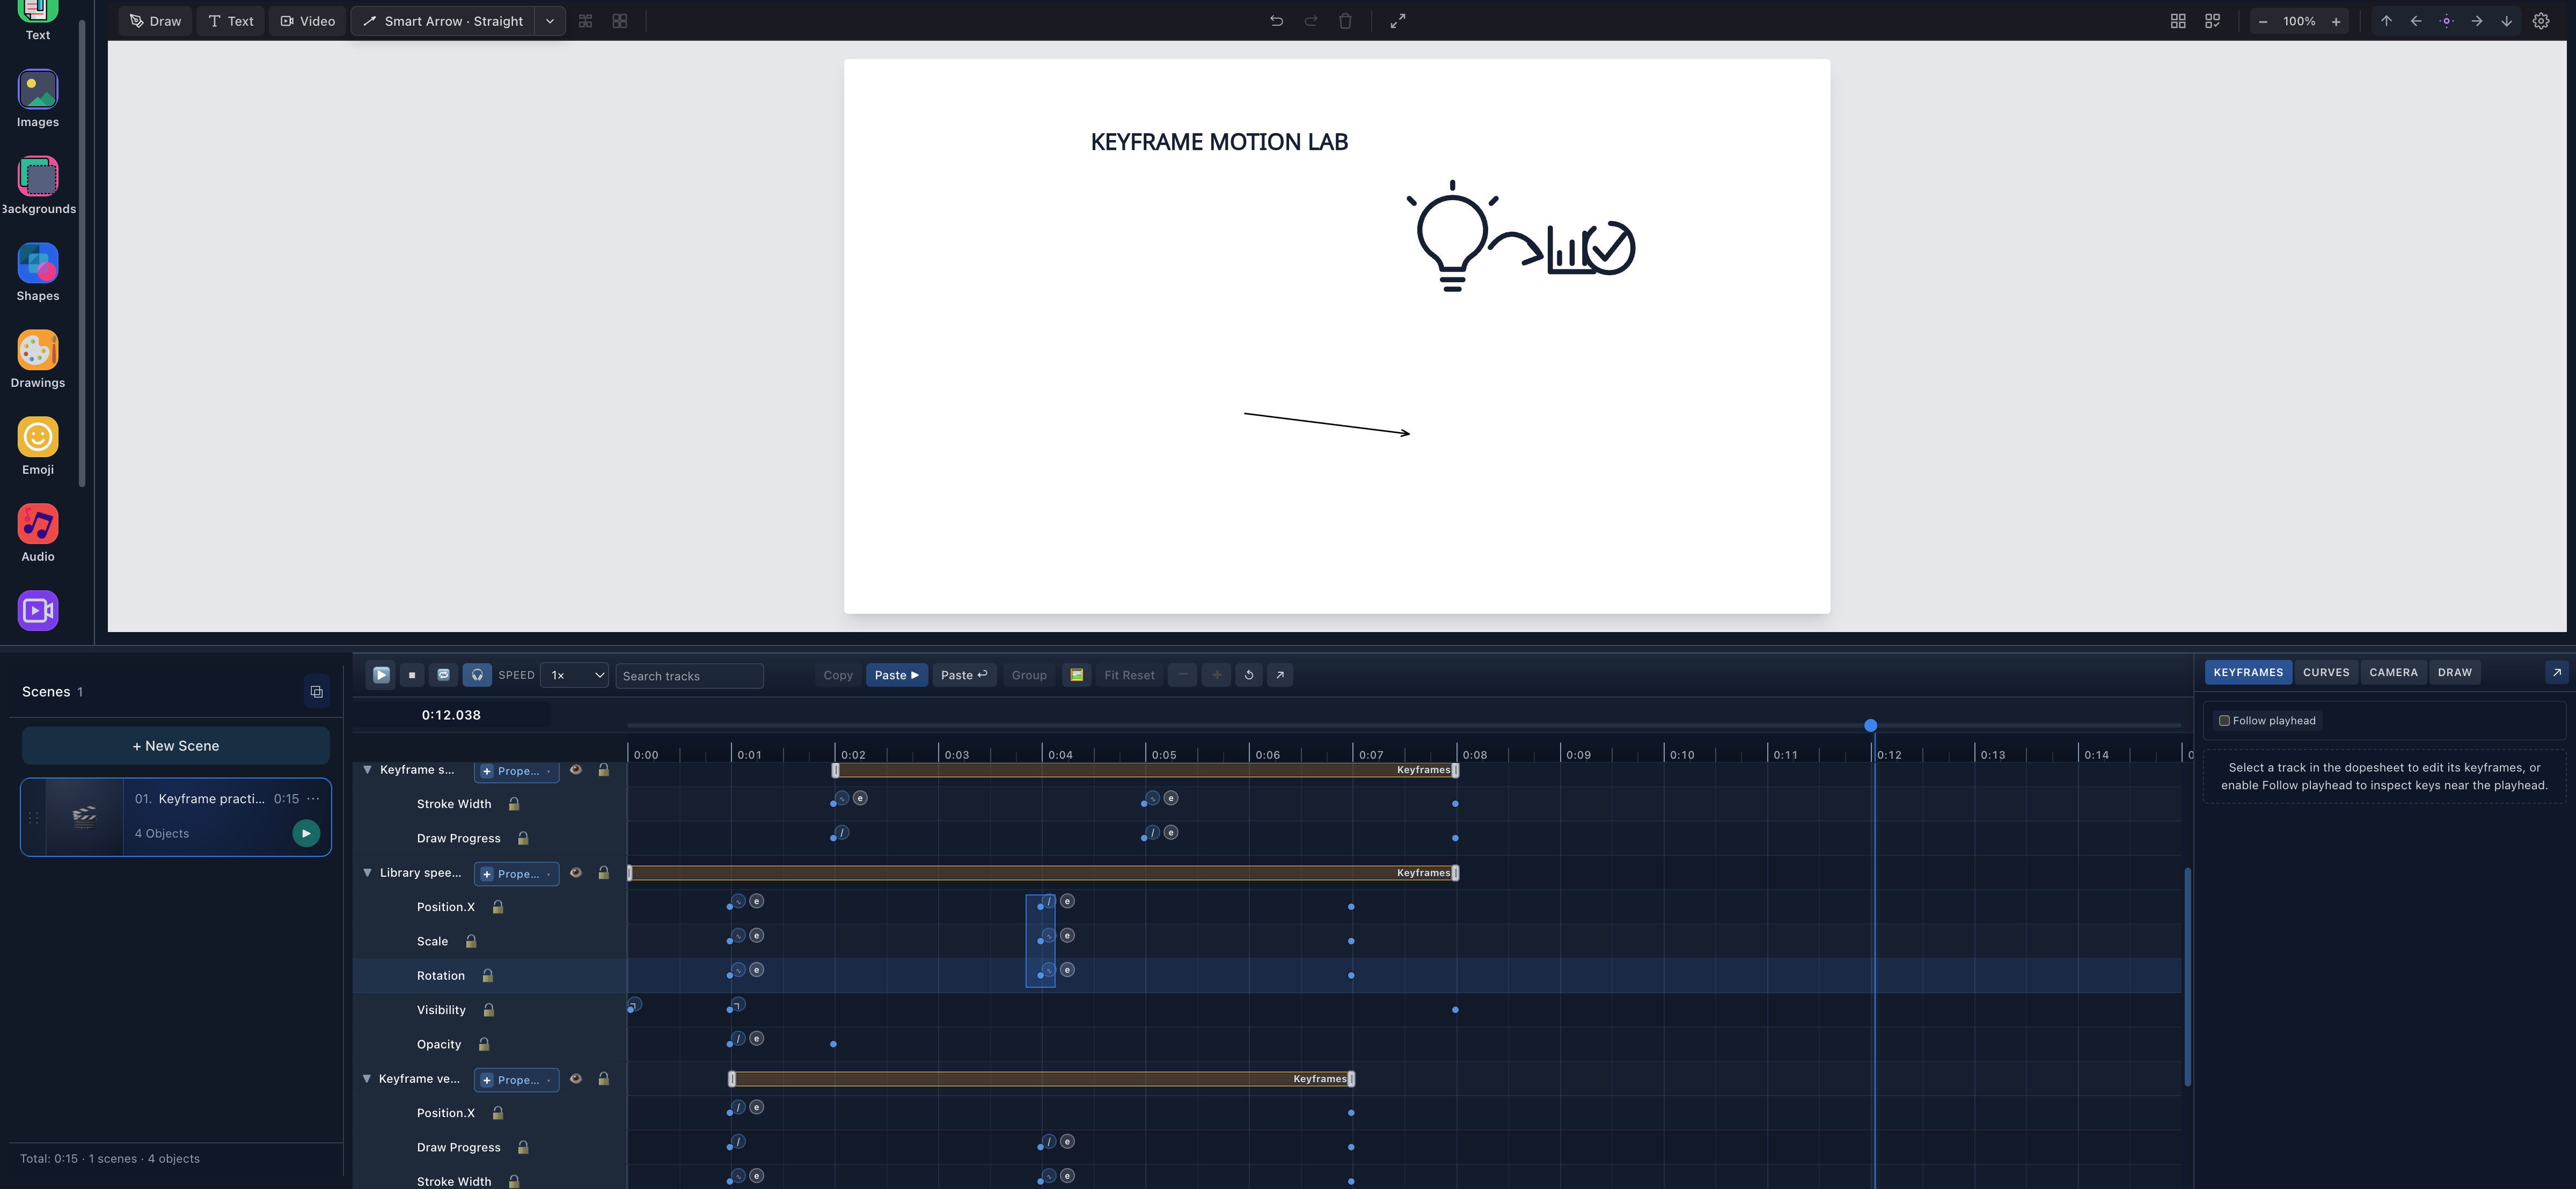
- Three-track marqueeThe temporary rectangle selects the second Position.X, Scale, and Rotation keys together.
Group keyframes and move an animation beat together
Grouping binds independent keys in time. It does not merge their values or tracks.
The practice image uses:
Position.X       ◆            ◆            ◆
Scale            ◆            ◆            ◆
Rotation         ◆            ◆            ◆
                 1s           4s           7s
Select the three 4s keys, right-click one selected marker, open Selection, and choose Group Keys.
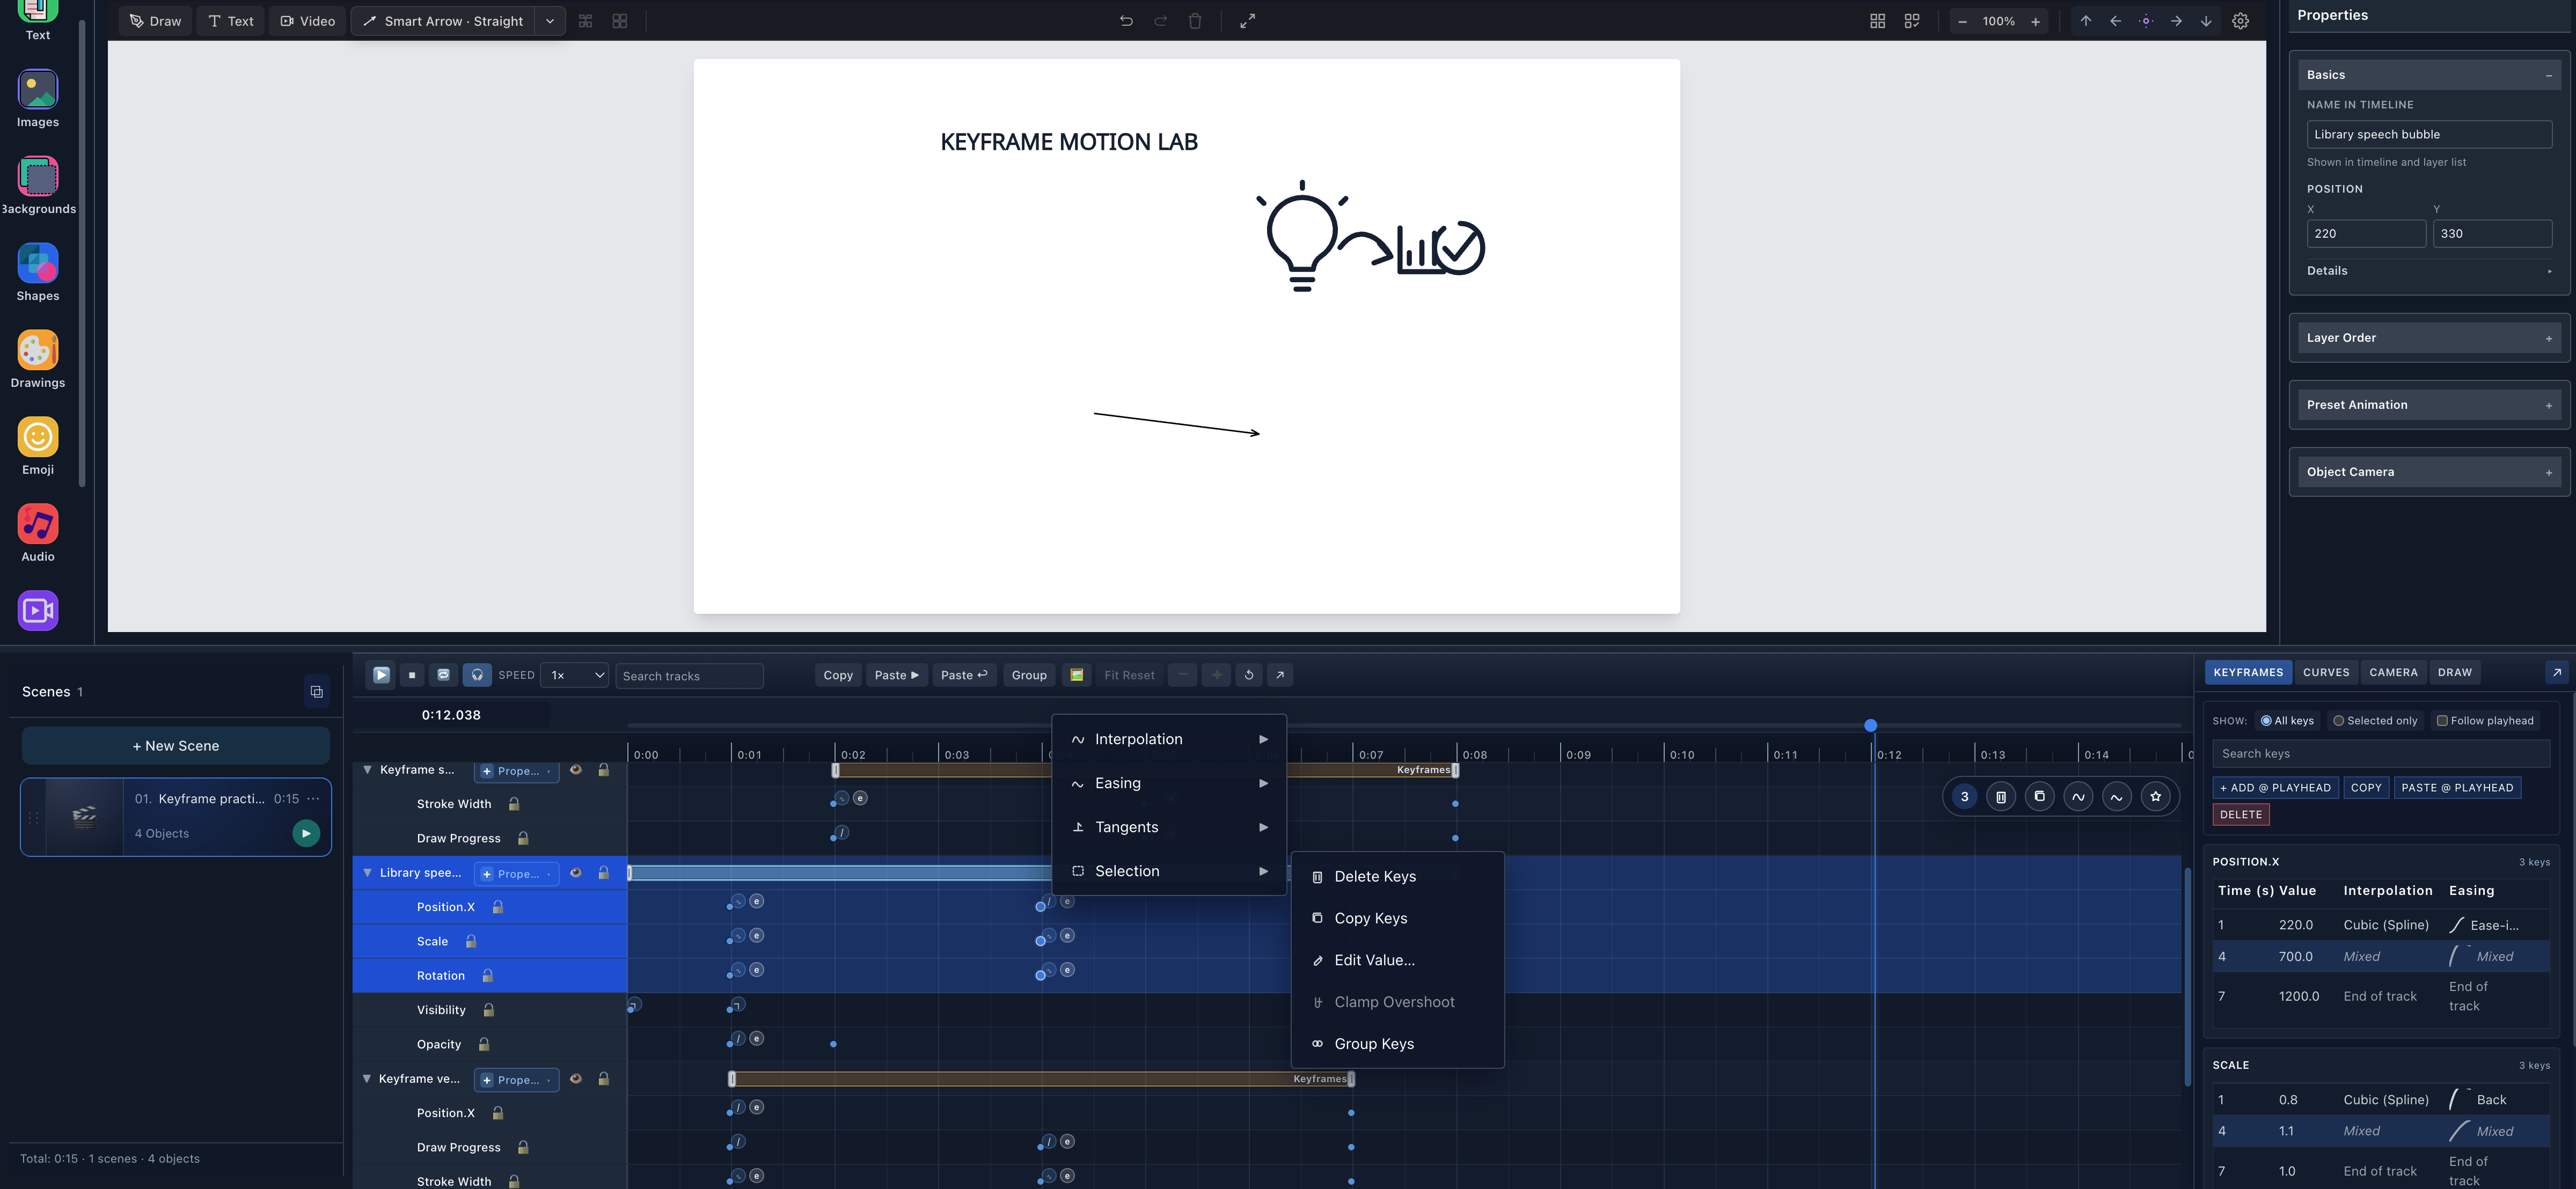
- Group the beatThe command assigns one group ID to the three selected keys.
The drawer then displayed a shared group badge, while the keys stayed on Position.X, Scale, and Rotation.
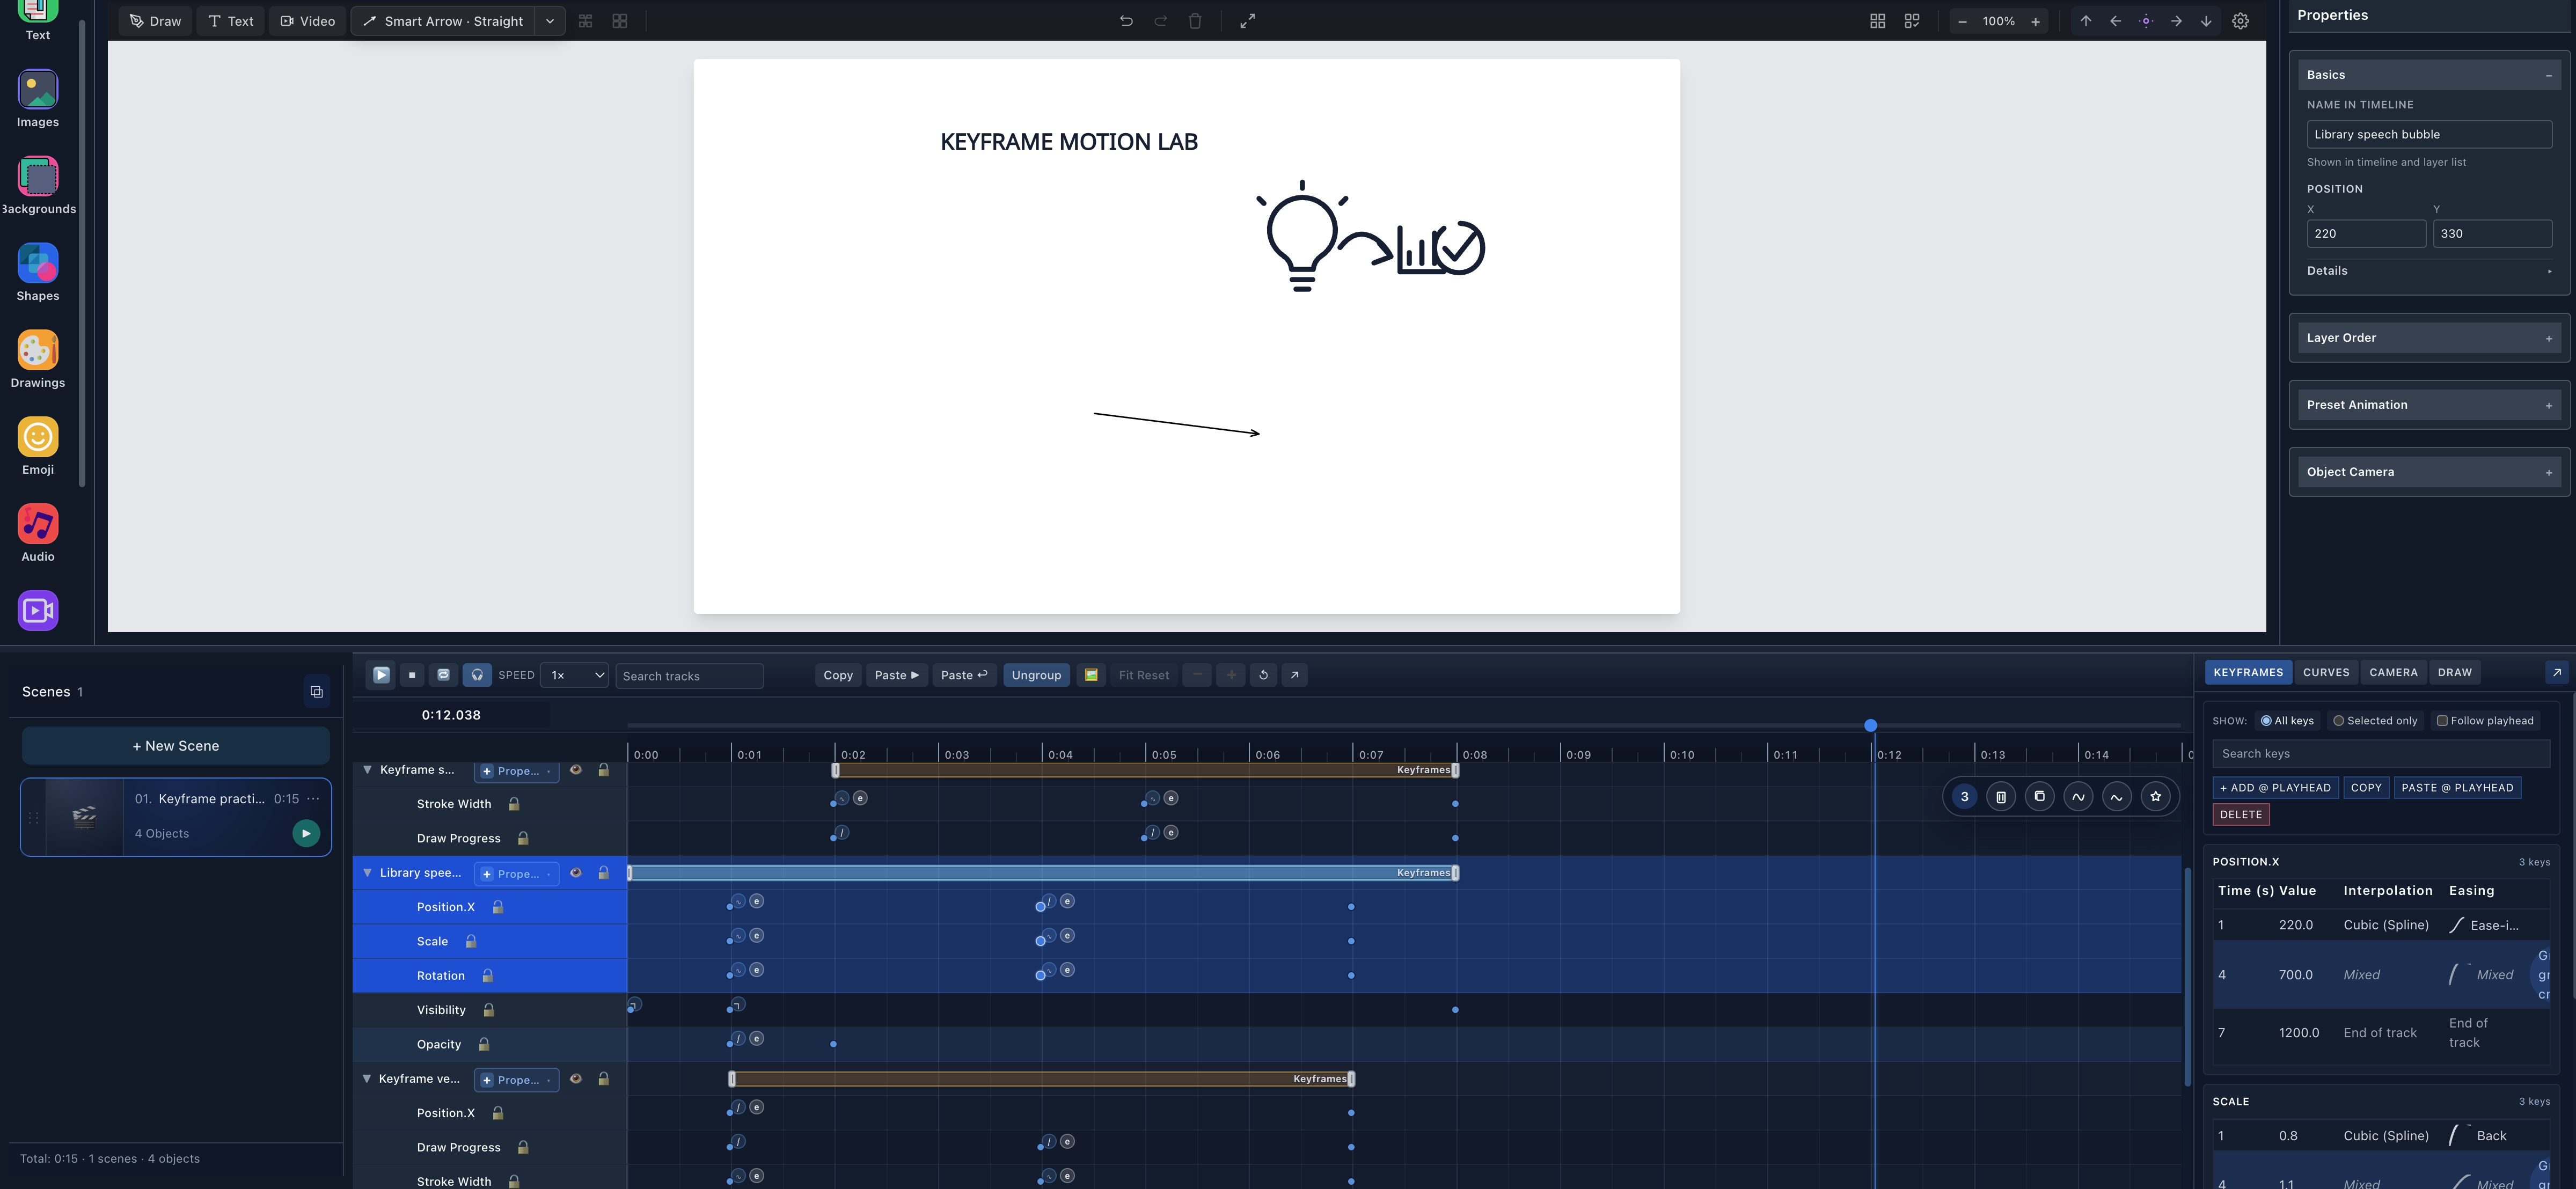
- Grouped 4-second beatThree selected markers share one time while remaining on separate property rows.
- Shared group IDThe exact drawer row exposes the assigned group rather than hiding the relationship.
Drag any member horizontally. All three members move by the same delta. In the first visual run, the beat moved from 4.000s to 4.746s. In a second verification run, it moved from 4.746s to 5.492s; one Undo restored all three to 4.746s, and one Redo restored all three to 5.492s.
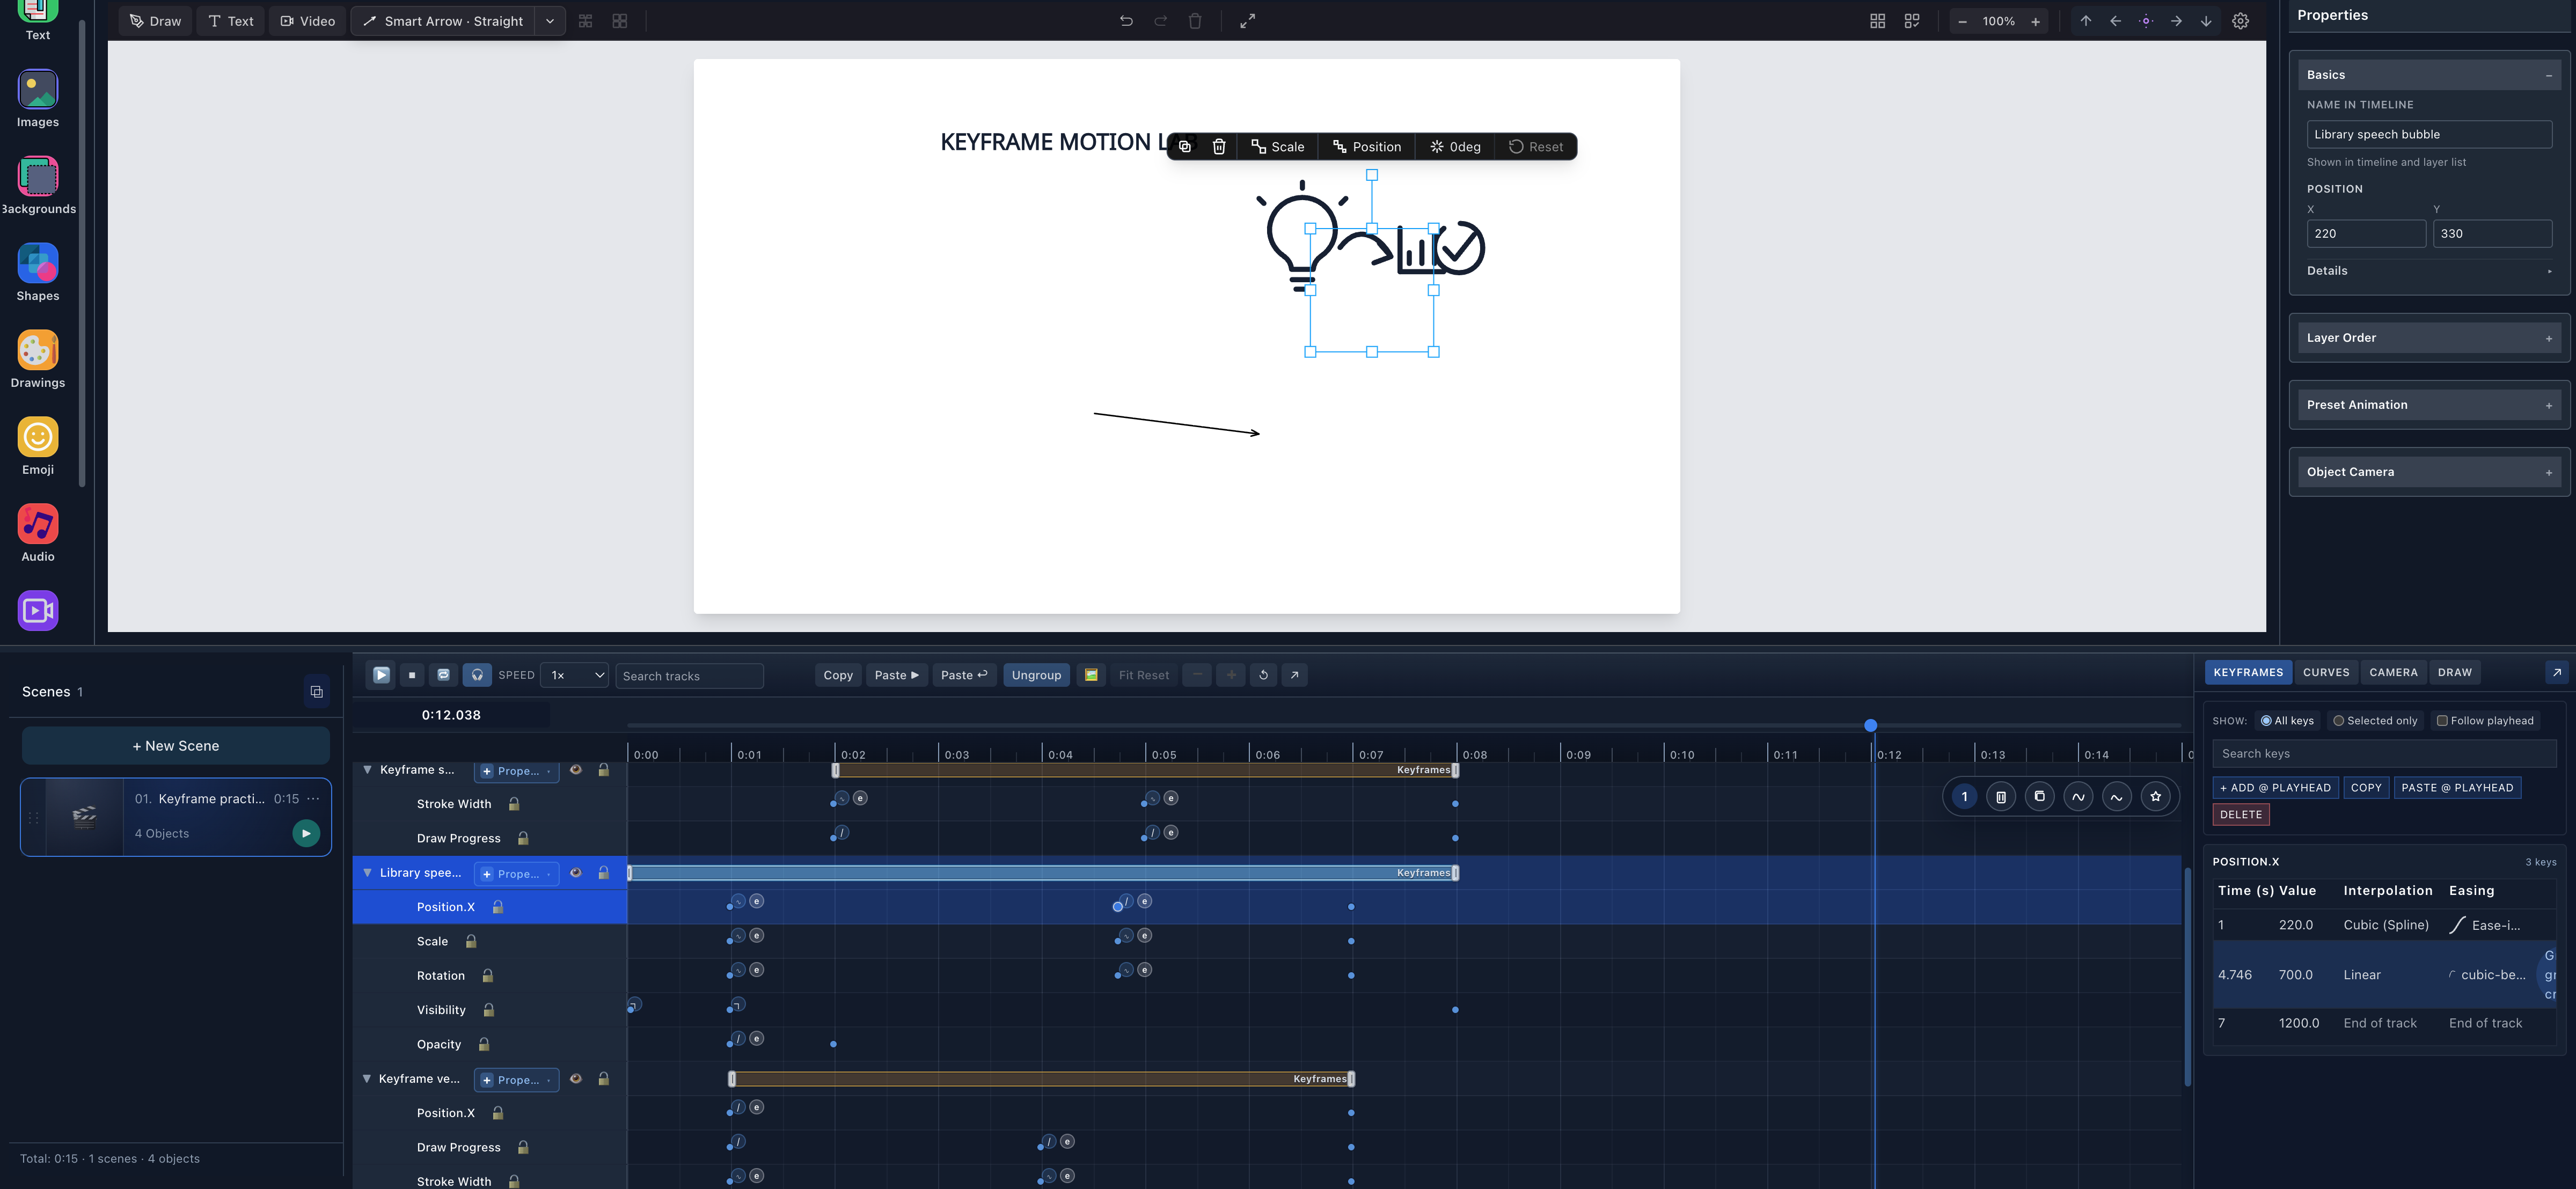
- Same deltaAll three grouped markers moved from four seconds to 4.746 seconds.
- 4.746 secondsThe drawer confirms the exact time after the visual drag.
Save and restore the group
Choose File → Save Locally, reload the editor, and choose Restore. The three keys retained the same group ID. Moving a member after Restore still moved the complete group.
Ungroup keys
Right-click a grouped member and open Selection. The current choices are Ungroup Selected and Ungroup Entire Group. The test used Ungroup Entire Group; after that, Position.X moved from 4.000s to 4.497s while Scale and Rotation remained at 4.000s. Undo restored Position.X.
Copy, paste, duplicate, and delete
The tested duplication workflow is explicit:
- Right-click a key and choose Selection → Copy Key, or select several and choose Copy Keys.
- Move the playhead and choose Paste ▶ / PASTE @ PLAYHEAD, or right-click a lane and choose Paste Here, Paste at Playhead, or Paste In Place.
- Confirm the new marker time.
The live test copied the grouped image Position.X key and pasted a new key at 10.525s. It then used Selection → Delete Key, and the new marker disappeared while the original 1s, 4s, and 7s keys remained.
There is no standalone Duplicate Keyframe action in the tested context menu. Copy plus an explicit paste destination is the current way to duplicate.
Property, value, interpolation, easing, and group
These terms describe different decisions:
Property
What changes: Position.X, Scale, Opacity, Draw Progress, and so on.
Key value
What value should that property have at this time?
Interpolation
How are two stored values connected mathematically? The current options are:
- Linear — a straight numeric connection;
- Step — hold one value until the next key;
- Cubic (Spline) — a smooth curve with tangent behavior.
Easing
How quickly does progress move through an eligible continuous span? The current drawer offers Linear, Ease-in, Ease-out, Ease-in-out, Anticipate, Back, Bounce, Elastic, and Custom….
Group
Which otherwise independent keys should move together in time?
Interpolation shapes values; easing remaps time through that span. They are related, but they are not the same control. A Step visibility track does not become a fade by choosing a dramatic easing—use Opacity for a continuous fade.
Custom easing and advanced tangents
Choose Custom… on an eligible outgoing numeric span to open the real custom easing editor. It exposes X1, Y1, X2, and Y2 control points plus presets including LINEARIZE, EASE, EASE-IN, EASE-OUT, EASE-IN-OUT, S-CURVE, and OVERSHOOT.
The verified Position.X span applied:
cubic-bezier(0.340, 1.560, 0.640, 1.000)
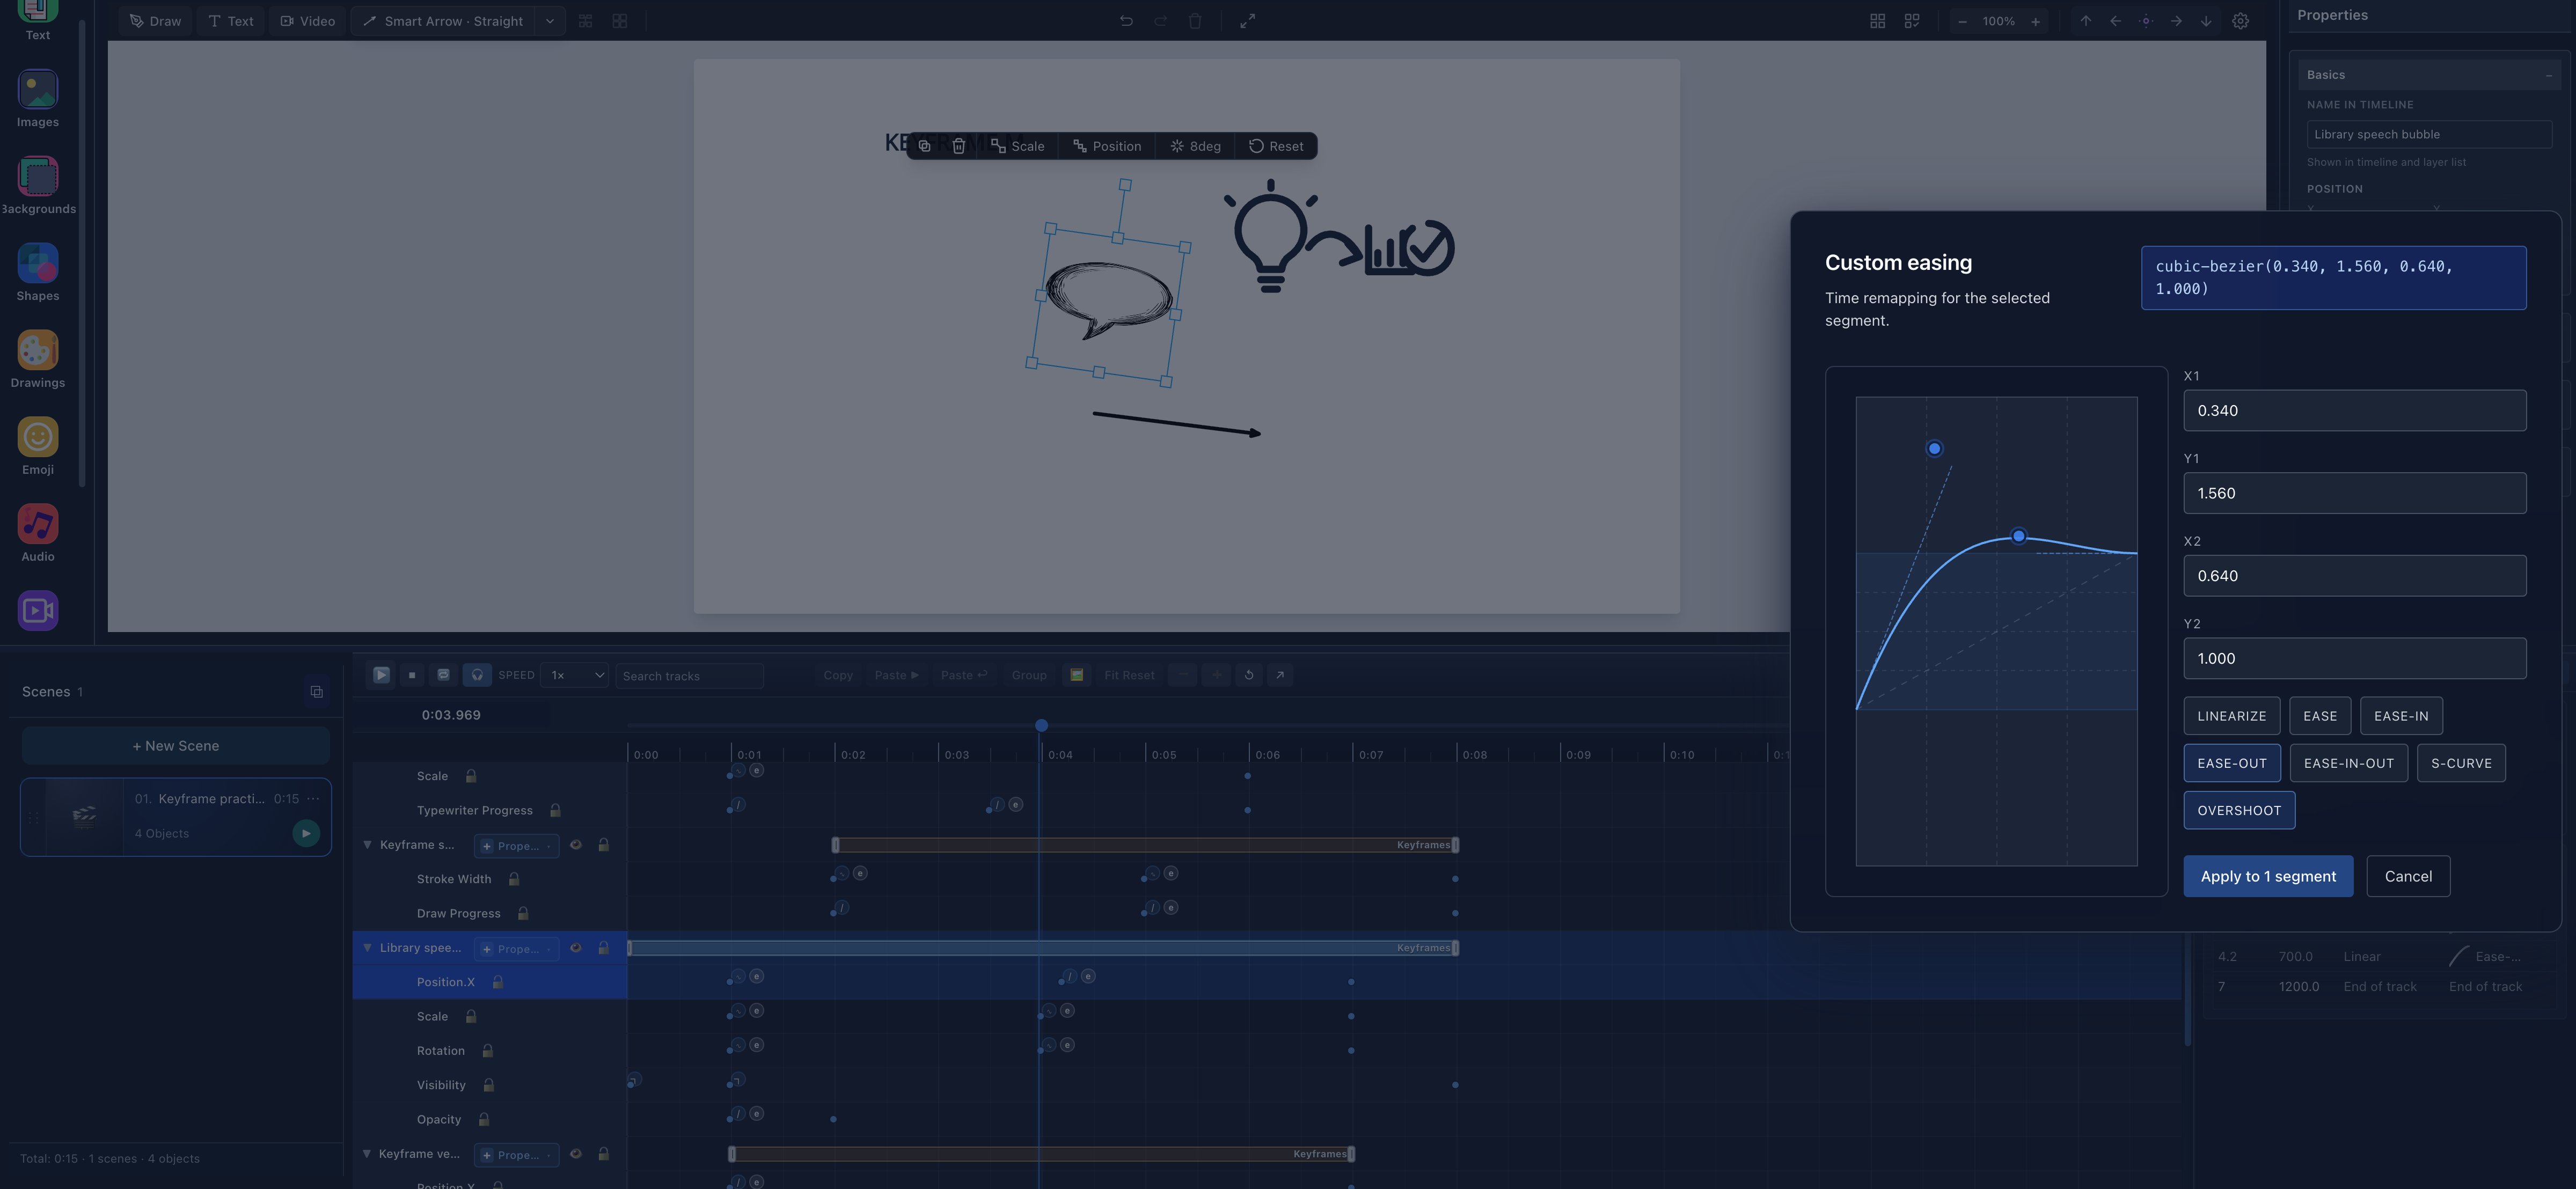
- Bezier controlsThe graph and X1/Y1/X2/Y2 values define the selected segment easing.
- Apply to one segmentThe editor states the affected segment count before applying.
For Cubic keys, the right-click Tangents submenu currently exposes Auto, Linearize, Flatten, and Break / Unify. The practice key successfully stored Auto tangent data. Use the CURVES drawer when you need a visual tangent workflow; this tutorial introduces the controls but does not replace the curve reference.
Bounded properties and Clamp
Opacity, Draw Progress, Typewriter Progress, and Path Follower use a 0–1 range. Scale has a positive minimum, and Stroke Width cannot be negative. Scribe's runtime evaluates bounded tracks inside their declared bounds.
Eligible outgoing bounded spans show a Clamp column in the drawer. The tested Draw Progress keys displayed Off, Off, then End of track; toggling the first row changed it to On in the current editor session.
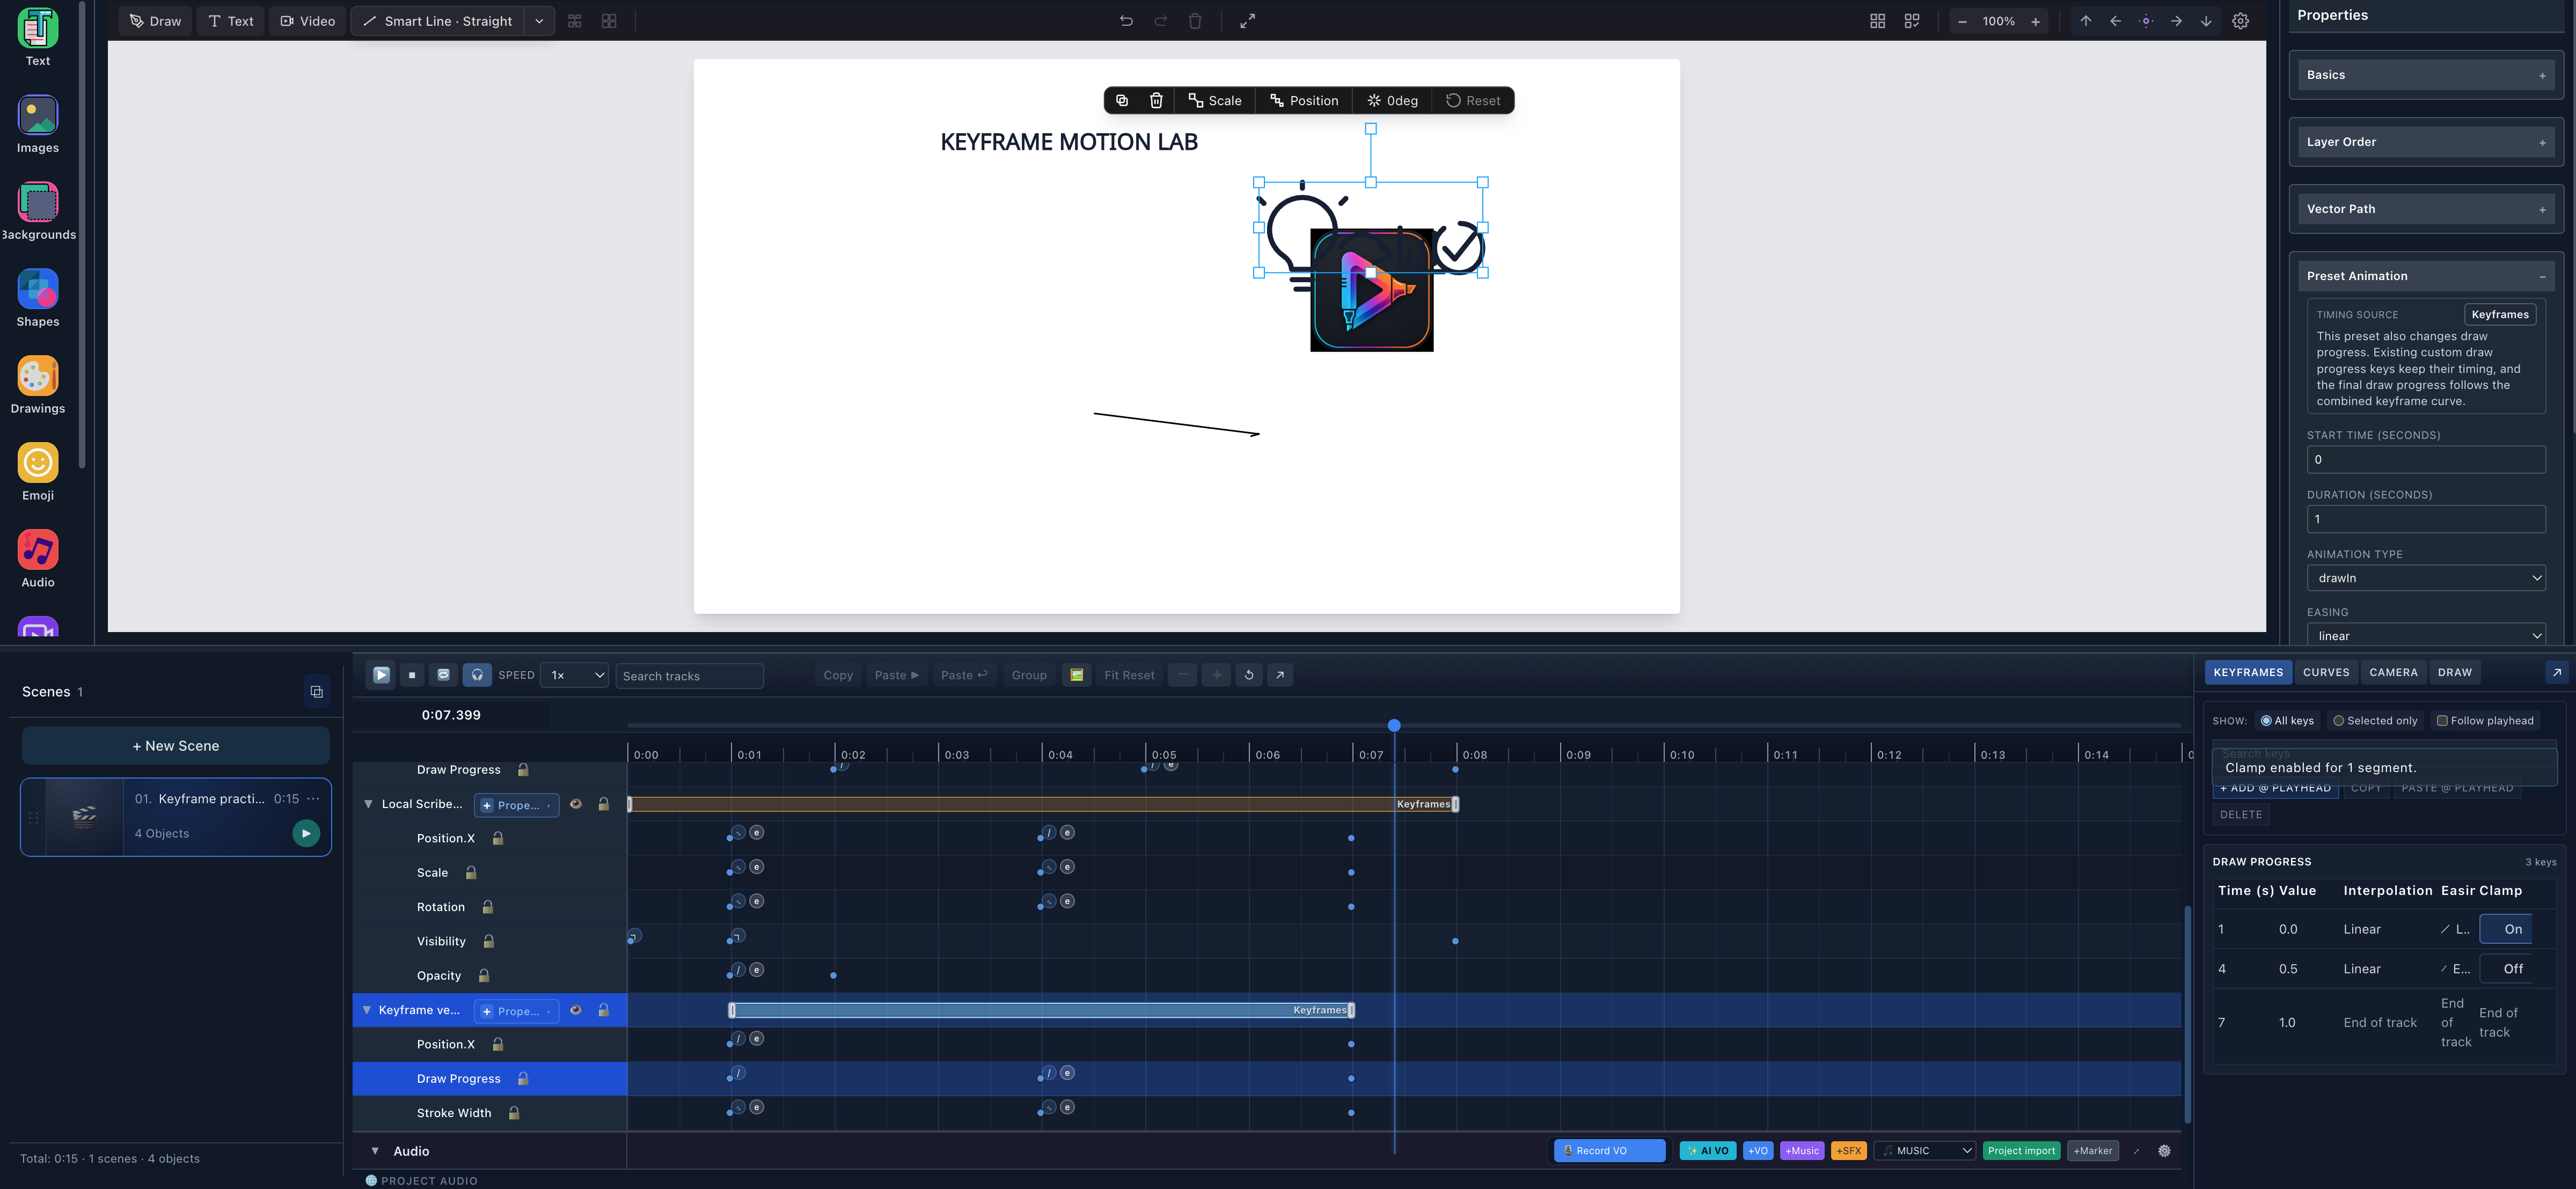
- 0 to 1 valuesDraw Progress uses normalized progress values.
- Clamp OnThe current session toggle applies to this outgoing key span.
The current Clamp toggle reset to Off after Save Locally → reload → Restore and is not stored as project key data in this build. Treat it as editor-session state, not durable project metadata. The article therefore does not promise a saved overshoot-toggle workflow.
Animate position, scale, rotation, and opacity
The image example uses these real keys:
| Property | Key 1 | Key 2 | Key 3 | Result |
|---|---|---|---|---|
| Position.X | 1s → 220 | 4s → 700 | 7s → 1200 | moves across the scene |
| Scale | 1s → 0.8 | 4s → 1.1 | 7s → 1.0 | emphasizes the middle beat |
| Rotation | 1s → -8° | 4s → 8° | 7s → 0° | adds a restrained turn |
| Opacity | 1s → 0 | 2s → 1 | — | fades in |
The 4s Position.X, Scale, and Rotation keys are grouped because they describe one visual beat. The Opacity keys remain independent because the fade finishes earlier.
Animate text with Typewriter Progress
The Text object uses:
1.0s → 0
3.5s → 0.5
6.0s → 1
At about four seconds, the live canvas showed only part of KEYFRAME MOTION LAB. At six seconds, the complete text was visible.
Typewriter Progress keyframes are explicit progress values on a property track. A Typewriter preset is an object-level preset. They may produce a similar reveal, but they are not the same authoring source.
Animate vector Draw Progress
The path-backed vector uses Draw In with no Draw Steps and explicit Draw Progress keys:
1s → 0
4s → 0.5
7s → 1
At the middle key, only part of the real vector route was visible. This is keyframe-driven normalized reveal; it does not choose a drawing hand or semantic stroke order.
Animate Stroke Width on supported objects
The vector uses 8 → 14 → 10. The Smart Arrow uses 2 → 8 → 3. Both changes were visible in the real canvas because these objects expose an eligible stroke path.
An Image and editable Text object do not offer Stroke Width in the current property menu. The support matrix is more reliable than assuming every visible outline is a keyframable stroke.
Visibility is different from opacity
The image Visibility track uses Step keys:
0s → 0
1s → 1
8s → 0
The value holds, then switches. It does not smoothly fade. Use Opacity when the transition itself should be visible.
Preview the combined result
Press Stop to return to scene start, confirm 1×, then Play. The authentic playback capture below was taken at 4.183s while playback was still running:
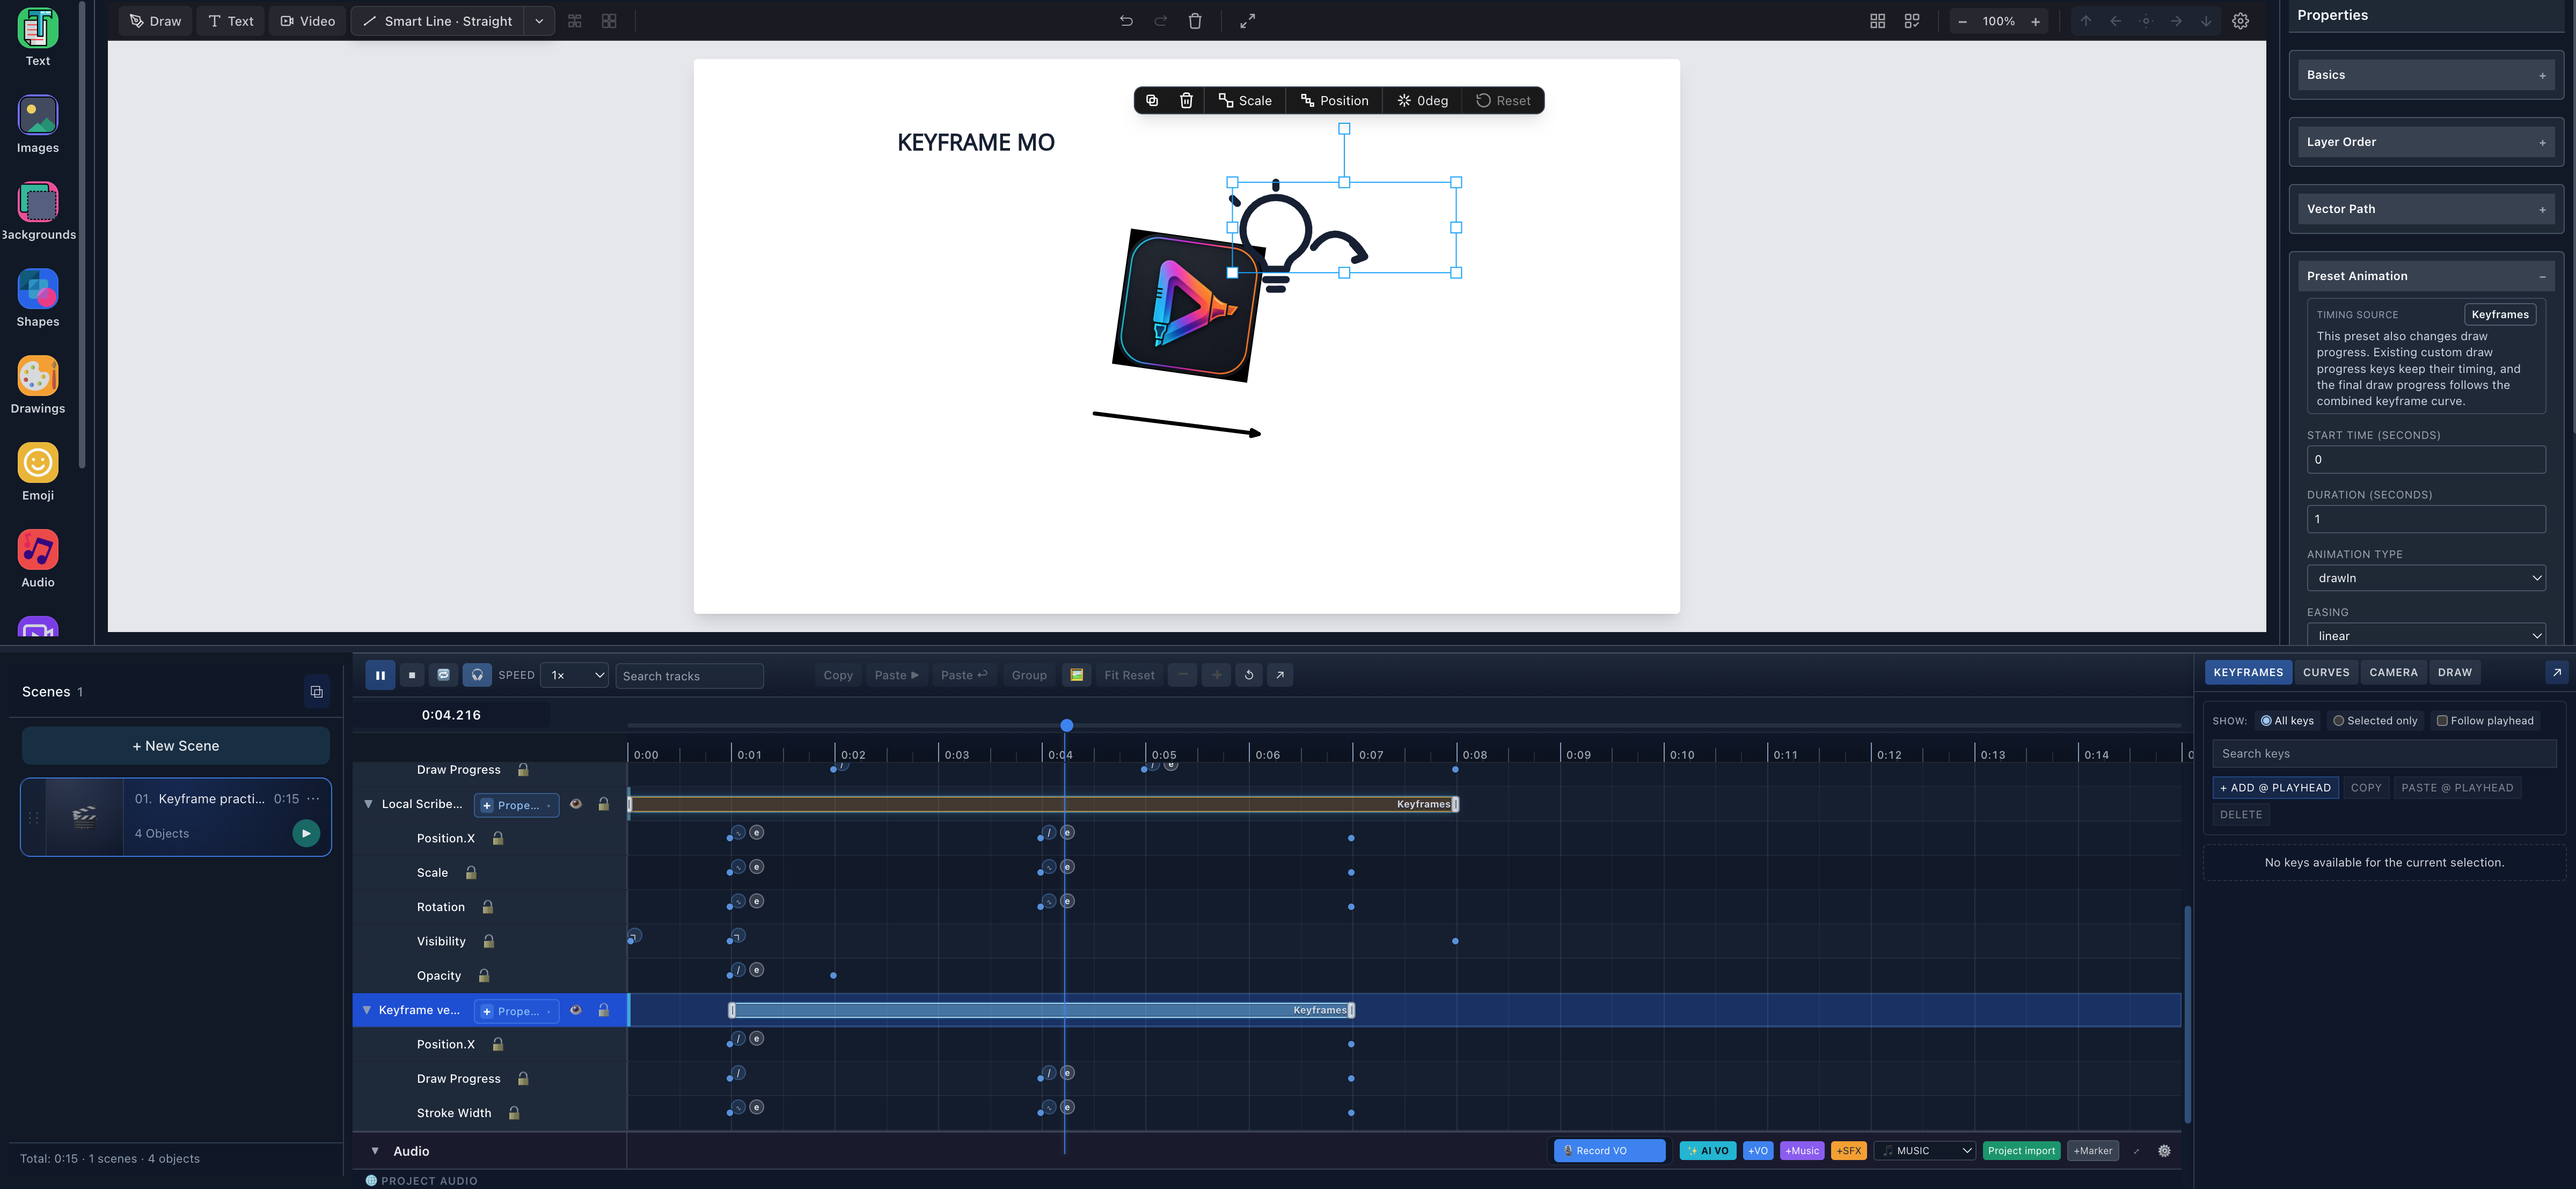
- Partial textTypewriter Progress is between its half and final keys.
- Image transformPosition, scale, rotation, and opacity are sampled together.
- Partial vector routeDraw Progress is near the verified midpoint.
- Playback is runningThe transport shows Pause while the playhead advances at 1x.
Scrub before the first key, between the keys, and after the final key as well. A final key owns a value at and after its time, but it has no following interpolation or easing span; the drawer correctly reports End of track.
What happens when presets and keyframes overlap?
Property keys replace a preset only for the same property. Unrelated sources can coexist:
| Combination | Verified rule |
|---|---|
| Fade In + Position.X keys | Preset opacity and keyed position can combine |
| Fade In + Opacity keys | Opacity keys own opacity |
| Scale In + Scale keys | Scale keys own scale |
| Draw In + Draw Progress keys | Explicit progress keys own reveal unless targeted Draw Steps take authority |
| Draw Steps + transform keys | Draw Steps own targeted reveal; transform keys can still move the object |
Mixed means several timing sources contribute to the object. It does not mean Scribe averages arbitrary animations together. Use the full timing-source matrix when an inspector field reports Preset, Keyframes, Draw Steps, Audio-bound, or Mixed.
For hand-led drawing order, use one SVG with several Draw Steps or the Drawing hands reference. Draw Steps and Draw Progress keys are related reveal tools, but they are not interchangeable.
Export and verify
Choose Export Video (MP4), then use:
- 720p (1280×720);
- 30 fps (Standard);
- High (10 Mbps);
- MP4 (H.264).
The real export completed at 450 frames. Independent ffprobe inspection reported:
codec:      h264
resolution: 1280 × 720
frame rate: 30/1
duration:   15.000 seconds
frames:     450
bytes:      1,903,899
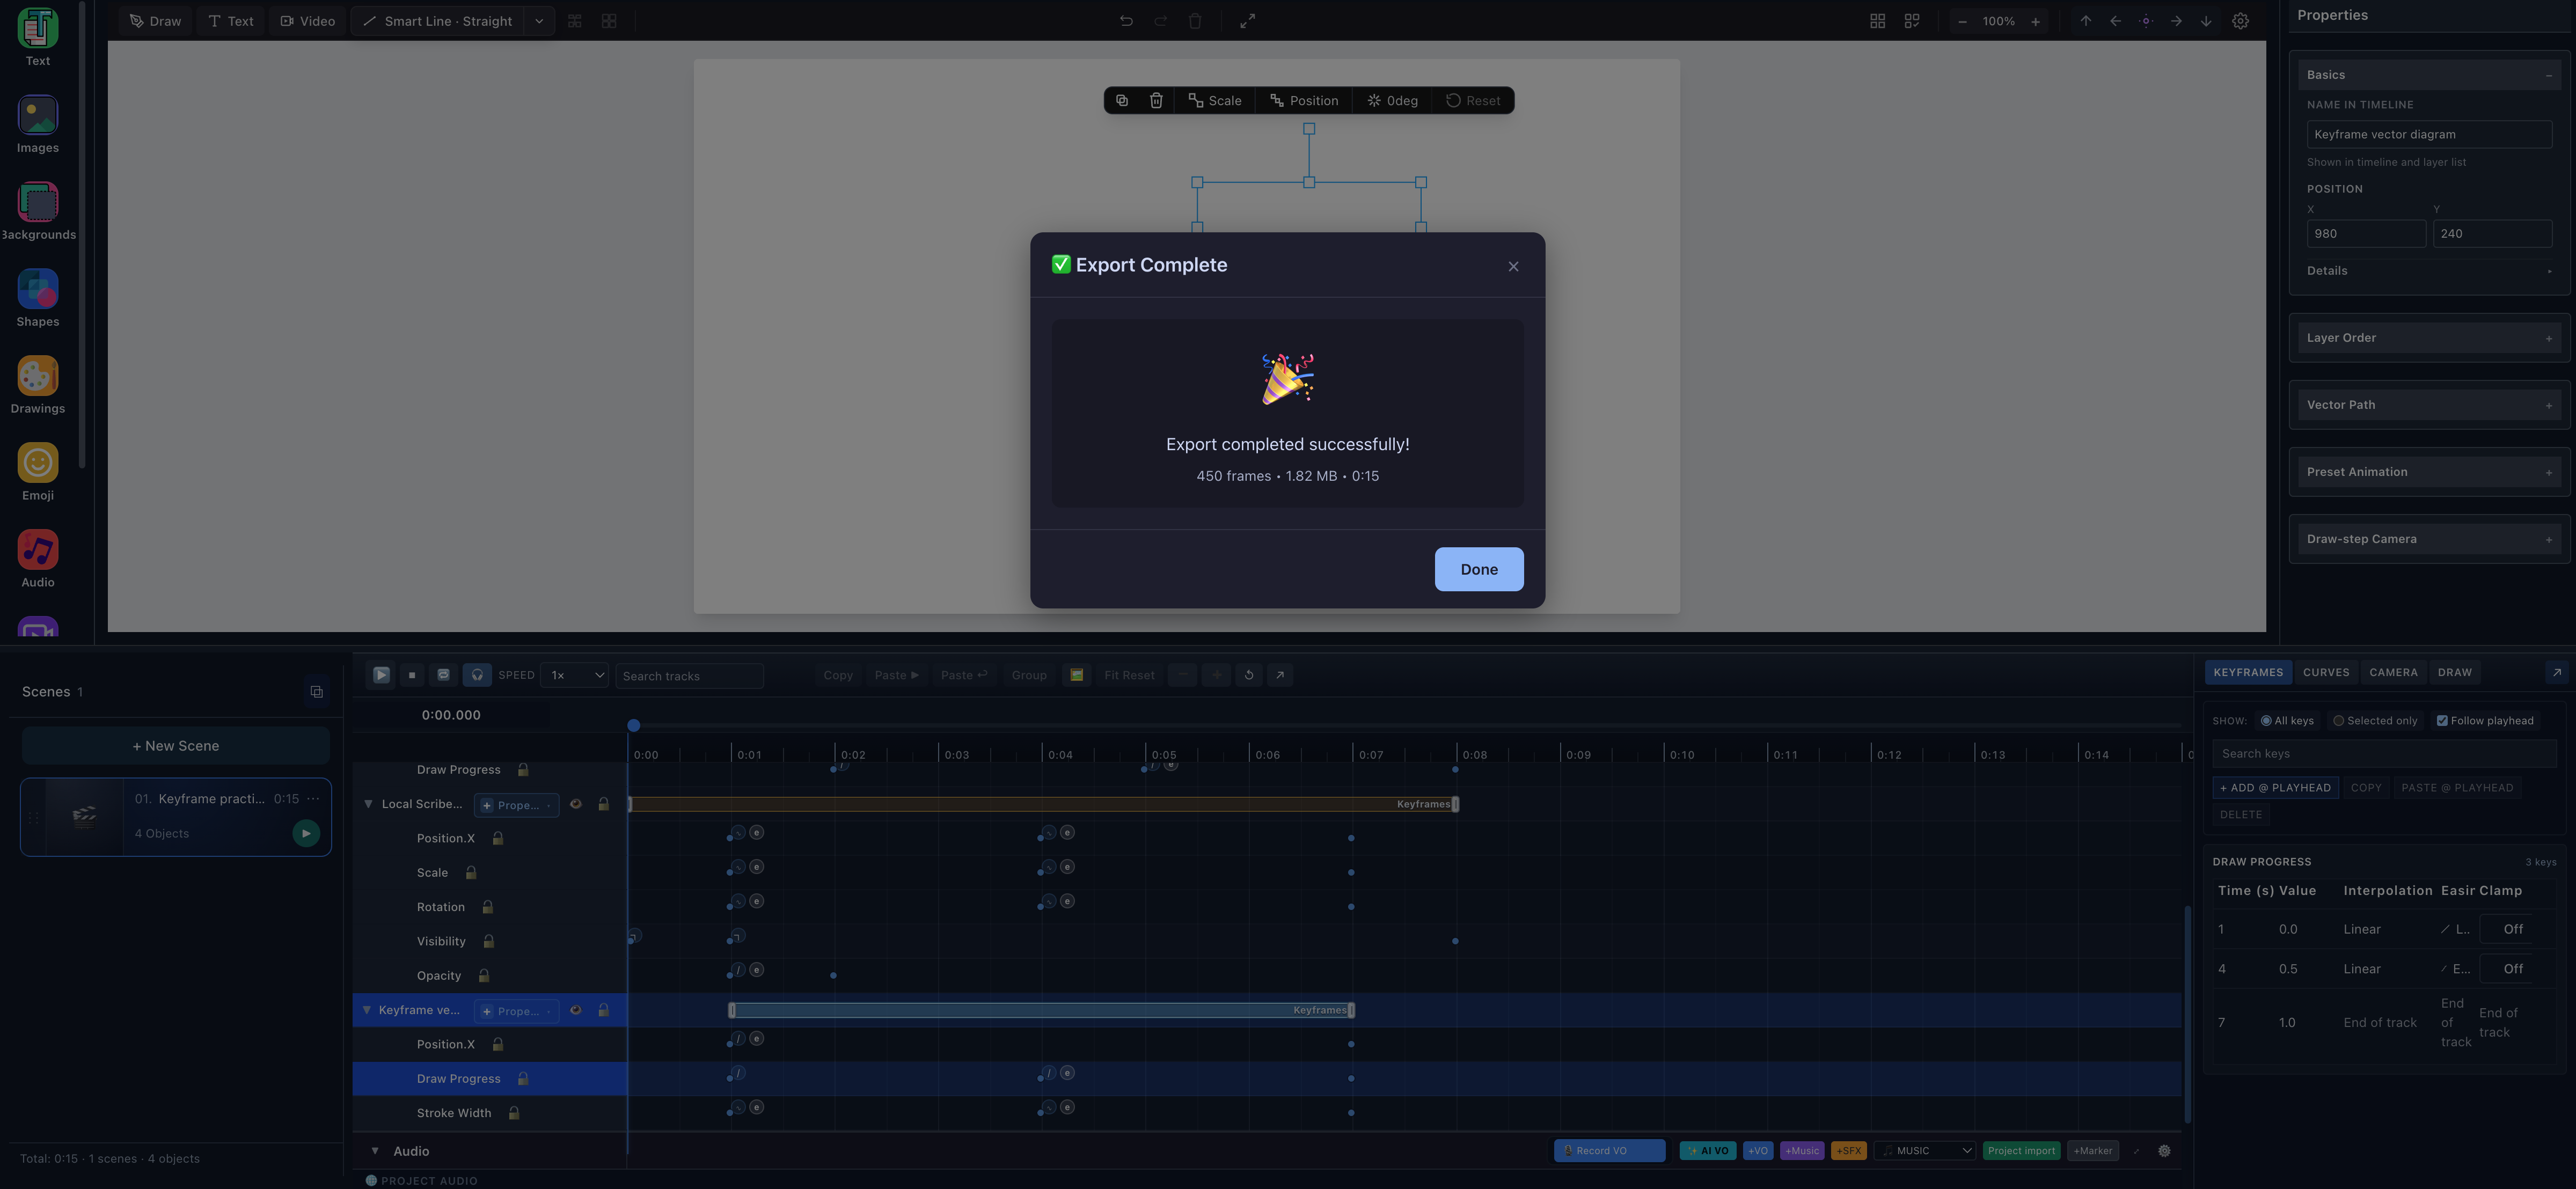
- 450-frame completionThe app reports the expected 15 seconds at 30 fps.
When to use each authoring surface
Use the Keyframes Drawer for:
- exact Time and Value edits;
- checking interpolation and easing;
- applying Custom easing;
- filtering to selected keys;
- seeing group membership and bounded Clamp eligibility.
Use the timeline/dopesheet for:
- judging timing visually;
- right-click or double-click insertion;
- horizontal key dragging;
- Shift/Cmd/Ctrl and marquee selection;
- grouping an animation beat across several property tracks;
- moving, copying, pasting, or deleting several keys quickly.
Current limitations and recovery
- Not every property is available for every object. Use the selected object's + Property menu.
- Visibility is discrete. Use Opacity for a fade.
- Progress properties use bounded
0–1values; Scale and Stroke Width also have lower bounds. - The final key owns no outgoing interpolation span.
- Step interpolation does not use continuous easing like a numeric Linear or Cubic span.
- Grouping binds key times, not values; members stay on their original tracks.
- Locked objects or property tracks reject edits.
- Dense multi-track selection and right-click work are easier on Desktop.
- Mobile Lite has a touch-oriented Animate workflow; this tutorial does not claim Desktop menu parity.
- Custom easing applies only to an eligible continuous span.
- Targeted Draw Steps take authority over Draw Progress; changing transform or opacity keys does not change that reveal ownership.
- The current Clamp toggle is session-only after reload/Restore.
- A temporary Images-library reference did not survive Save/Restore in the test project, so the deterministic image example uses a same-origin first-party app asset.
Try keyframe animation in Scribe Animator
Open Scribe Animator, add one Image, and make only three tracks: Position.X, Scale, and Opacity. Verify that small motion first. Then group one Position/Scale beat, preview at 1×, and add Typewriter or Draw Progress only when the selected object actually exposes it.
For reference tables and timing authority, continue with Animate with the timeline and the Timeline complete guide.