Timeline - Complete Guide
Master the Timeline panel in Scribe Animator for precise animation control. This guide covers playback controls, keyframes, zoom, tracks, and timing for professional animations.
Visual orientation
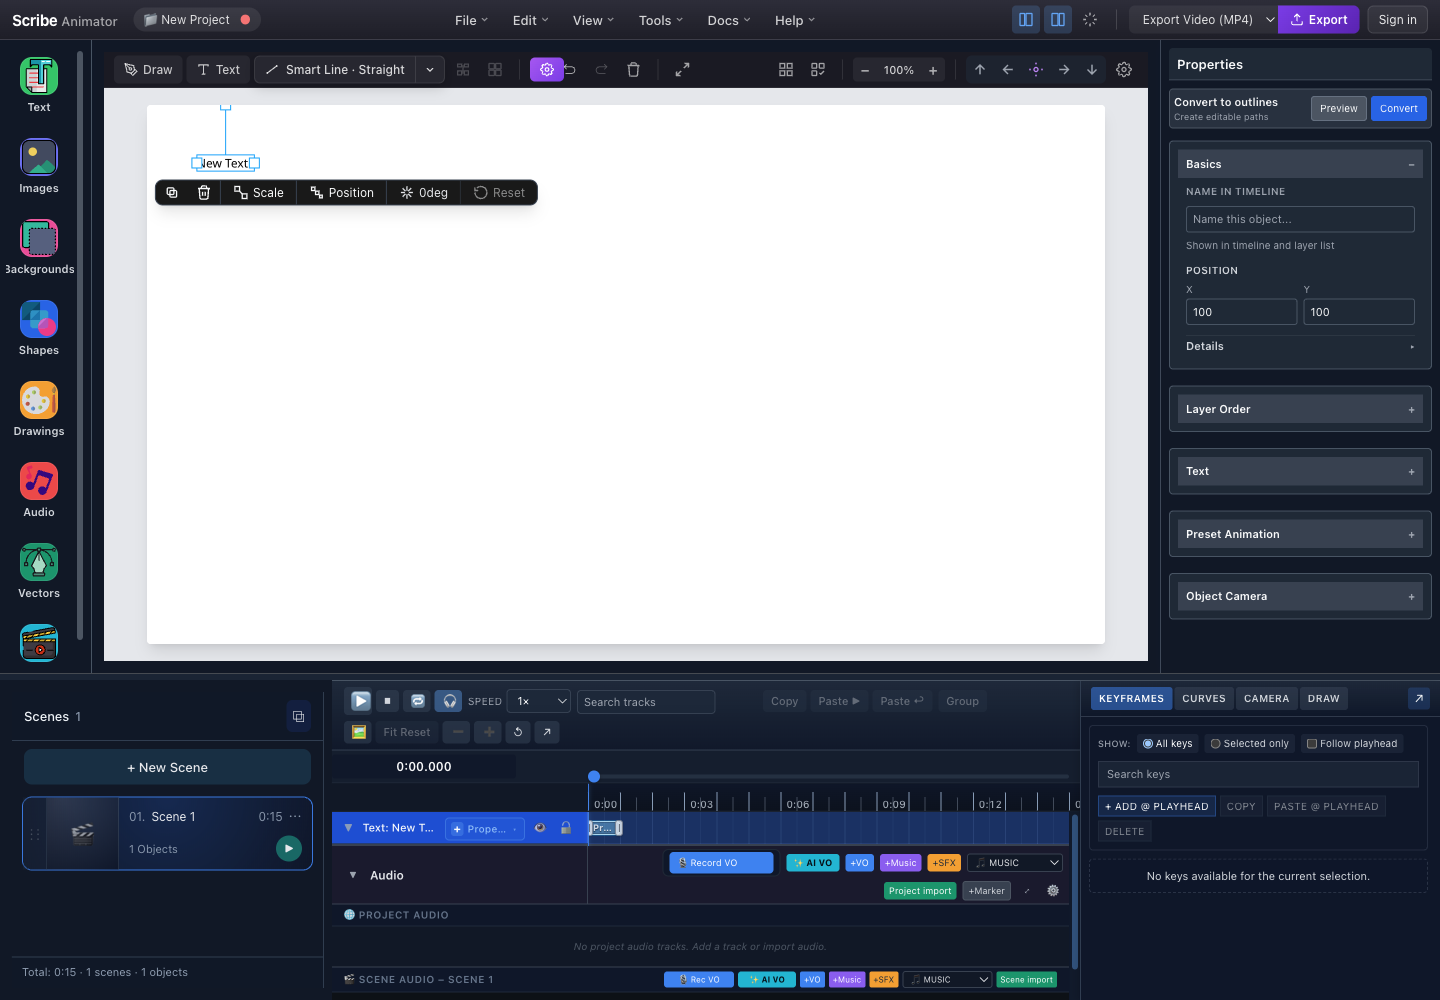
- Canvas selectionThe selected object controls which properties and tracks are editable.
- Properties inspectorExact object values and preset animation controls live here.
- Transport and toolsPreview, loop, speed, search, clipboard, grouping, fit, zoom, and pop-out actions.
- Tracks, ruler, and playheadRows show object timing while the ruler and vertical playhead establish time.
- Detail drawersKEYFRAMES, CURVES, CAMERA, and DRAW edit different timing domains.
This screenshot and its visible labels were checked in the real local Desktop editor at 1440 × 1000 on 26 July 2026. It is not a documentation playground. The reference tables below explain timing relationships; when the text and the installed UI differ, use the visible editor labels.
For a guided first workflow, use Animate with the timeline. This page remains the detailed reference.
Timeline Components
Component Overview
Read the timeline from top to bottom: transport controls, time ruler and playhead, object/property tracks, optional audio lanes, and the domain drawer selected at the right. The selected canvas object determines which inspector values and tracks are editable.
| Component | Description |
|---|---|
| Transport Bar | Playback controls, search, zoom |
| Time Ruler | Time scale with tick marks |
| Playhead | Current time indicator |
| Track List | Object and property tracks |
| Track Meta | Track names and controls |
| Track Lane | Keyframes and animation bars |
| Audio Lane | Audio waveform (toggleable) |
Transport Bar Controls
Playback Controls
| Control | Icon | Function |
|---|---|---|
| Play/Pause | ▶ / ⏸ | Start or pause playback |
| Stop | ⏹ | Stop and return to start |
| Loop | 🔁 | Toggle loop playback |
| Speed | 1× | Change playback rate |
Playback Speeds
| Speed | Use Case |
|---|---|
| 0.25× | Slow motion review |
| 0.5× | Detail inspection |
| 1× | Normal speed (default) |
| 1.5× | Quick preview |
| 2× | Fast preview |
| 4× | Rapid scrub |
Use 0.5× speed to check animation timing details, and 2× speed to quickly preview long animations.
Zoom Controls
Zoom Interface
Use Zoom Out for more context, Reset Zoom for 100%, Zoom In for precision, and Fit All to fit the complete editable time range.
Zoom Levels
| Level | Display | Use Case |
|---|---|---|
| 0.25× (25%) | Entire project overview | Long animations |
| 1× (100%) | Default view | General editing |
| 4× (400%) | Fine detail | Precise keyframe placement |
| 64× (6400%) | Maximum zoom | Frame-by-frame editing |
Zoom Range
The supported range is 0.25× to 64×. Use 0.25× for a project overview, 1× for general editing, and higher levels only when you need fine or frame-level placement.
Scroll wheel on the track area also zooms in/out. Hold Ctrl/⌘ while scrolling for faster zoom.
Time Ruler
The time ruler shows the timeline scale and current position.
Ruler Layout
Major labels establish the time scale, minor ticks subdivide it, and the playhead marks the sampled project or scene time. Tick spacing changes with zoom; do not infer elapsed time from pixel distance without reading the ruler.
Ruler Ticks
| Zoom Level | Major Ticks | Minor Ticks |
|---|---|---|
| Overview (0.25×) | 10 seconds | 5 seconds |
| Normal (1×) | 5 seconds | 1 second |
| Detailed (4×) | 1 second | 0.5 seconds |
| Frame-level (16×+) | 0.5 seconds | 0.1 seconds |
Clicking the Ruler
| Action | Effect |
|---|---|
| Click | Jump playhead to that time |
| Drag | Scrub through timeline |
| Double-click | Set in/out range (with Shift) |
Playhead
The playhead indicates the current time position.
Playhead Features
The draggable handle sits on the ruler, while its vertical line continues through the track area. Together they show which object values, camera state, draw step, and audio position are sampled at the current time.
Playhead Operations
| Action | How To |
|---|---|
| Move playhead | Click on ruler or drag handle |
| Scrub | Drag playhead left/right |
| Jump to start | Press Home or click ⏹ |
| Jump to end | Press End |
| Step frame | Arrow keys (← →) |
Tracks
Tracks represent objects and their animatable properties.
Track Types
| Track Type | Icon | Description |
|---|---|---|
| Object Track | 📦 | Main track for scene objects |
| Property Track | ↳ | Sub-track for specific properties |
| Audio Track | 🎵 | Audio clips and waveforms |
Track Structure
| Hierarchy level | Examples | Behavior |
|---|---|---|
| Object track | Text Object, Image Object | Owns visibility, lock, collapse, and the object's timing row |
| Property track | Position X, Position Y, Opacity, Scale, Rotation | Holds keyframes for one animatable value beneath its object |
Track Meta Controls
| Control | Icon | Function |
|---|---|---|
| Visibility | 👁 | Show/hide object |
| Lock | 🔒 | Prevent editing |
| Collapse | ▼ | Expand/collapse property tracks |
Keyframes
Keyframes define animation values at specific times.
Keyframes can coexist with preset animation and Draw timing on the same object, but they do not all drive the same properties or ranges. Use Timing-source combinations to identify the active timing owner before moving keys or changing a preset.
Keyframe Types
| State | Meaning |
|---|---|
| Standard keyframe | Defines a property value at its time |
| Empty keyframe | Marks time without introducing a changed value |
| Selected keyframe | Included in the next edit, move, copy, or delete action |
| Animation span | The interval interpolated between two value-defining keyframes |
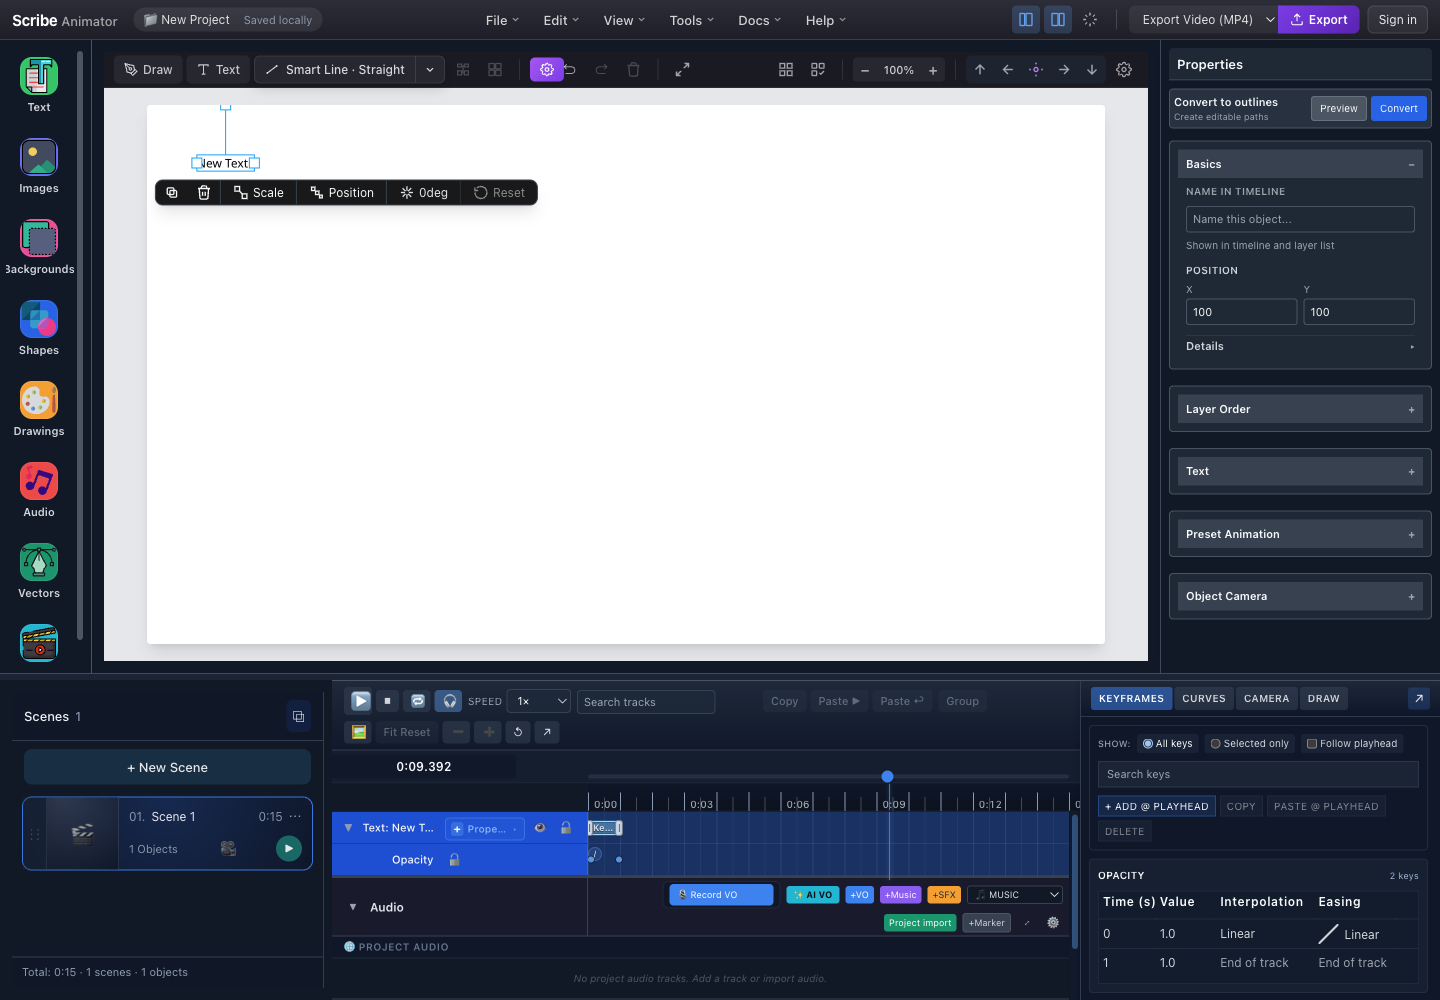
- Selected property trackOpacity is expanded beneath the selected text object.
- Ruler and playheadThe vertical playhead samples the selected track at the displayed time.
- KEYFRAMES drawerThe selected drawer exposes filtering, search, add/copy/paste actions, and the property key table.
- Two-key tableTime, value, interpolation, and easing describe the real Opacity keys.
Adding Keyframes
| Method | How To |
|---|---|
| Auto-key | Change object property at playhead |
| Click track | Click at desired time position |
| Right-click menu | Insert Keyframe at Playhead |
| Keyboard | Press K at current time |
Keyframe Operations
Right-click a keyframe to open the actions available in the current context:
| Action | Result |
|---|---|
| Edit Value | Change the value stored at that time |
| Copy Keyframe | Copy the selected keyframe data |
| Paste Keyframe | Paste copied data at the eligible destination |
| Duplicate Keyframe | Create another keyframe from the selected one |
| Ease In, Ease Out, Ease In-Out | Apply the corresponding transition behavior |
| Delete Keyframe | Remove the selected editable keyframe |
Selecting Multiple Keyframes
- Shift-click additional keyframes to extend the current selection.
- Marquee-select by dragging around multiple visible keyframes.
- With the intended track focused, use
Ctrl/⌘ + Ato select all eligible keyframes in that context. - Confirm the visible selected state before moving or deleting the group.
Animation Curves
Control how values change between keyframes.
Easing Types
| Easing | Effect |
|---|---|
| Linear | Constant speed |
| Ease In | Starts slow, ends fast |
| Ease Out | Starts fast, ends slow |
| Ease In-Out | Smooth start and end |
Curve Visualization
| Curve | Start of span | Middle of span | End of span |
|---|---|---|---|
| Linear | Immediate constant rate | Constant rate | Stops at the same rate |
| Ease In | Slow | Accelerates | Fast |
| Ease Out | Fast | Decelerates | Slow |
| Ease In-Out | Slow | Fastest near the middle | Slow |
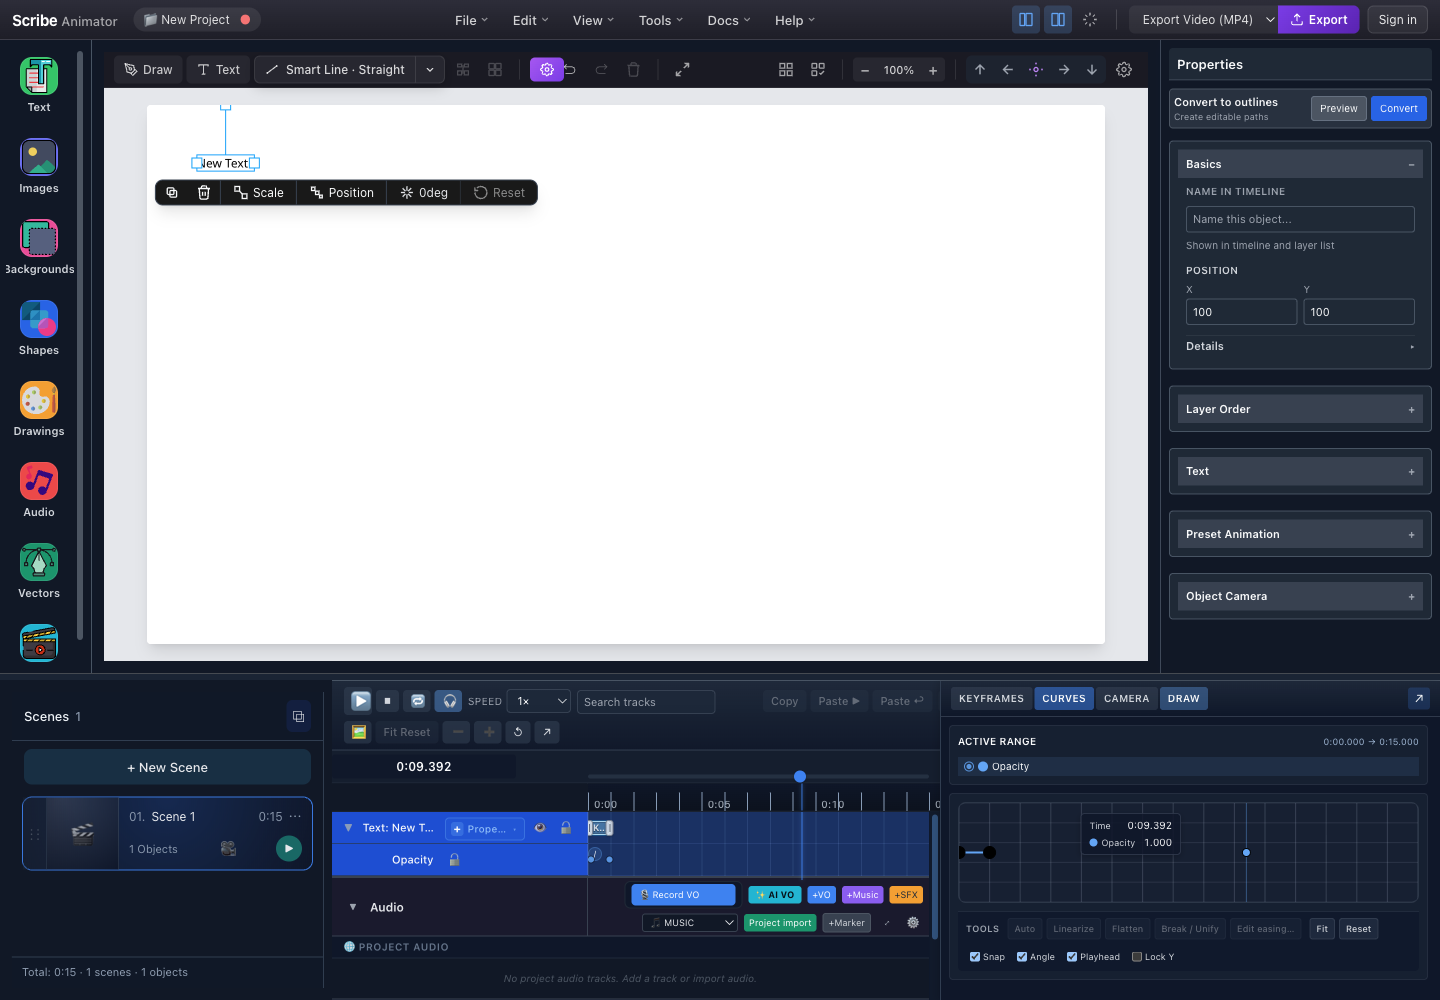
- CURVES tabSwitches the detail area from the key table to the curve editor.
- Active rangeIdentifies the property and time range shown by the graph.
- Curve graphPlots the selected property value against time.
- Curve toolsSnap, angle, playhead, lock, fit, reset, and available easing actions operate on the selected curve context.
Opening Curve Editor
- Select the object and property track you want to edit.
- Open the CURVES drawer beside KEYFRAMES, CAMERA, and DRAW.
- Select the relevant keyframe span.
- Adjust the curve while watching its value and time axes.
- Preview the span at normal speed before adding more keyframes.
Searching and Filtering
Find specific tracks and keyframes quickly.
Search Interface
Enter an object name, property, track label, or multiple terms in the transport search field. Clear the query with the visible clear action to restore the complete track list.
Search Features
| Search For | Example |
|---|---|
| Object name | "Title" |
| Property type | "opacity" |
| Track type | "position" |
| Multiple terms | "text scale" |
Use search to quickly navigate to specific objects in projects with many tracks.
Docking Options
The current Desktop workspace opens the Timeline at the bottom. It can also be detached as a floating panel when more canvas space or a second monitor is available.
Dock Positions
| Position | Best For |
|---|---|
| Bottom (default) | Wide timeline view |
| Floating | Multi-monitor setups |
Older projects or stored layouts can contain a legacy right value. The current layout sanitizer opens that value as floating, so do not rely on a right-docked timeline in a tutorial.
Dock Toggle
When the timeline is bottom-docked, choose the visible undock action to make it floating. In floating mode, choose the dock action to return it to the bottom workspace.
Resizing
| Direction | How To |
|---|---|
| Height (bottom dock) | Drag top edge |
| Both (floating) | Drag any edge or corner |
Size Limits
| Dimension | Minimum | Maximum |
|---|---|---|
| Height | 220 px | 720 px |
| Width | 280 px | 960 px |
Keyboard Shortcuts
Shortcut handling is focus-sensitive. The installed editor's Help → Keyboard Shortcuts modal is the source of truth.
| Shortcut | Confirmed timeline context |
|---|---|
Space | Play or pause when the main timeline owns focus |
Delete / Backspace | Delete selected editable keys |
Ctrl/⌘ + C | Copy selected keys |
Ctrl/⌘ + V | Paste copied keys at the playhead |
Hold Space and drag | Temporarily pan the curve editor |
X / Y during a curve drag | Constrain the active drag to one axis |
Escape during a curve drag | Cancel the active drag |
Inputs, text fields, the canvas, and other panels can own the same keys. Click the intended timeline area first and confirm the visible selection before a destructive command. See Shortcuts and accessible editing for the browser-verified shortcut modal.
Timeline Drawers
Advanced editing tools in collapsible drawers.
Available Drawers
| Drawer | Icon | Purpose |
|---|---|---|
| Keyframes | ◆ | Bulk keyframe editing |
| Curves | 📈 | Easing curve editor |
| Camera | 🎥 | Scene camera tracks |
| Draw | ✏️ | Draw animation settings |
Drawer Layout
The tab row switches one shared detail area between keyframe lists, curve editing, camera authoring, and draw-step planning. Closing a drawer hides its detail area; it does not remove the underlying project data.
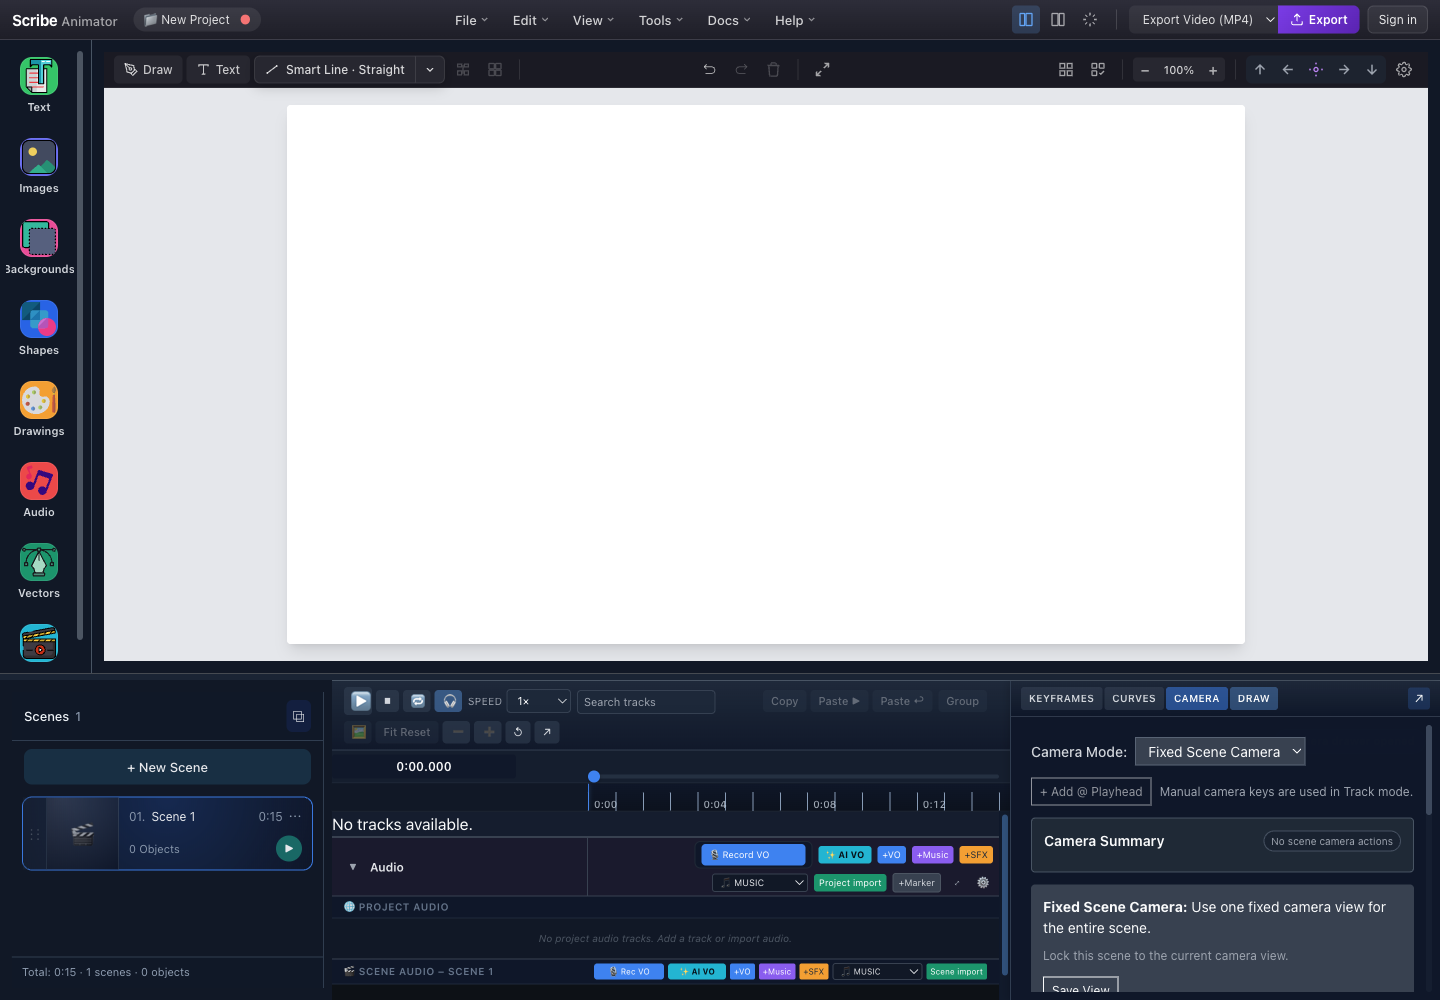
- CAMERA tabSwitches the shared detail area to camera authoring.
- Camera controlsThe selected mode determines the controls shown beneath the summary.
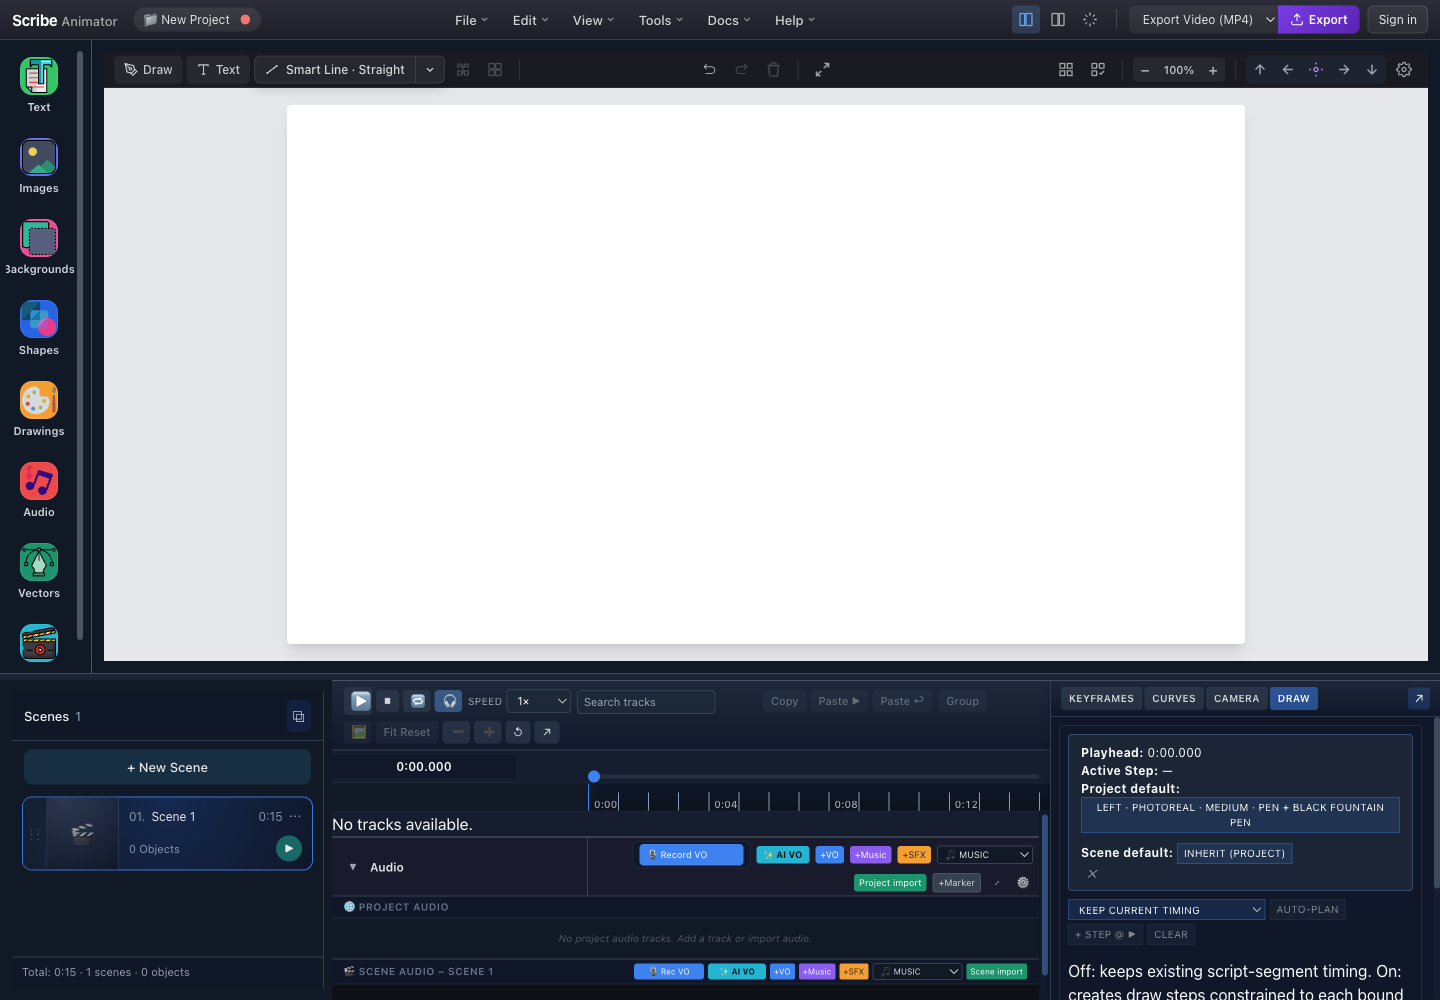
- DRAW tabSwitches the shared detail area to draw-step planning.
- Planning actionsAuto-plan, add-step, clear, and precompute actions operate on the active scene.
Camera and Draw ownership
The Camera and Draw drawers share the same scene timing, but they do not own the same actions:
| Source | Where it is edited | What CAMERA reports |
|---|---|---|
| Manual camera key | CAMERA → + Add @ Playhead and the key table | M |
| Object Camera | Selected eligible object → Properties → Object Camera | O |
| Draw-step Camera | DRAW → expanded step → Camera | D |
All three run only when the scene's Camera Mode is Track. Fixed, Follow Hand, and Follow Object preserve the Track but leave those actions inactive. An Object Camera range overlapping a Draw-step Camera range is blocking; a manual-key overlap produces a warning and the manual key can take priority.
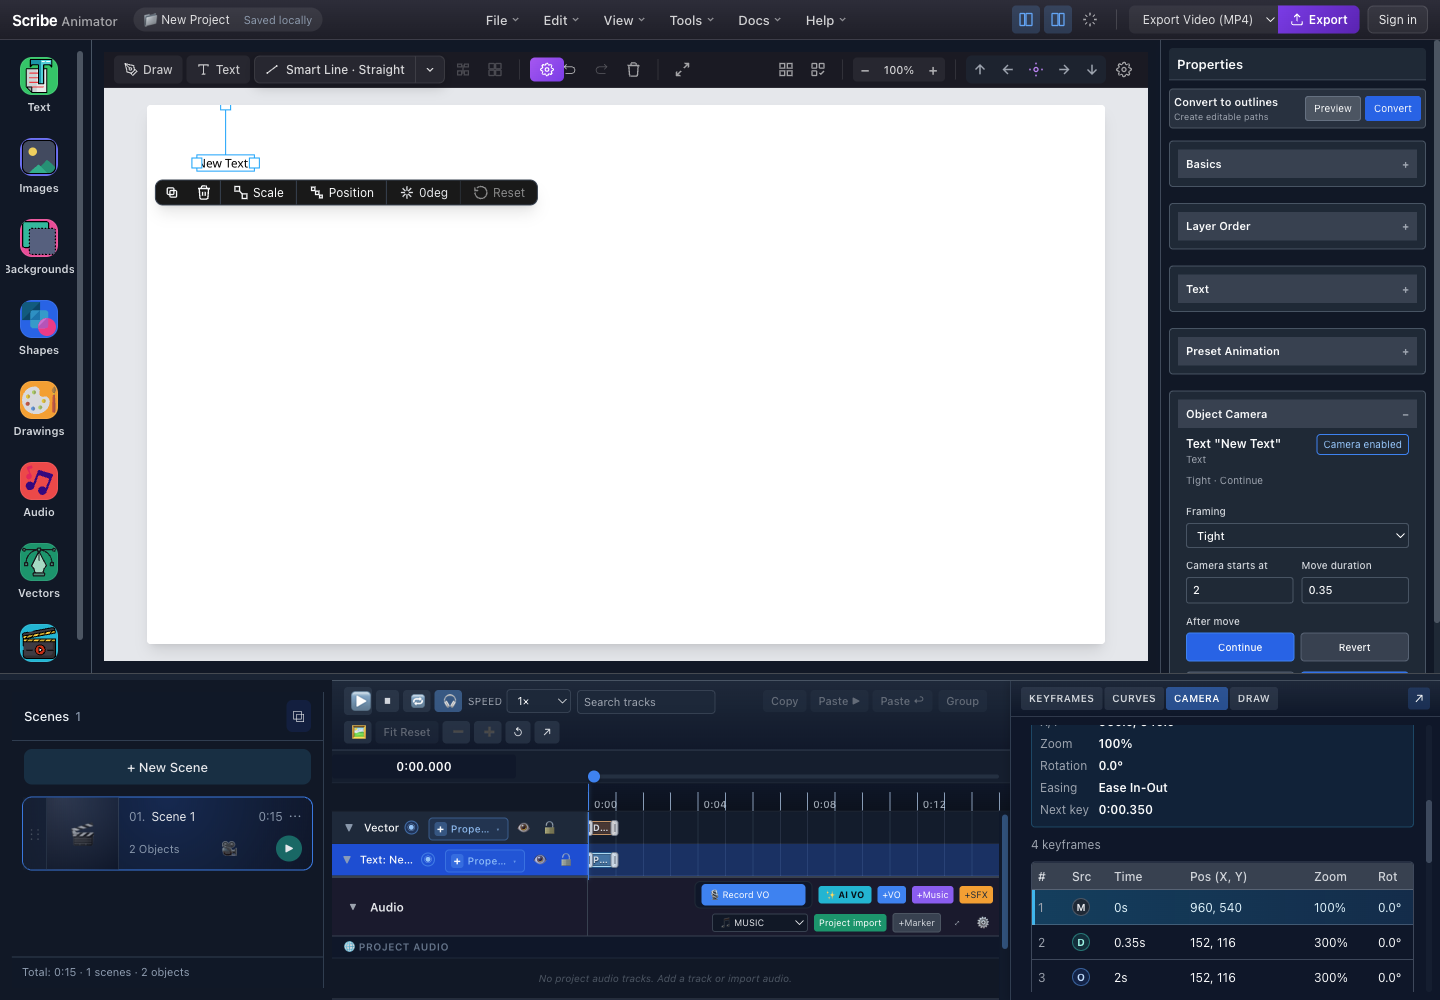
- CAMERA drawerInspect every camera source against the shared playhead.
- M, D, O sourcesManual, Draw-step, and Object keys are time-sorted in the same table.
- Object source editorThe selected object’s Properties panel remains the correct place to update Object Camera.
See How the camera systems interact for the complete comparison, generated-action timing, Follow Object distinction, overlap matrix, and recovery steps.
Pop-Out Windows
Each drawer can be detached as a floating window:
- Click [Pop Out ⧉] in drawer
- Drawer becomes floating window
- Position anywhere on screen
- Click [Dock] to return
Audio Lane
View and edit audio clips synchronized with your animation.
Audio Lane Interface
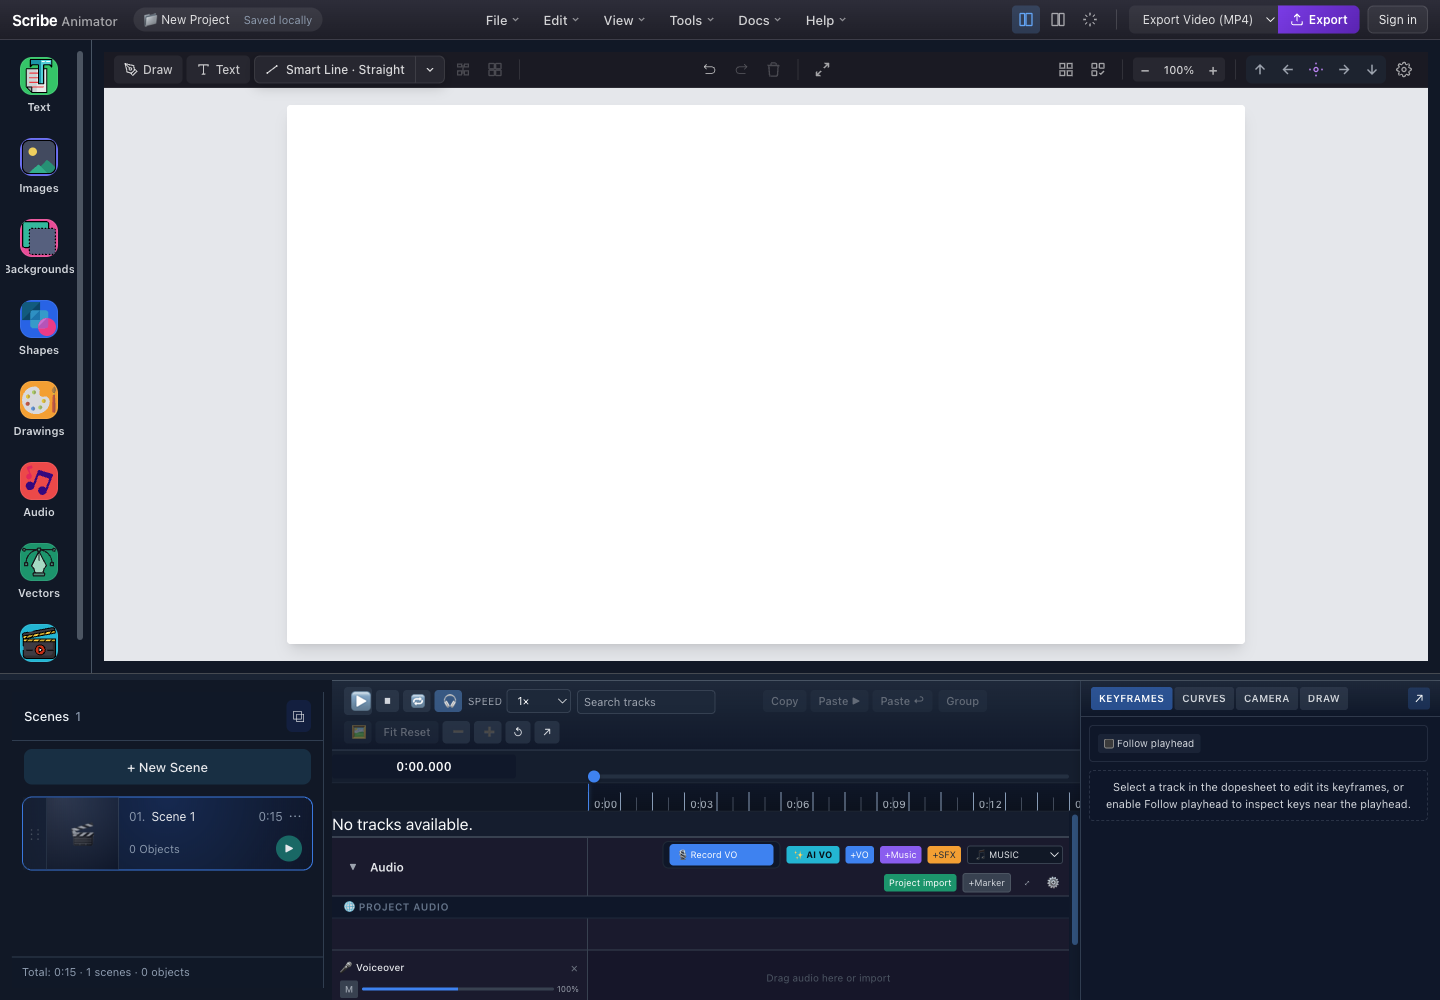
- Created audio trackThe track header identifies role and exposes the controls supported by the current build.
- Clip laneClips, waveforms, and timing are read against the shared ruler and playhead.
Music, SFX, and voiceover tracks can contain different clip lengths and offsets. Waveforms are timing aids; preview the project to verify actual loudness and synchronization.
Placing or recording a clip does not automatically create a script segment or object binding. See Audio binding when animation or Draw timing must follow a narration segment.
Toggling Audio Lane
Use the visible Audio toggle in the timeline controls to show or hide the lane. Hiding it changes the workspace view, not whether placed clips play.
Common Workflows
Workflow 1: Basic Animation
- Position the playhead at the animation start.
- Change the selected object's property to establish its starting value.
- Move the playhead to the intended end time.
- Change the property again to establish its ending value.
- Confirm that the expected keyframes were created, then preview the span.
Workflow 2: Precise Timing Adjustment
- Zoom to 4× or higher until the timing interval is easy to target.
- Select the keyframe or keyframes.
- Drag to the required time while checking the ruler.
- Preview at normal speed to verify timing and easing.
Workflow 3: Copy Animation
- Select the source keyframes in their track.
- Copy them with
Ctrl/⌘ + C. - Select the compatible destination track and position the playhead.
- Paste with
Ctrl/⌘ + V. - Verify the pasted values and timing before previewing.
Troubleshooting
Playback Issues
| Issue | Cause | Solution |
|---|---|---|
| Playback stutters | Complex animation | Reduce object count or effects |
| Wrong speed | Speed not reset | Press K to reset to 1× |
| Doesn't loop | Loop disabled | Click 🔁 to enable |
Keyframe Issues
| Issue | Cause | Solution |
|---|---|---|
| Can't add keyframe | Object locked | Unlock object (🔒) |
| Keyframe not visible | Wrong zoom | Zoom out or use Fit All |
| Values not animating | Only one keyframe | Add second keyframe |
Zoom Issues
| Issue | Cause | Solution |
|---|---|---|
| Can't zoom more | At limit | Max is 64×, min is 0.25× |
| Lost position | Over-zoomed | Use "Fit All" to reset view |
| Timeline blank | Zoomed too far | Reset zoom with 0 key |
Best Practices
Timing
- Start simple — Add keyframes at start and end first
- Use easing — Linear motion looks robotic
- Overlap animations — Stagger starts for natural flow
- Preview often — Check timing at different speeds
Organization
- Name tracks — Use descriptive object names
- Collapse unused — Keep view clean
- Group related — Keyframes for complex animations
- Use scenes — Break long animations into scenes
Performance
- Limit keyframes — Use only what's needed
- Avoid micro-adjustments — Small changes add complexity
- Use appropriate zoom — Don't over-zoom for simple edits
- Close drawers — When not in use
Pro tip: Use the Curves drawer to fine-tune easing rather than adding extra keyframes for smooth acceleration/deceleration.
Summary
| Feature | Location | Purpose |
|---|---|---|
| Transport Bar | Top of timeline | Playback and zoom controls |
| Time Ruler | Below transport | Time scale and navigation |
| Playhead | On ruler | Current time position |
| Track List | Main area | Object and property tracks |
| Keyframes | On tracks | Animation values at time |
| Audio Lane | Below tracks | Audio visualization |
| Drawers | Right side | Advanced editing tools |
The Timeline is the heart of animation control in Scribe Animator. Master it to create precise, professional whiteboard animations with perfect timing.
Related documentation:
- Timing-source combinations — preset, Draw, and keyframe ownership
- Drawing hands and shot planning — draw-step timing
- Camera modes and path following — camera timing
- Audio binding — segment-to-object timing
- Shortcuts and accessible editing — current shortcut reference