Create your first animation
This tutorial takes you from the editor welcome screen to a saved, previewed animation. It uses a title and a second scene so you learn the same project, canvas, inspector, scene, timeline, and export boundaries used by larger productions.
What this workflow is for
Use this workflow when you want to:
- learn the editor without starting from a complex template;
- make a short title card, announcement, or explainer;
- confirm that saving and export work on your browser and device; or
- establish a clean project before following a feature-specific guide.
Starting with one text object is useful because selection, transformation, timing, scenes, and export remain easy to inspect. Add complex artwork and audio only after this basic loop works.
Before you start
You need:
- a supported desktop browser with enough space to show the canvas and timeline;
- permission to download files if you plan to export a
.scribebackup or video; and - a Scribe account only if you want to use the synced project library.
You do not need to sign in to create a blank project, save a local checkpoint, export a .scribe package, or render through a locally available exporter.
1. Choose how to begin
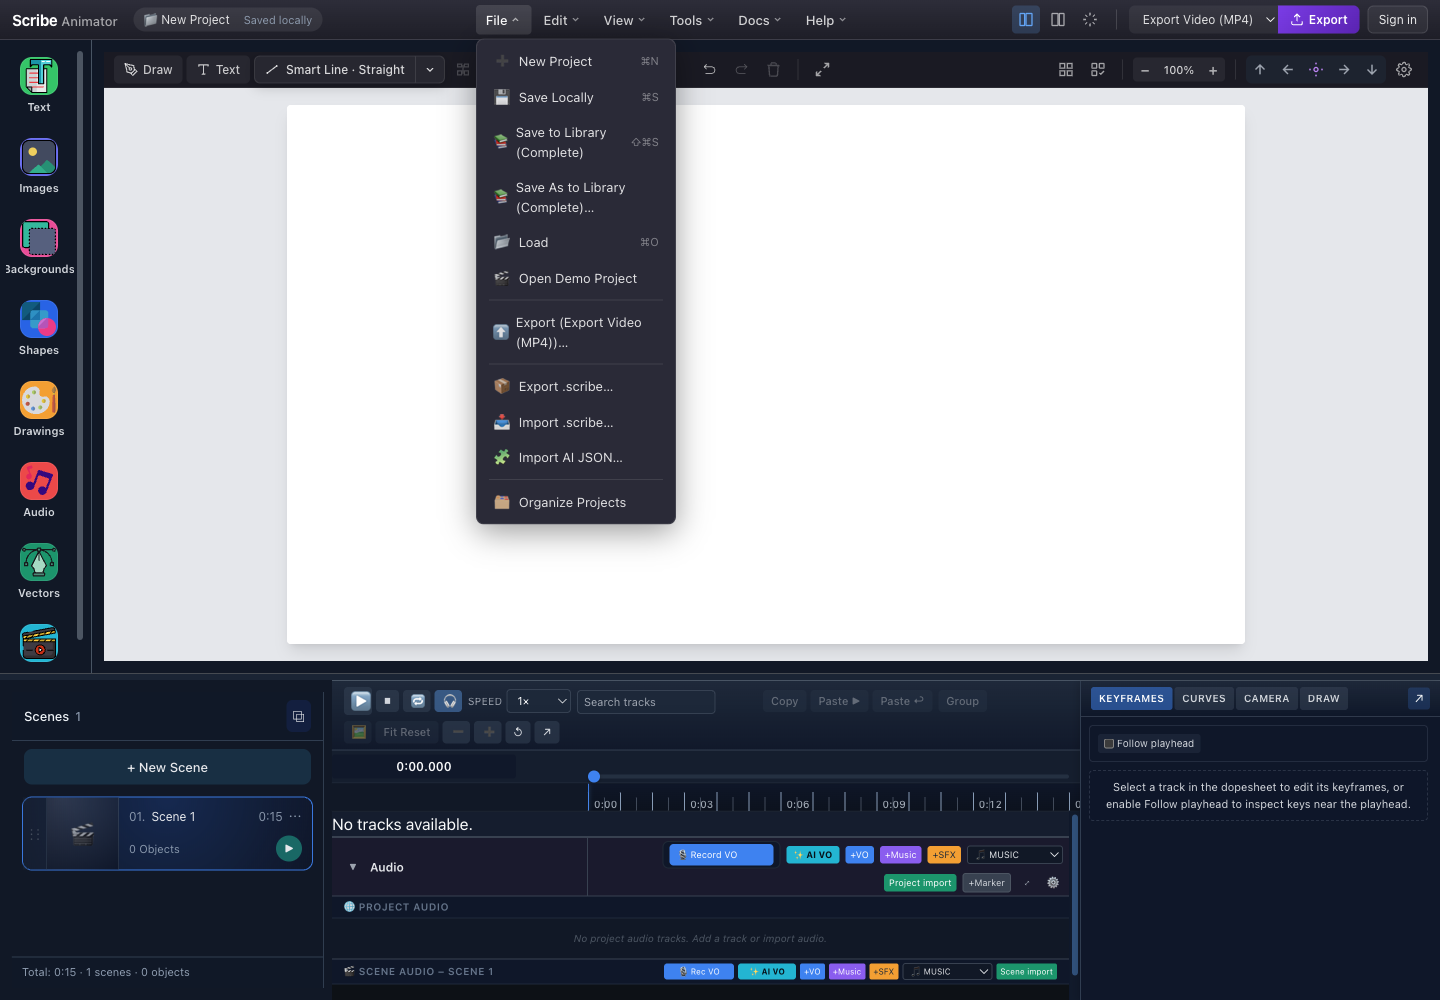
- New ProjectOpens the project/template chooser. Choose Blank project for this tutorial.
- Save LocallyCreates a browser-local checkpoint. Use it after your first meaningful edit.
- Load ProjectOpens the signed-in project library when you want existing work instead of a blank project.
- Export .scribeDownloads the portable editable backup used near the end of this tutorial.
- On the welcome screen, select Create New Project. If the editor is already open, choose File → New Project, then Blank project.
- Wait until the editor shows a blank canvas and one scene.
- Confirm the project badge in the header reads New Project.
If you are already editing, use File → New Project, then choose Blank project in the template chooser. Scribe shows an unsaved-work confirmation when replacing a dirty project; cancel and create a backup first if the current work matters.
Expected result: a blank project named New Project, one active scene, an empty timeline, and no selected object.
2. Add a title
The fastest desktop path is the Text button in the canvas toolbar. It inserts a default New Text object and selects it. The left-side Text library is different: choosing a text preset or block adds that prepared item immediately.
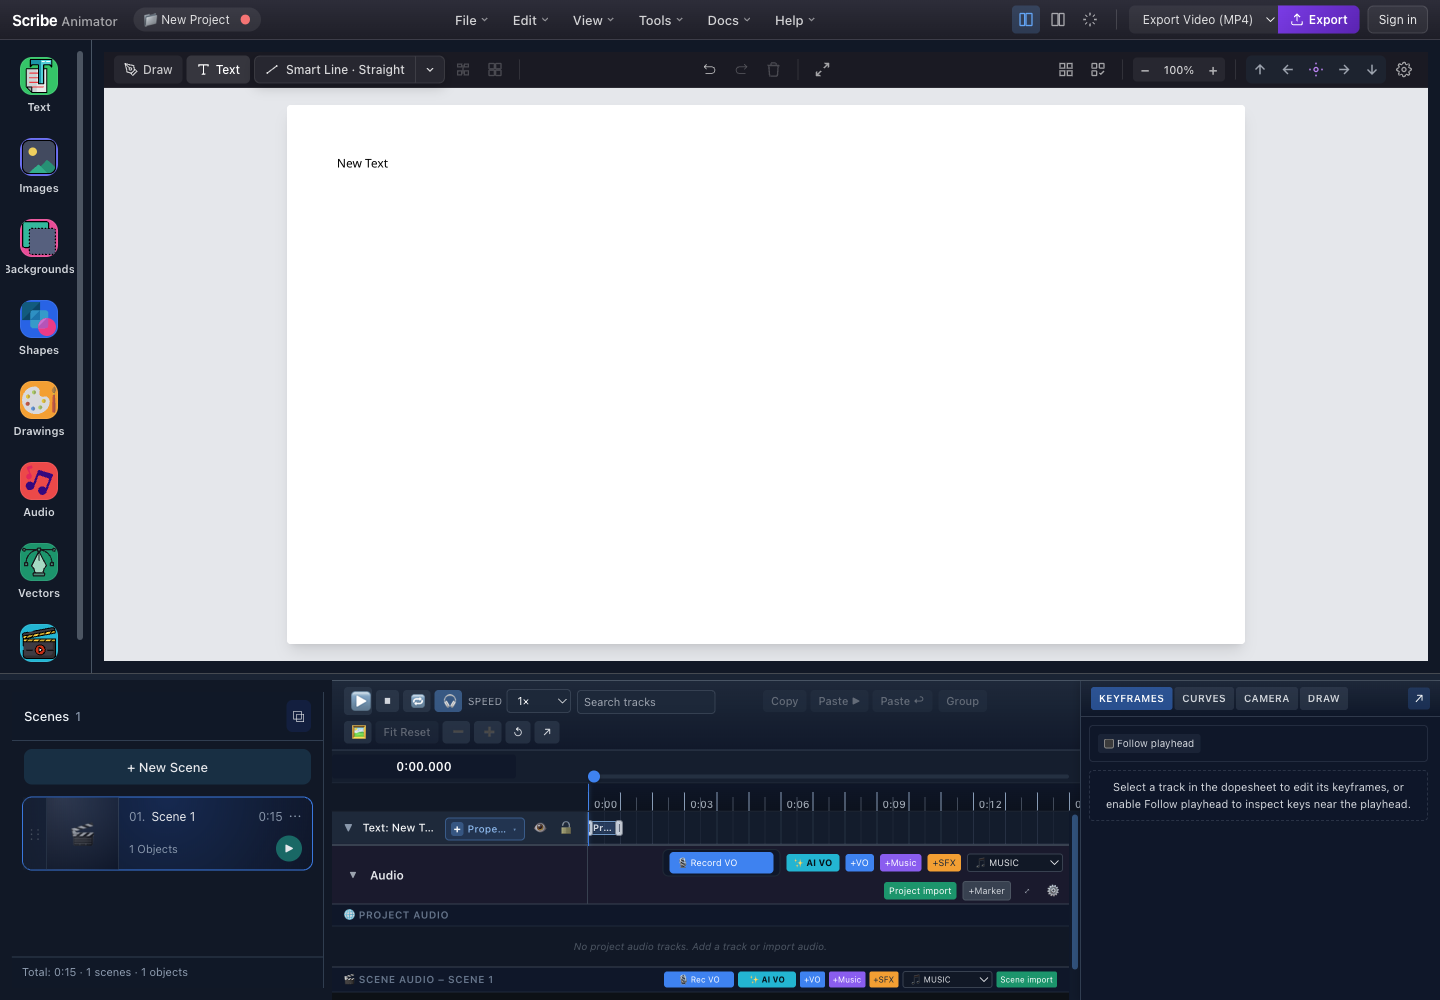
- Text toolbar buttonAdds the default New Text object at the active scene and playhead position.
- Selected titleThe canvas object can now be moved; its selection also drives the inspector and timeline.
- Active sceneThe object belongs to Scene 1. The card reports the scene duration and object count.
- Text timeline trackThe track represents the same selected canvas object and exposes its timing.
- Select Text in the top canvas toolbar.
- Confirm that
New Textappears on the canvas. - Click the object if it is not already selected.
- Drag it to a clear position within the white canvas.
- Do not drag it into the gray pasteboard; content outside the canvas is not part of the visible frame.
Expected result: the title is selected, the scene reports one object, and a text track is visible.
3. Change the words and appearance
Selecting an object opens the right-side Properties panel. The floating toolbar is for quick duplicate, delete, scale, position/layer, and rotation reset actions; the inspector is for named and numeric properties.
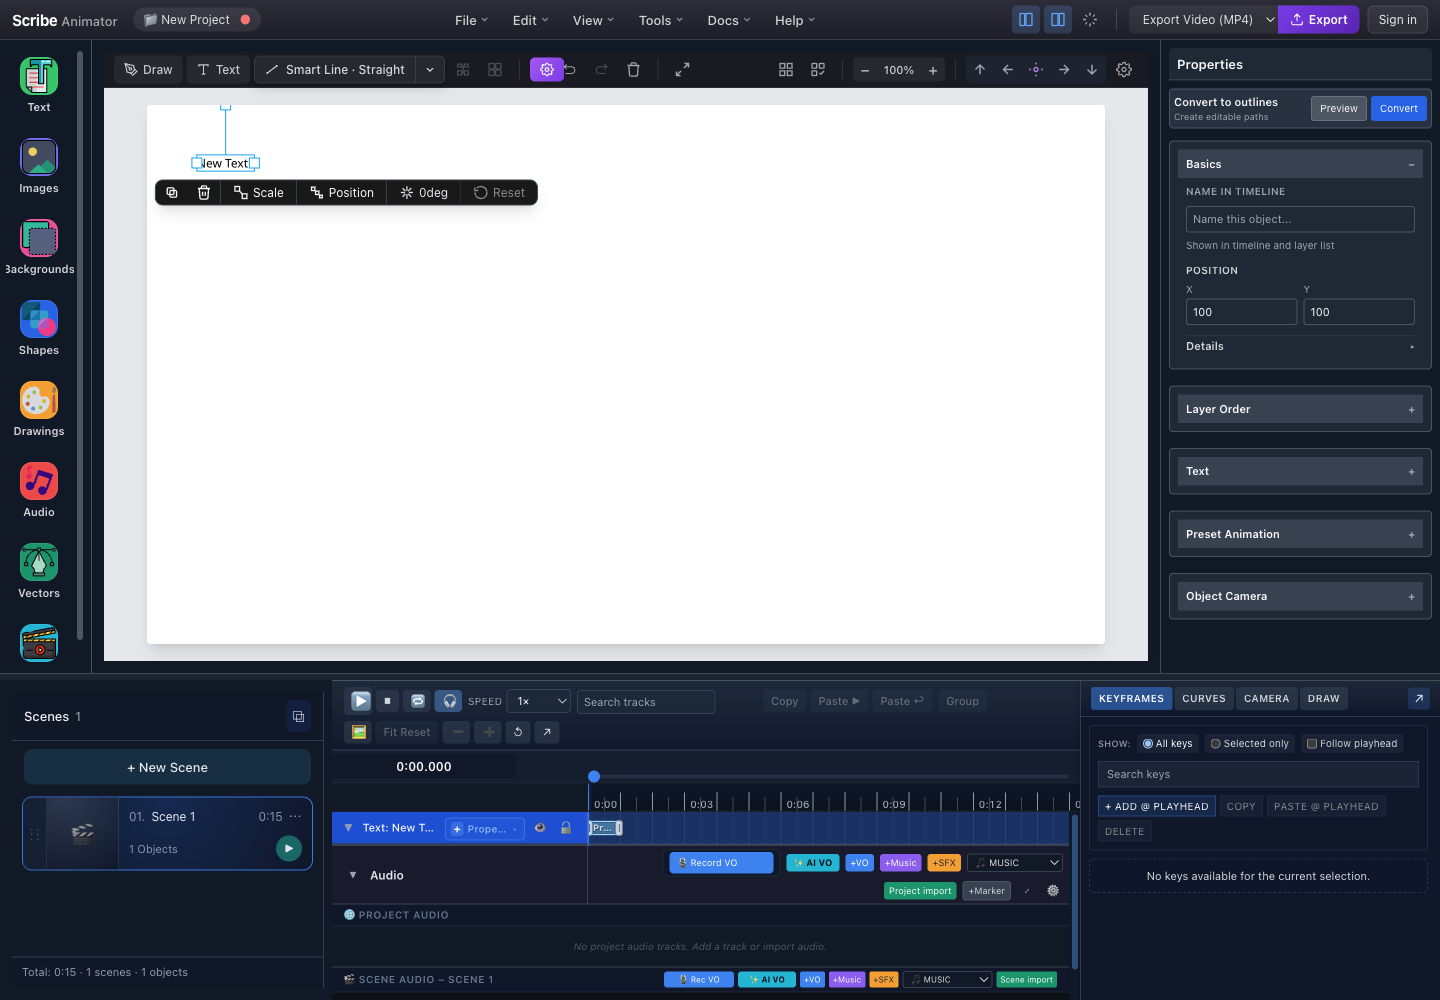
- Canvas selectionHorizontal handles resize the text box. Drag the object itself to move it.
- Selection toolbarProvides duplicate, delete, scale, position/layer, rotation, and reset actions for the selected object.
- Properties inspectorOpen Text to change content, font, size, and fill; open Preset Animation to set entrance behavior.
- Selected timeline trackThe blue row is the selected text track. Timing changes should remain inside the scene duration.
- Keyframes drawerUse this later for custom motion. A first project can use Preset Animation instead.
- In Properties, expand Text.
- In Content, replace
New Textwith a short title. - Press
EnterwithoutShift, move focus away, or click elsewhere to commit the content. - Adjust Font Size, Fill Color, or Font only if needed.
- Expand Basics and use Position X/Y when you need repeatable numeric placement.
For multiline text, use Shift+Enter inside the content field. Resizing a text object changes its text-box width; it is not the same operation as changing Font Size.
Expected result: the canvas, object name/track, and text inspector all refer to the same selected title.
4. Add a simple entrance
- Keep the title selected.
- Expand Preset Animation in Properties.
- Set Animation Type to a simple entrance such as
fadeInorscaleIn. - Set Start Time (seconds) to
0. - Use a short Duration (seconds) that leaves time to read the title.
- Leave Easing at its default until the preview works.
The inspector writes these changes directly; there is no separate desktop Apply button. The Timing source message explains whether preset animation, draw steps, explicit visibility, or keyframes currently controls the object.
Before combining more than one of those systems on the same object, read How timing sources combine. Choosing Draw In later does not create Draw Steps automatically; those are authored separately in DRAW.
Expected result: the text track reflects a timed animation and the title changes during preview.
5. Preview the first scene
- Move the playhead to the beginning.
- Press the triangular Play button above the timeline.
- Watch the title enter.
- Pause playback before editing again.
During playback, editing and viewport actions are limited so the preview remains deterministic. If the title is invisible at time zero, let the entrance play or temporarily choose none while positioning it.
6. Add a second scene
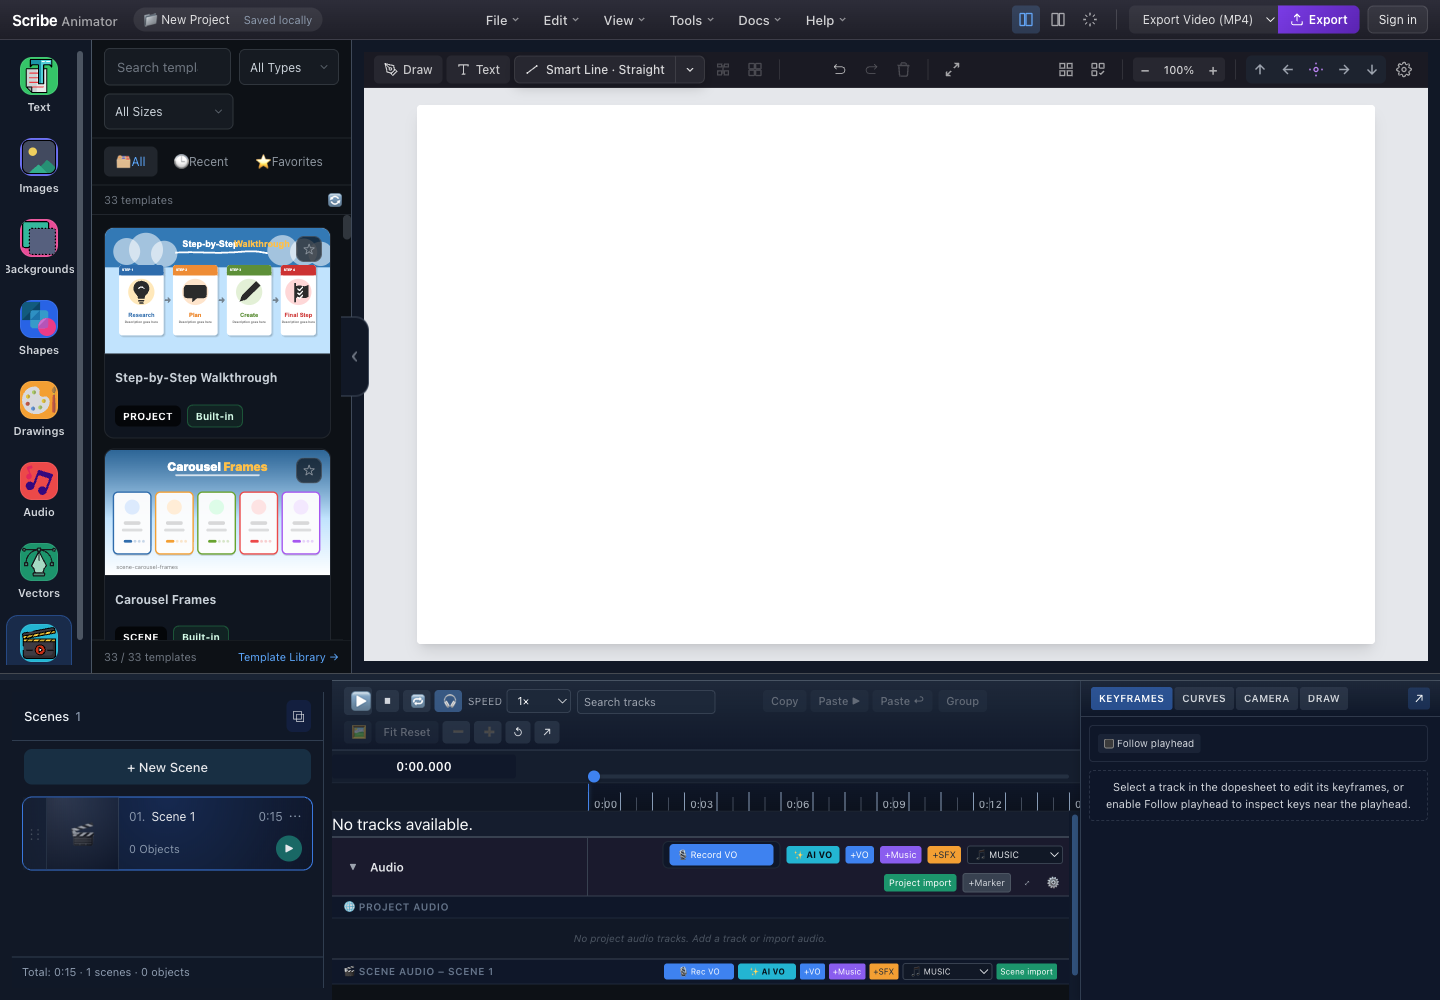
- Template browserTemplate cards are optional starting structures. Their PROJECT or SCENE badges indicate scope.
- New SceneAdds another scene to the current project without replacing Scene 1.
- Scene cardSelect a scene card before adding or editing scene-local content.
- Timeline playbackPreview project timing from the timeline after the new scene has content.
- Select + New Scene.
- Select the new scene card.
- Add another text object and change its content.
- Use the scene card menu when you need to rename the scene or set its duration.
- Play from Scene 1 and confirm the project advances into Scene 2.
Use a new scene for a new beat or camera composition. Do not create a scene merely to animate a second object; objects inside one scene can have independent timing.
Expected result: the project has two named scene cards and each scene displays its own content.
7. Save both a checkpoint and a portable backup
- Pause playback.
- Choose File → Save Locally.
- Wait for the Saved locally notice.
- Choose File → Export .scribe….
- Keep the downloaded file's
.scribeextension and store it outside a temporary downloads folder.
Save Locally writes a recoverable checkpoint in this browser profile. A .scribe package is the portable backup to move between browsers or devices. These are not interchangeable; use both for important work.
For signed-in library sync, use File → Save to Library (Complete) and provide a project name, description, and folder on the first save.
8. Export a viewing copy
- Preview from the beginning and check both scenes.
- Choose the exporter in the header.
- Select Export, or use File → Export (...)….
- Choose only the resolution and format available for your plan and device.
- Keep the editor open while rendering.
- Play the downloaded video once before sharing it.
A video is a viewing copy, not an editable backup. Keep the .scribe package even after the video exports successfully.
Final result checklist
You are finished when:
- the project contains two scenes;
- the first scene has a readable title with one entrance;
- the second scene has different content;
- playback reaches the second scene without clipping either title;
- the project badge no longer shows an unsaved-change dot after local save; and
- you have an exported
.scribepackage and, if needed, a playable video.
Limitations and safe choices
- Local checkpoints stay in the current browser profile and can be erased by browser cleanup.
- Library saving requires sign-in and network access.
- Some voiceovers may remain local when a library save is interrupted; Scribe reports this in the save notice.
- Templates can replace a scene or an entire project depending on their type. Read the confirmation before applying one to existing work.
- Text objects use horizontal resize handles because resizing changes the text-box width.
- Export formats, resolution, watermark behavior, and encoding paths vary by plan and platform.
Troubleshooting and recovery
The text is not visible
- Pause playback and seek to the beginning.
- Select the text track in the timeline.
- Check Preset Animation → Start Time and Duration.
- Temporarily set Animation Type to
none. - Confirm the object is inside the white canvas and is not hidden behind another layer.
Selecting the object does nothing
- Stop playback.
- Press
Escapeonce to leave a connector or group-edit operation, then select the object again. - Check whether the object is locked.
- Select its timeline track if it is difficult to click on the canvas.
You started a new project accidentally
- If the recovery prompt appears after reopening, choose Restore.
- Otherwise import your latest
.scribepackage. - Do not repeatedly refresh while a package import or recovery operation is running.
Export fails
- Save a
.scribepackage before retrying. - Try a lower supported resolution.
- Keep the tab in the foreground and prevent the device from sleeping.
- Use Choose the best export for encoder-specific recovery.
Keyboard and accessibility notes
Ctrl/Cmd+Ssaves a local checkpoint.Shift+Ctrl/Cmd+Sstarts a complete library save.Ctrl/Cmd+Zundoes;Shift+Ctrl/Cmd+ZorCtrl/Cmd+Yredoes where supported.Escapeclears canvas selection or exits the current connector/group operation.DeleteorBackspaceremoves the current unlocked canvas or timeline selection.- Menu triggers expose expanded/collapsed state to assistive technology.
- Inspector fields use visible labels; press
Enterto commit fields that support explicit keyboard commit.