Add voiceover, music, and synchronized audio
Scribe Animator separates reusable audio sources, timeline tracks, placed clips, synchronization markers, and scene/object bindings. This lets one source appear at the right time without tying its original media to a single scene.
The Desktop audio screenshots below were captured from the real local editor at 1440 × 1000 through 27 July 2026. They document the production library, audio lane, script segments, binding actions, and bound-object inspector rather than a simulated player.
Choose scope and role first
Scope
| Scope | Use it for | Timing |
|---|---|---|
| Project Audio | Music, narration, or effects that should continue across scene boundaries | Global project time |
| Scene Audio | Narration or effects owned by one scene | The selected scene's local range |
| Audio Library only | Save a source for later without placing a clip | No timeline placement |
Role
| Role | Typical content | Why it matters |
|---|---|---|
| VOICEOVER | Recorded or generated narration | Supports narration-oriented placement and bindings |
| MUSIC | Background score | Makes track intent clear and helps mixing |
| SFX | Short effects | Keeps effects separate from speech/music |
| GENERIC | Audio that does not fit another role | Safe fallback for imported files |
Choose scope before importing. Moving media into the wrong scope can make scene edits and synchronization harder later.
Before you start
- Stop playback.
- Select the intended scene if you need Scene Audio.
- Verify that the file is recognized as
audio/*by the browser. - Keep a single imported file within the current upload limit (5 MB in this build).
- Use headphones for recording and final sync review.
- Allow microphone access only when intentionally recording.
- Keep enough local memory/storage for imported or generated audio.
Browser decoding support varies. A file extension alone does not guarantee that the current browser or native WebView can decode it.
Audio library and timeline anatomy
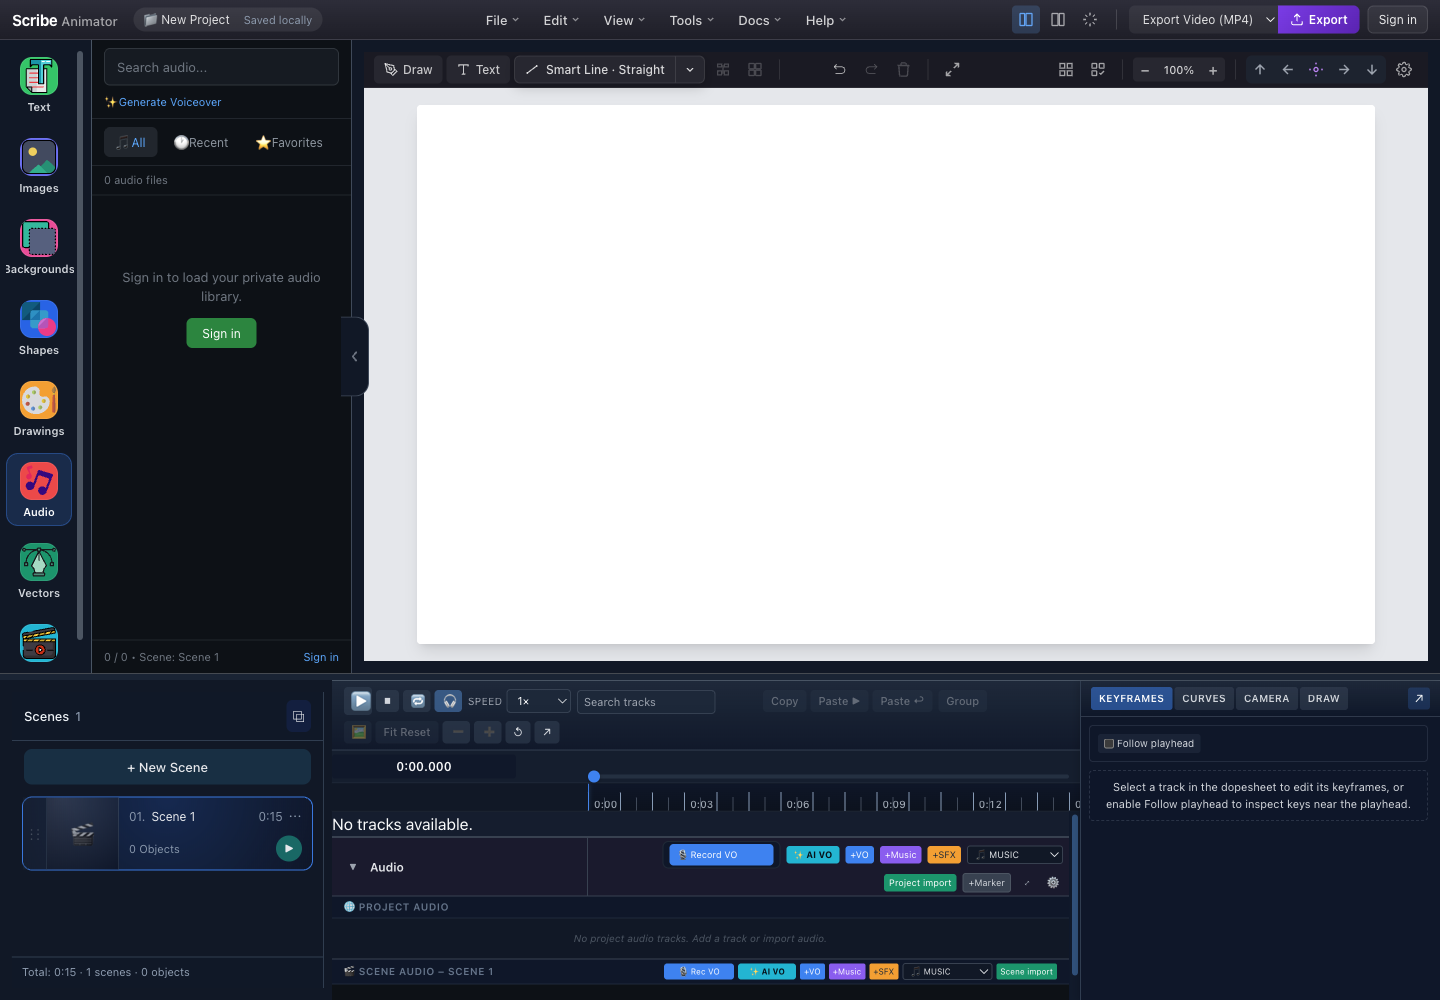
- Search and Generate VoiceoverFind private-library sources or open local AI narration.
- All, Recent, and FavoritesFilters organize available library sources without changing the timeline.
- Signed-out private-library stateSign-in is required for private cloud library items, not for every local project-audio action.
- Project Audio actionsRecord VO, AI VO, add tracks, choose import role, import media, and add markers.
- Project and Scene Audio regionsGlobal tracks and active-scene tracks remain visibly separate.
Visible Audio lane controls
| Control | Purpose |
|---|---|
| Collapse arrow and Audio label | Hides or reveals lane details without deleting tracks |
| Record VO | Starts project voiceover recording; while recording it becomes a stop action with elapsed time |
| AI VO | Opens local voice synthesis for project placement |
| +VO, +Music, +SFX | Creates an empty global track with that role |
| Role selector | Sets the default role for the next import |
| Project import | Imports media into Project Audio |
| +Marker | Creates a marker at the current global playhead |
| Focus-mode icon | Expands or exits the focused audio editing layout |
| Settings icon | Opens waveform style and other available audio-lane settings |
| Scene Rec VO, AI VO, +VO, +Music, +SFX | Same operations scoped to the active scene |
| Scene import | Imports media into the selected scene |
Tutorial 1: create a track
Use an empty track when you want to establish role and scope before adding media.
- Decide Project Audio or Scene Audio.
- Choose +VO, +Music, or +SFX in the correct section.
- Confirm the track appears in that section.
- Click its name to rename it.
- Use the mute control for temporary silence.
- Adjust its gain/volume.
- Drag compatible media onto the track, or use the matching import action.
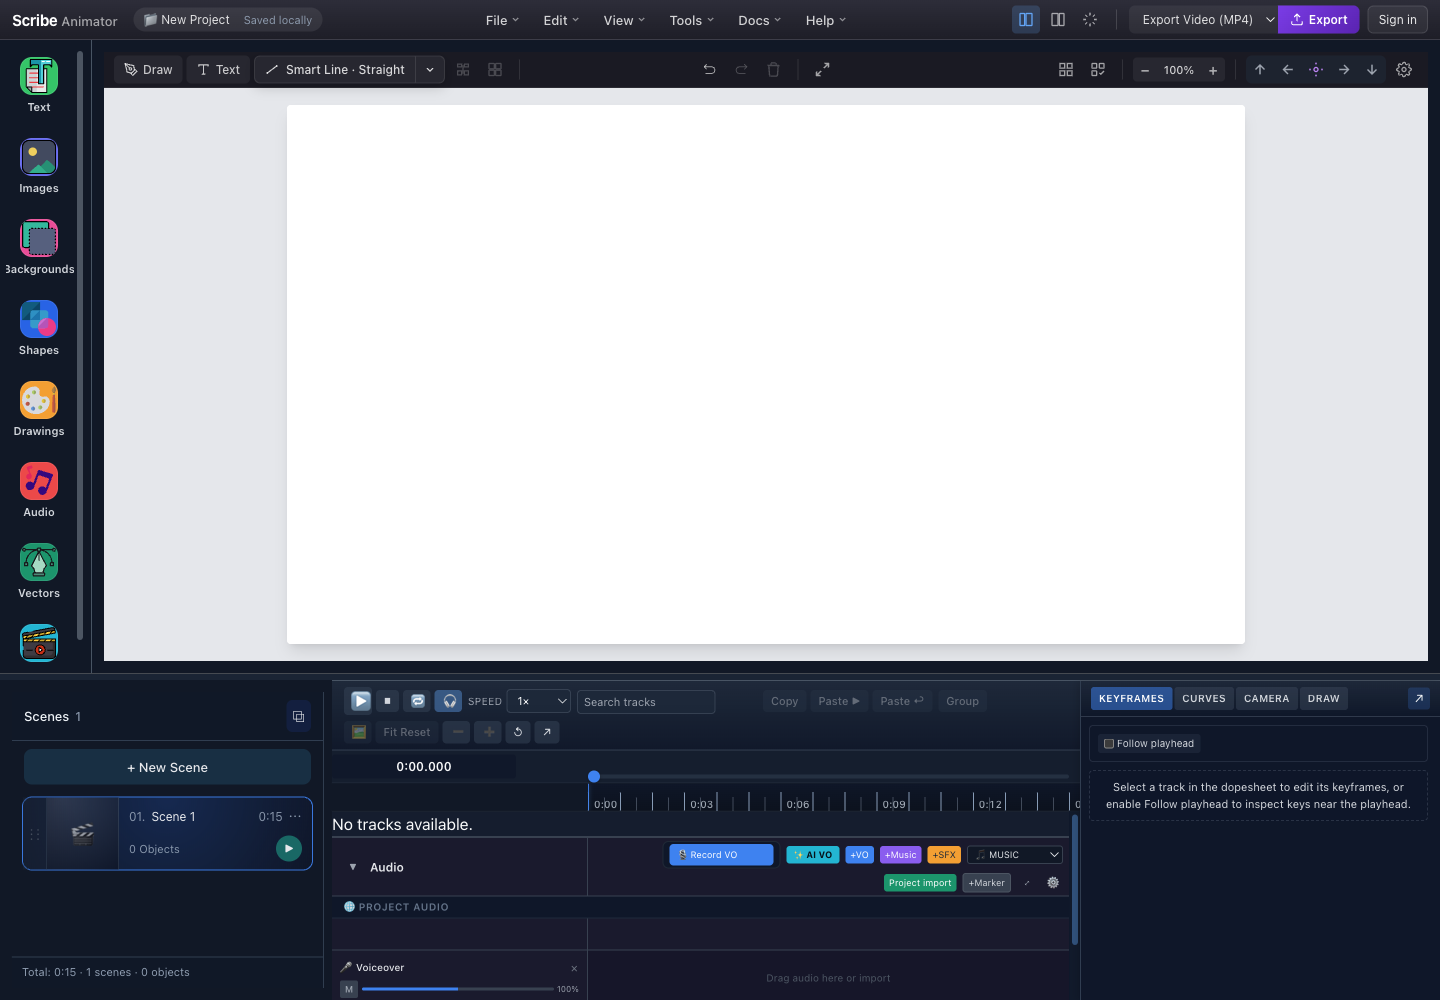
- Track-creation and import actionsChoose the role, create a track, import, record, generate, or add a marker.
- Project AudioTracks here use global project time and can continue across scenes.
- Voiceover track headerRename, mute, set gain, delete, and drop/import clips into the lane.
Expected result: the role-labelled track exists in the intended scope. An empty track is valid; it becomes audible only after it contains a playable clip.
Deleting a track also removes its placed clips from that track. Keep the source in the library or a backup when you may need it again.
Tutorial 2: import audio
- Position the playhead where the clip should begin.
- Choose a role from the import selector.
- Choose Project import or Scene import.
- Select a supported audio file.
- Review any overflow, size, or decode warning.
- Choose the existing target track or allow the editor to create a compatible one.
- Wait for waveform/source preparation.
- Drag or trim the clip to the required range.
- Preview from just before its start.
Expected result: a clip appears on the selected scope's track at the intended time and the waveform aligns with the shared playhead.
Track and clip editing
- Click a track name to rename it.
- Use mute to silence a track without deleting clips.
- Adjust gain while monitoring speech clarity and clipping.
- Drag a clip to change its start time.
- Trim supported clip edges rather than editing the original source.
- Drop an audio file directly on a compatible track to target it.
- Remove a track only after checking for clips and bindings.
- Audio-specific undo/redo can take precedence immediately after an audio interaction or while focus remains inside the audio surface.
Tutorial 3: record voiceover
- Connect and select the intended microphone in system/browser settings.
- Use headphones to reduce feedback.
- Position the playhead.
- Choose project Record VO or scene Rec VO.
- Allow microphone permission when the browser or OS asks.
- Wait for any count-in.
- Record a short test sentence.
- Choose the stop action.
- Listen to the take.
- Keep or insert the recording, or discard and repeat.
- Rename the track/clip so the take is identifiable.
Expected result: the accepted recording appears as a Voiceover source and clip in the selected project or scene scope.
If permission was denied, change the site/app microphone setting, close the recording UI, and reopen it. Repeatedly clicking Record does not override an OS-level denial.
Tutorial 4: generate local AI voiceover
Use local synthesis for editable scripts and rapid narration drafts. Availability is provider- and device-dependent.
- Choose AI VO in Project Audio or Scene Audio, or Generate Voiceover in the Audio library.
- Enter the final or near-final script.
- Choose a Provider such as an available Kokoro, Pocket, or Supertonic local provider.
- Choose Language.
- Choose a compatible Voice.
- For supported Supertonic setups, optionally mix two voice styles.
- Set Speed, or enable an approximate target duration.
- Choose Voice Quality:
- performance for lower resource use;
- higher quality for final review when supported;
- ultra only when the platform capability and memory are suitable.
- Choose Placement:
- Project Audio at playhead;
- Scene Audio at playhead;
- Scene Audio at scene start; or
- Audio Library only.
- Review and accept any required consent/disclosure before model acquisition.
- Choose Generate Preview.
- Wait through runtime loading, model download, warm-up, generation, and WAV encoding.
- Play the preview.
- Regenerate or change the inputs if needed.
- Save/insert the generated result.
Expected result: the generated WAV is previewable and is saved to the library or inserted on the requested Voiceover track.
Local voice controls and constraints
- Changing provider, language, voice, speed, quality, or script invalidates the old preview.
- First use can download model assets.
- Loaded-model controls can unload app-cache references; the browser may release memory later.
- Target duration is approximate and speed is clamped to the provider's supported range.
- Ultra quality works best with WebGPU where the UI reports it.
- Scene insertion can ask whether to replace existing voiceover or use a new track.
- Audio-budget overflow can require shortening narration, removing other audio, or choosing a supported overflow action.
Voice cloning safety
Where Pocket local cloning is explicitly available:
- Use only a voice you own or have permission to use.
- Confirm the permission statement.
- Upload or record a suitable local sample.
- Wait for local processing.
- Verify the cloned voice matches the selected language bundle.
- Clear the cloned voice when it is no longer needed.
Do not use cloning for impersonation, deception, or a voice without authorization. Follow visible disclosure and consent requirements.
Audio binding
Audio binding aligns one object's authored timing to a narration script segment. It is not audio-reactive animation: Scribe does not read waveform samples, loudness, or spoken words to trigger an effect. Audio and visuals already share the project playhead; a binding additionally stores a relationship and fits or constrains the object's real preset, keyframe, or Draw Step timing.
Create, inspect, rebind, and remove object-to-segment bindings in the Desktop Timeline's Voiceover track. Mobile Lite plays and respects bindings already stored in the project, but it does not currently expose the Script Segment binding controls.
Do not confuse these audio concepts
| Concept | What it means | Does it rewrite object timing? |
|---|---|---|
| Clip playback sync | An audio clip and the canvas use the same playhead | No |
| Marker | A manual label at an important beat, word, or cue | No |
| Script segment | A labelled narration interval with a start and end time | No, until an object is bound |
| Object binding | A persistent object-to-segment relationship with a fitting strategy | Yes, according to the selected action |
| Scene Audio | Tracks and clips owned by one scene | Not by itself; Scene Audio is not object binding |
An imported or recorded clip does not necessarily create script segments. Generated voiceover script chunks can create them. If the Voiceover track has a waveform but no labelled segment controls, there is nothing to bind yet.
Before binding
- Finish the narration script and create the generated script segments.
- Put the segments in the correct Project or Scene Audio time scope.
- Set scene durations before fitting detailed object timing.
- Create the object's intended preset, property keys, and Draw Steps first.
- Select exactly one object and read its Timing Source.
- Save a
.scribebackup before fitting many objects.
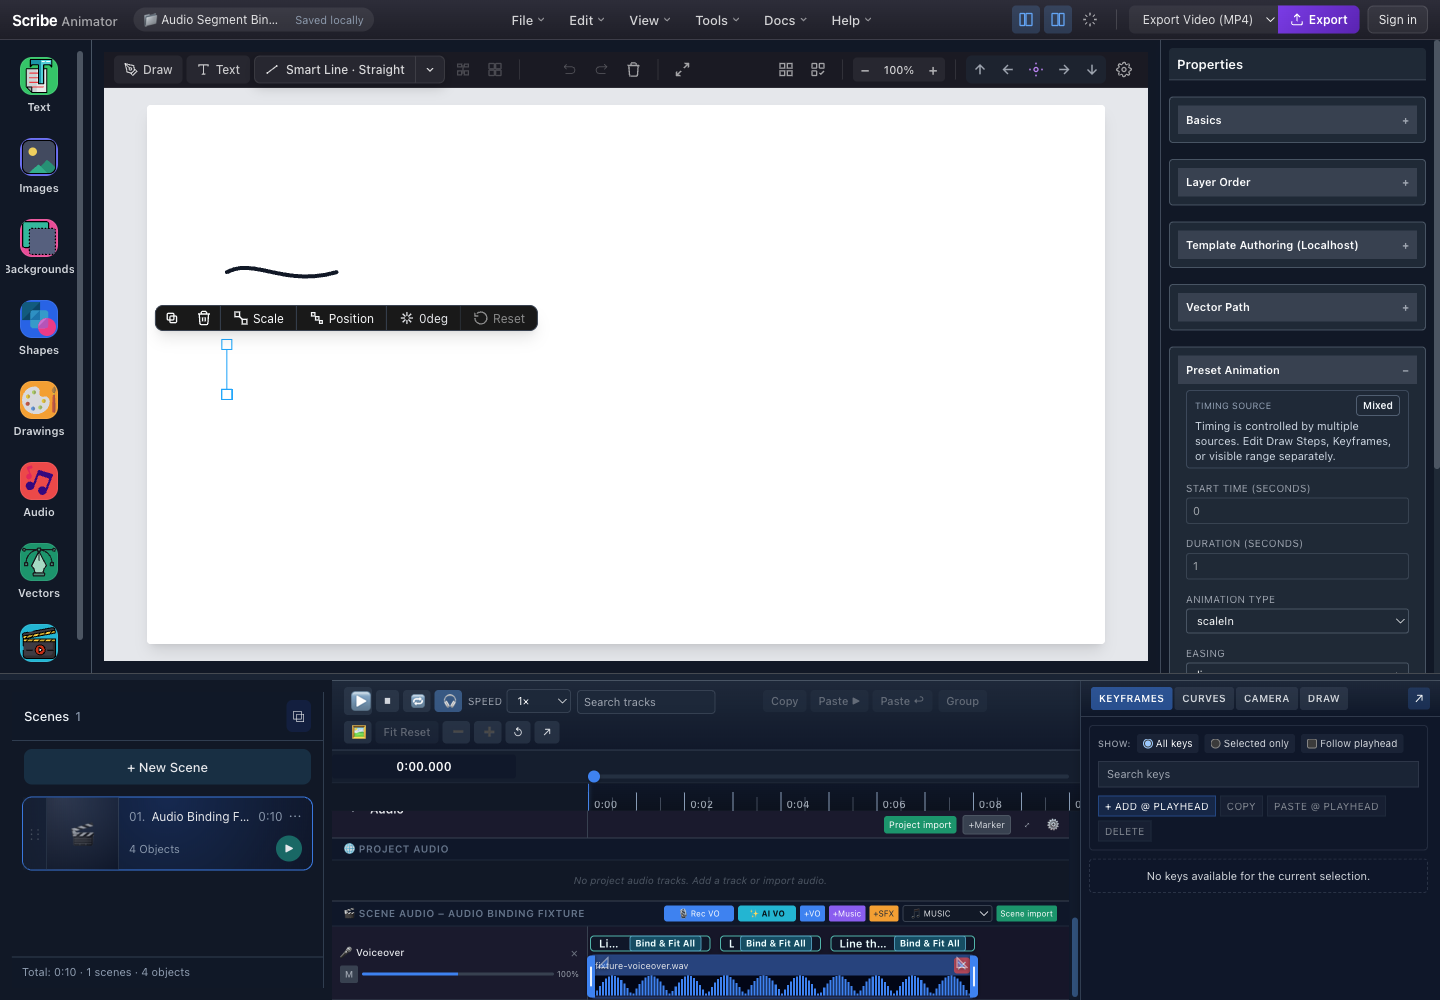
- Selected target objectThe segment action is calculated for the currently selected object and its real timing sources.
- Timing Source: MixedThis object has more than one timing owner, so a combined fitting action is available.
- Script segment actionsThe label changes with the selected object: Bind, Fit Draw, Fit Keys, Fit All, Resolve, Bound, or Rebind.
- Voiceover clip and shared timeThe waveform is a visual timing reference. Binding uses segment times, not waveform amplitude.
Bind an object step by step
- Select the object on the canvas or its object track.
- Expand the Scene Audio or Project Audio Voiceover track that contains script segments.
- Find the segment that should own the object's timing.
- Read the action on that segment. The label is based on the selected object's active timing sources.
- Choose the action once. Scribe creates the binding, sets the segment as the object's visible range, and fits only the sources named by that action.
- Scrub from just before the segment start through just after its end.
- Preview at normal speed with audio enabled.
- Choose the segment's bound-count badge to inspect the stored strategy.
What every segment action does
| Action shown | Selected object's timing state | Result |
|---|---|---|
| Bind | Scene/default timing or an ordinary explicit visible range | Uses the full segment as the object's visible range without fitting keys or Draw Steps |
| Bind & Fit | An active Preset Animation without a Draw Step driver | Fits the preset start and duration to the full segment |
| Bind & Fit Draw | Draw Steps | Scales all of that object's Draw Steps to the full segment |
| Bind & Fit Keys | Property keyframes | Maps the first and last key times to the segment bounds and scales keys between them |
| Bind & Fit All | Property keyframes plus Draw Steps | Fits both sets to the segment |
| Resolve | Another mixed combination | Opens a choice of supported timing sources; only the chosen source is fitted, while other sources remain authored |
| Bound | The selected object is already attached to this segment | No new action; inspect the existing relationship |
| Rebind | The selected object is bound to a different segment | Moves its single binding to this segment and applies the new fit |
| 1 bound, 2 bound, and so on | One or more objects use this segment | Opens the bound-object inspector, strategy, and unbind action |
One object can be bound to at most one script segment at a time. One script segment can own multiple object bindings.
How animation sources behave with a binding
| Object before binding | What the segment controls | What still behaves independently |
|---|---|---|
| No preset, keys, or Draw Steps | The outer visible range | Object properties |
| Fade In, Scale In, Slide In, Draw In, or another active preset | Preset start and duration are fitted inside the segment | Unrelated property keys unless the chosen action also fits them |
| Draw In + Draw Steps | The steps are fitted and remain authoritative for reveal | Unrelated transform/opacity keys |
| Property keyframes | Key times are fitted; key values and interpolation remain editable | Preset properties that are not replaced by matching keys |
| Property keys + Draw Steps | Both timing sets are fitted by Bind & Fit All | Their property/reveal ownership remains separate |
| Unsupported mixed source resolved to one strategy | Only the source chosen in Resolve is retimed | Other sources can still produce a Mixed result |
Binding does not resolve a visual conflict between preset, keys, and Draw Steps. It only chooses which existing timing source or sources are retimed. Review Timing-source combinations before binding a complex object.
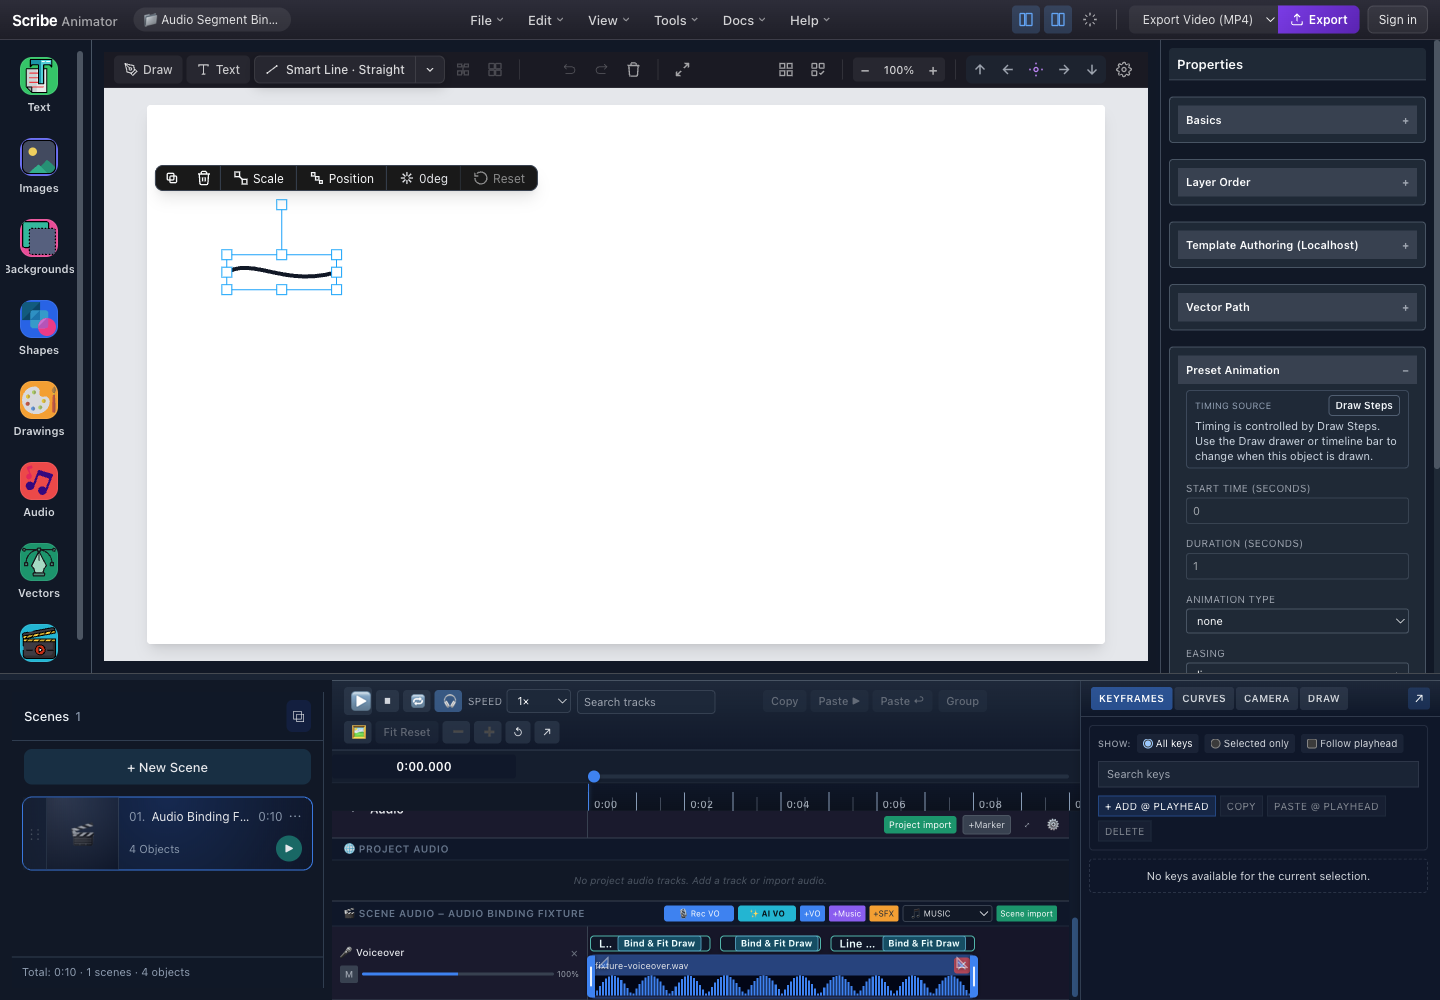
- Drawable object selectedThe selected vector is the target whose Draw Step times will be fitted.
- Draw Steps own timingThe inspector points to the DRAW domain instead of pretending preset start and duration are authoritative.
- Bind & Fit DrawAll steps targeting this object are scaled into the chosen script segment.
- Segment timing over waveformThe labelled segment range, not the waveform shape, determines the fit.
Rules after binding
- The bound segment becomes the object's outer visible range.
- Later preset start/duration edits are constrained inside that range.
- Fitted key times cannot be moved outside the segment, but their values remain editable.
- Fitted Draw Steps must remain inside the segment.
- Draw Auto-plan respects audio-owned timing. Enable Replan audio-bound objects only when you intentionally want to replace the fitted step schedule.
- Project-time segments are converted to the active scene's local time and clamped to the part that intersects the scene.
- A scene-time segment can bind only in its matching active scene.
- The visible-range end does not create an automatic exit or hide. Add an explicit visibility/exit change when the object must disappear.
Inspect, rebind, unbind, and recover
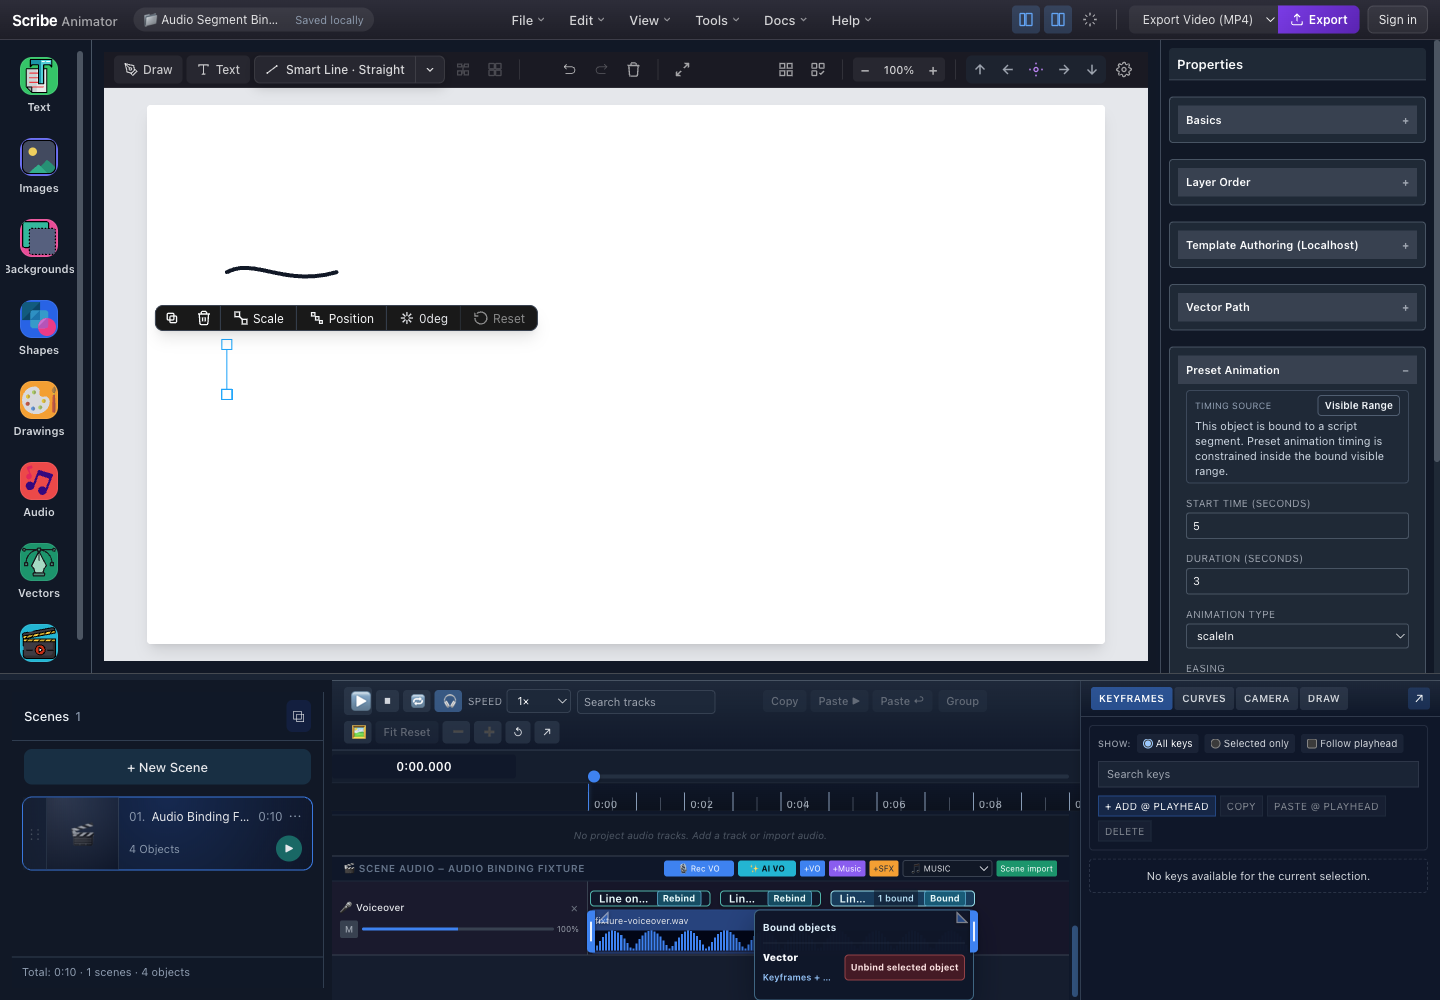
- Audio-bound visible rangePreset timing and fitted sources must remain inside this script-segment envelope.
- Rebind to another segmentRebind moves this object from its current segment and applies the new segment fit.
- Bound state and countBound identifies the selected relationship; the count opens every object attached to the segment.
- Strategy and unbind actionInspect whether Keys, Draw Steps, or both were fitted before removing the relationship.
Use these recovery rules:
- Rebind when the same object belongs to another segment. Re-preview every fitted source.
- Use Unbind selected object to remove the persistent relationship.
- Do not treat Unbind as a full time-travel operation:
- a previous explicit visible range can be restored when one was recorded;
- key/composite key times can be scaled back when a prior range exists;
- preset timing and draw-only/composite Draw Step timing are not guaranteed to return to their exact pre-fit arrangement.
- Use Undo immediately after binding or fitting when exact restoration matters.
- Save a checkpoint or
.scribepackage before bulk binding/rebinding.
Retiming, deletion, duplication, and persistence
- Moving a linked audio clip can shift its script-segment timestamps, but it does not automatically refit an object that was already bound. After a clip/segment timing change, the safest workflow is Unbind, bind again, and preview.
- Deleting the segment, clip, track, or source removes the binding record. It does not restore every fitted object time.
- Duplicating a scene copies its Scene Audio tracks and clips, but it does not clone script-segment bindings as a new independent authoring set.
.scribesave/load preserves valid script segments, bindings, and fitted timing.- Converting bound text to an outline preserves a valid supported binding.
- Binding is deterministic project state; it does not require cloud playback, account state, or waveform analysis.
Audio Binding troubleshooting
| Problem | What to check |
|---|---|
| Waveform exists but no Bind action | Confirm that generated script segments exist; import/record alone may create only a source and clip |
| Wrong action label appears | Re-select the intended object and read its Timing Source; the label is object-specific |
| Resolve appears | Choose the timing source you intend to fit, then inspect the other source separately |
| Object moves correctly but does not draw | Confirm the object is path-backed, Draw In is selected, and Draw Steps target that object |
| Key or Draw Step cannot move | It may be constrained by the bound segment; inspect the binding range |
| Object does not disappear at segment end | Binding does not author an exit; add a visibility or exit change explicitly |
| Audio/visual sync changed after moving a clip | Unbind and bind again so the object's sources are fitted to the new segment times |
| Unbind did not restore old timing | Undo the bind/fit action or restore a saved checkpoint/package |
| Binding controls are missing on Mobile Lite | Use Desktop to author them; Mobile Lite currently consumes existing bindings only |
Tutorial 5: add markers and synchronize scenes
- Put the playhead on an important word, beat, or cue.
- Choose +Marker.
- Enter the marker label/type and optional color.
- Use markers as references while adjusting scenes, object timing, draw steps, and camera keys.
- Bind narration segments to objects only when the workflow requires it.
- Preview across each scene boundary.
- Export a short test and confirm the final mix.
For spoken explainers, narration is usually the pacing source. Lengthen scenes to preserve understandable speech rather than speeding every visual action.
Limitations
- The current file picker accepts browser-recognized
audio/*; actual decoding depends on browser/native support. - This build enforces a 5 MB audio upload limit.
- Private cloud audio library items require sign-in; local project work does not always require cloud access.
- Browser-generated blob URLs need persistence/hydration to survive a full restart.
- Local AI models require compatible assets, memory, language support, and sometimes WebGPU/native capabilities.
- Generated duration is approximate.
- Voice recording requires explicit microphone permission.
- Overlapping narration clips can reduce intelligibility.
- Scene Audio is constrained to its scene context; Project Audio uses global time.
- Static SVG export contains no audio.
Troubleshooting and recovery
| Problem | Recovery |
|---|---|
| Private Audio library is empty while signed out | Sign in only if you need private cloud sources; use local import for local media |
| Imported file is ignored | Confirm the browser reports an audio/* MIME type and the file is decodable and within limits |
| Track exists but is silent | Add a clip, unmute the track, raise gain, and check source hydration |
| Waveform is missing | Wait for processing, confirm the source decoded, and reopen the project only after persistence completes |
| Recording will not start | Check OS/browser permission, input device, secure context, and whether another app owns the microphone |
| Recording has echo | Use headphones and reduce speaker monitoring |
| AI model will not load | Try a supported provider/quality, free memory, confirm assets/network for first load, or use recorded/imported narration |
| AI generation fails | Shorten text, choose a supported language/voice, lower quality, and retry once |
| Generated clip exceeds scene | Extend the scene, insert at scene start, replace conflicting narration, or use another track intentionally |
| Audio is out of sync after restore | Wait for hydration/reconciliation, verify scope, then compare clip and scene time |
| Export is silent | Check track mute/gain, source availability, exporter audio support, and final mux |
| Audio edit cannot be undone | Keep focus in the audio surface and use undo immediately after the audio action |