Select, arrange, group, and connect objects
Canvas editing follows one domain loop: select project objects in the active scene, change their geometry or relationships, then preview the same state on the timeline. This guide covers desktop behavior and calls out Mobile Lite differences.
What these tools are for
Use selection and arrangement to:
- position an object in project coordinates;
- resize or rotate supported object types;
- select several eligible objects for a shared action;
- group objects that should move as a unit;
- protect finished objects with a lock;
- control visual stacking; and
- attach a smart line or arrow to objects that may move later.
Do this before detailed keyframing. Large geometry changes after animation, hand-follow, camera, or connector setup can require additional timing and framing corrections.
Before you edit
- Select the scene containing the objects.
- Pause playback.
- Choose the normal select tool rather than Draw or connector target-pick mode.
- Save a local checkpoint before deleting, grouping, or making broad changes.
Objects from inactive scenes are not rendered or eligible for canvas selection in the active scene.
1. Read a single selection
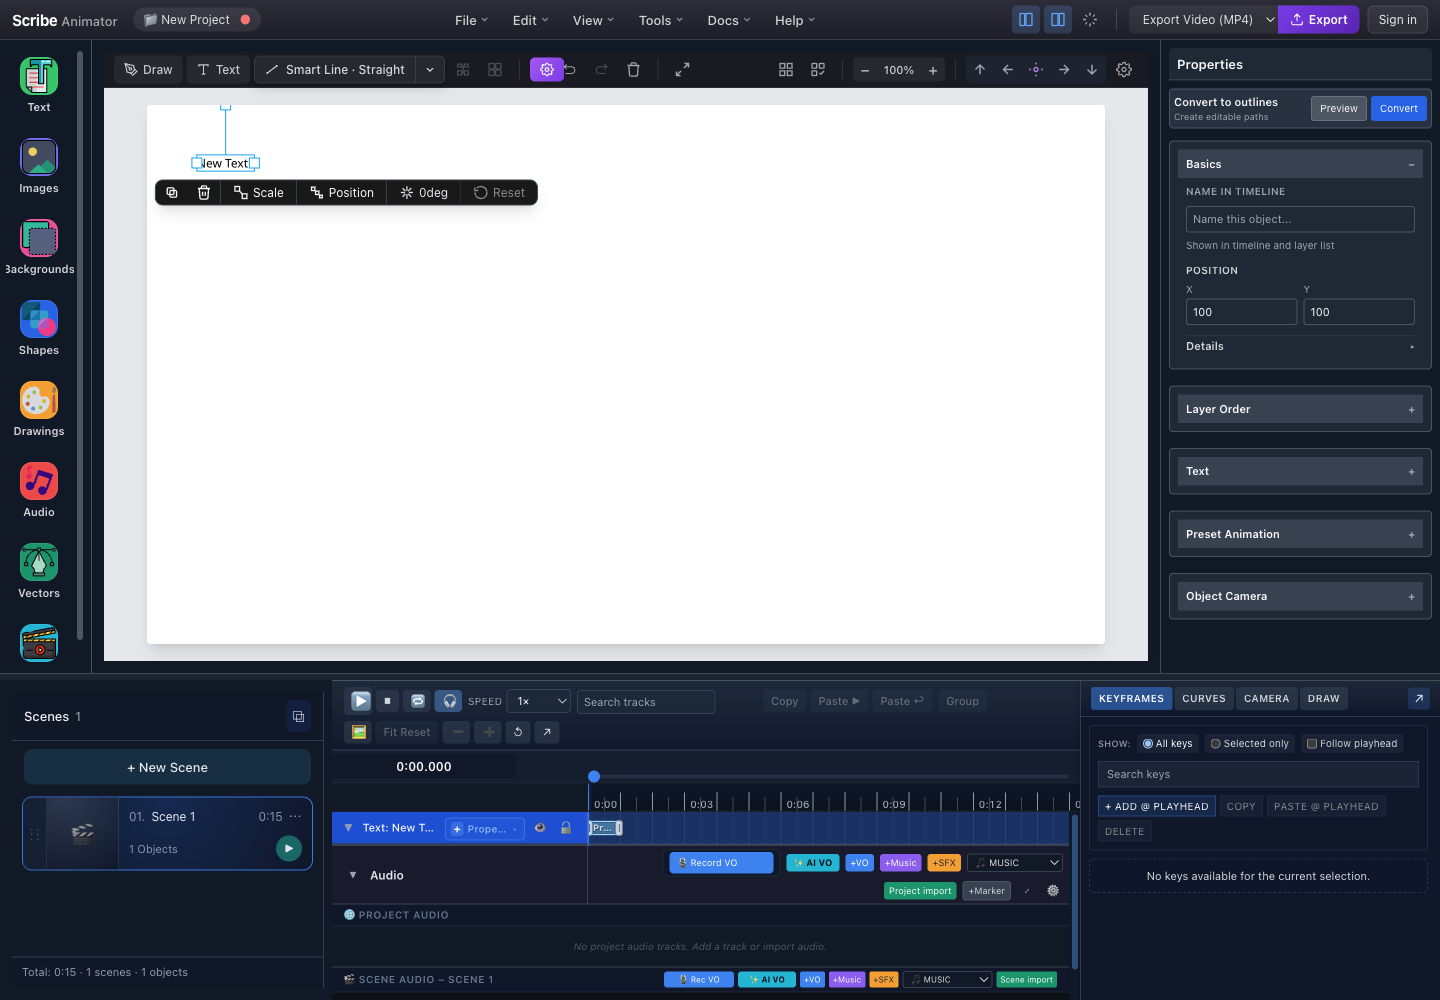
- Selection boundsThe blue outline and handles identify the active text object. Drag the object body to move it.
- Floating actionsDuplicate, delete, scale, position/layer, rotation, and group actions are contextual to this selection.
- Properties inspectorBasics provides numeric X/Y; Layer Order and type-specific sections edit the same object.
- Timeline selectionSelecting the object also identifies its timed track in the active scene.
- Click or tap an object once.
- Confirm its bounds or locked status appear.
- Confirm Properties refers to the same type and ID.
- Confirm its track is selected in the timeline.
Click empty canvas space to clear selection. Press Escape to cancel connector picking, exit group editing, or clear the selection according to the current mode.
2. Select more than one object
Desktop supports two multi-selection paths.
Modifier-click selection
- Select the first unlocked object.
- Hold
Shift,Ctrl, orCmd. - Click another eligible object to add it.
- Modifier-click an already selected object to remove it from the set.
The most recently added eligible item becomes the selection anchor.
Marquee selection
- Begin dragging on empty canvas.
- Draw the marquee across the objects you want.
- Release to select eligible objects inside the marquee.
A very small empty-canvas drag behaves like clearing selection rather than creating a useful marquee.
Multi-selection limitations
- Locked objects do not join multi-selection.
- Hidden or inactive-scene objects are excluded.
- A multi-selection uses high-contrast outlines instead of the normal single-object transformer.
- Shared actions are intentionally narrower than the full single-object inspector.
- Select at least two eligible objects before grouping.
3. Move an object
For visual placement:
- Drag the selected object's body.
- Release inside the white canvas.
- Preview after a large move if camera or hand behavior already exists.
For repeatable placement:
- Select the object.
- Open Properties → Basics.
- Enter Position X and Position Y.
- Commit the field according to its input behavior.
Viewport panning and zooming do not change object coordinates. Drag the object, not the pasteboard, when you intend to move project content.
4. Resize and rotate
- Select one unlocked object.
- Drag an available transform handle.
- Use the rotation handle for a supported object type.
- Use the floating Scale action for a uniform percentage change when appropriate.
- Use the rotation action's numeric value or Reset for a repeatable orientation.
Important object-specific rules:
- Text exposes horizontal resize handles because the operation changes text-box width; change Font Size for the glyph size.
- Ordinary non-text objects preserve their aspect ratio by default.
- Groups do not expose normal resize/rotation controls in the same way; enter group editing or ungroup when child geometry must change.
- Locked objects can be selected for inspection but cannot be transformed.
- Playback blocks editing-oriented transform behavior.
Expected result: the canvas and numeric Properties values report the same geometry after the transform commits.
5. Duplicate, delete, and unlock
With one object selected, the floating toolbar exposes contextual duplicate and delete actions.
- Duplicate creates a separate project object; move or rename it immediately so the copy is easy to distinguish.
- Delete removes the unlocked selection.
DeleteorBackspaceprovides the keyboard path. - A selected locked object shows Locked and an Unlock button instead of the normal edit toolbar.
Deleting a mixed selection removes eligible unlocked objects and preserves locked ones. Read the toast when Scribe reports that an object is locked.
Undo immediately if a result is unexpected; do not continue editing and rely on a long undo chain as the only backup.
6. Change visual stacking
Visual stacking controls which overlapping object is painted above another. It does not change scene order or timeline timing.
Use the floating Position menu:
- Forward: one layer toward the front;
- Backward: one layer toward the back;
- To Front: topmost layer;
- To Back: bottommost layer.
The Properties → Layer Order section exposes the same domain actions with the shorter labels Front, Forward, Backward, and Back.
Use one-step movement when you need to preserve relationships among several overlapping objects. Use front/back only when the object should clearly become the extreme layer.
7. Group and ungroup
Grouping is appropriate when objects should move as one unit. Avoid grouping objects that still need independent canvas transforms or timing.
- Select at least two eligible unlocked objects.
- Press
Ctrl/Cmd+Gor use the available group action. - Select the new group to move it as one project object.
- Use Edit group when you need to interact with its children.
- Press
Escapeto exit group editing. - Select the unlocked group and press
Shift+Ctrl/Cmd+G, or choose Ungroup, to restore its children.
Locked items are not silently absorbed into an editable group selection. Grouping also does not merge child timeline semantics into a new visual asset.
8. Add the correct smart connector
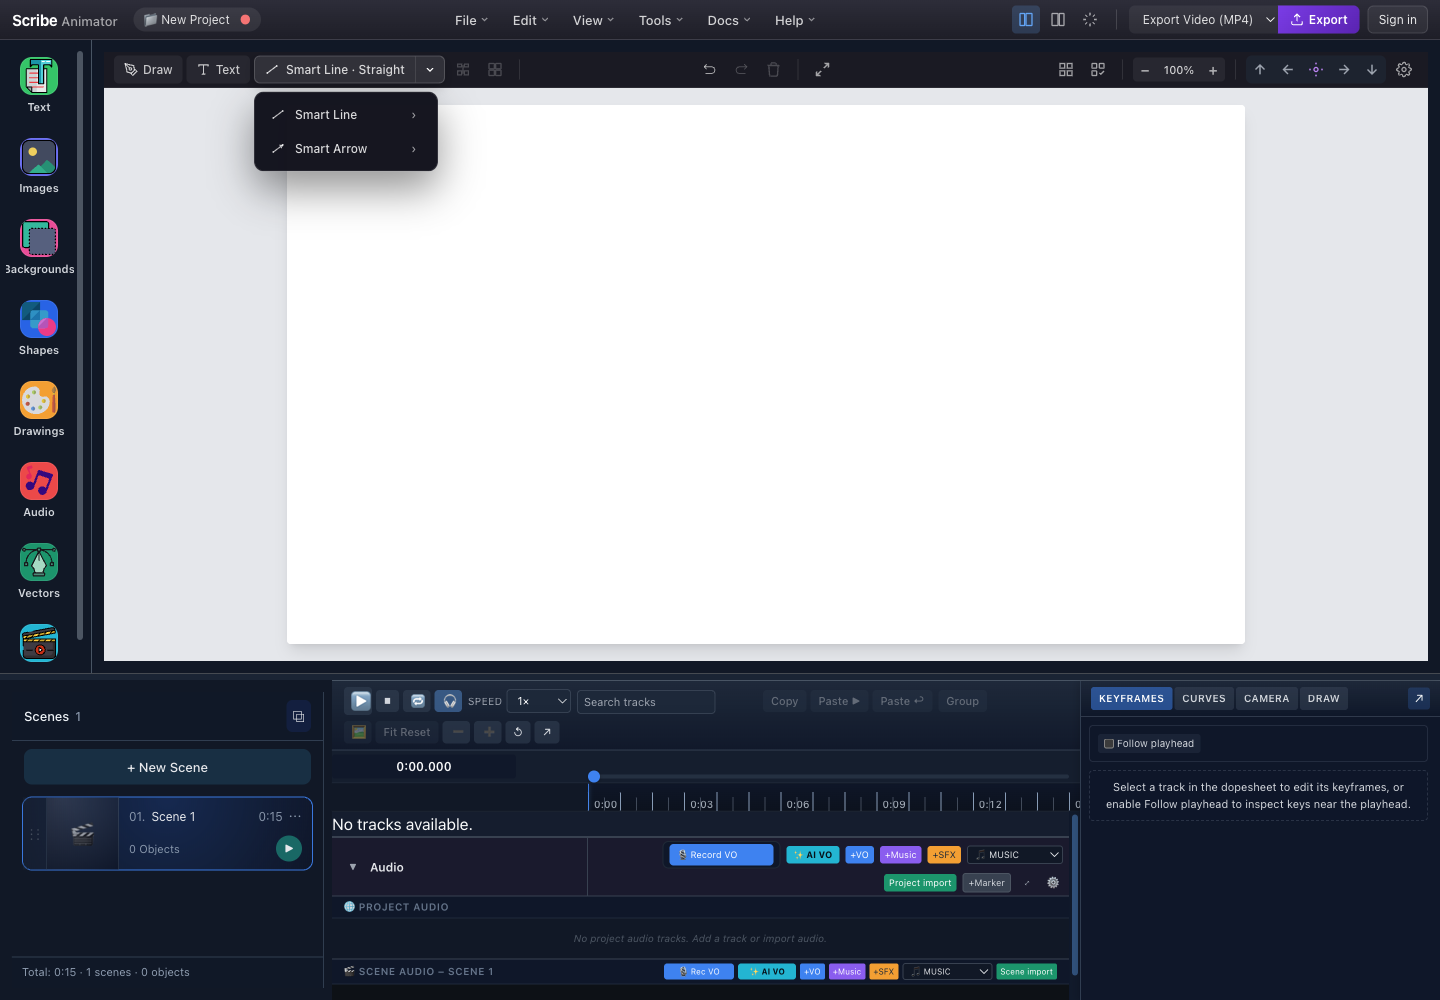
- Current connectorClick the main button to insert the displayed Smart Line or Smart Arrow route immediately.
- Variant chevronOpens the family menu without inserting an object.
- Smart LineChoose this family, then Straight, Curved, or Elbow.
- Smart ArrowUses the same routes but includes an arrow endpoint.
Choose:
| Variant | Use it when |
|---|---|
| Smart Line · Straight | Two objects need the shortest direct visual relationship |
| Smart Line · Curved | A direct segment would cross important content |
| Smart Line · Elbow | Diagram structure benefits from horizontal/vertical turns |
| Smart Arrow · Straight | Direction is important and a direct route is clear |
| Smart Arrow · Curved | Direction is important but the path must arc around content |
| Smart Arrow · Elbow | A directional flowchart-style route is needed |
The split-button remembers the chosen family and route. Clicking its main half later inserts that current variant.
9. Attach a connector to objects
After inserting a smart line or arrow:
- Select the connector.
- Open its Smart Connector section in Properties.
- Under Start, choose Attach Target.
- Click the intended target object on the canvas.
- Under End, choose Attach Target.
- Click the second target.
- Confirm each row changes from
Status: FreetoStatus: Attached to …. - Move a target object and confirm the attached endpoint follows it.
For an attached endpoint, choose an Anchor:
- Auto chooses a suitable side as geometry changes;
- Top, Right, Bottom, and Left pin to a named side; and
- Center attaches to the target center.
Use Change Target to pick a different object, Detach to return the endpoint to a free point, or Cancel/Escape to leave target-pick mode.
10. Refine connector geometry
With the connector selected:
- drag the start or end handle to change a free endpoint;
- adjust curve control handles for a curved route;
- adjust the elbow midpoint for an elbow route; and
- preserve any imported multi-curve route points when editing projects that contain them.
Attachment and route shape are different concepts. An endpoint can be attached while the line still uses Straight, Curved, or Elbow geometry.
After changing a target's position, preview and inspect the connector at relevant times. A connector follows current object geometry, but camera framing and overlapping layers can still make the result unreadable.
11. Create and connect in Mobile Lite
Mobile Lite can author real smart lines and arrows; it presents the same project objects through Assets and contextual object actions.
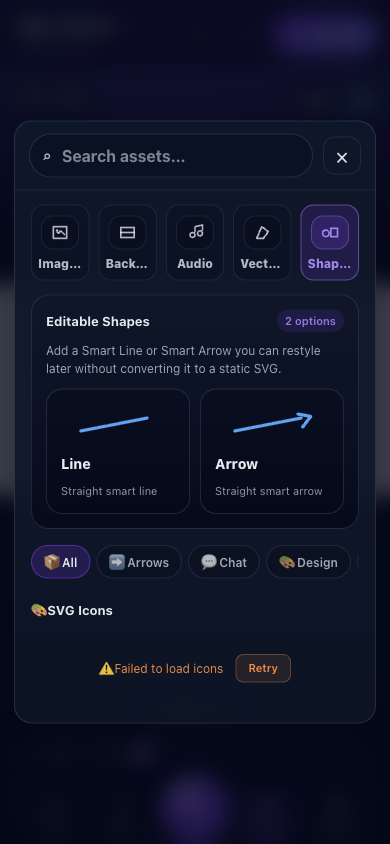
- Shapes categoryOpen Assets, then Shapes to reach editable connectors.
- Editable ShapesThese are project-native smart strokes, not flattened SVG icons.
- LineAdds and selects a straight Smart Line.
- ArrowAdds and selects a straight Smart Arrow with a directional end head.
- Tap Assets in the bottom navigation.
- Tap Shapes.
- Under Editable Shapes, choose Line or Arrow.
- Close the Assets sheet if it remains open.
- Confirm the connector is selected on the canvas.
- Tap More to expand its complete object actions.
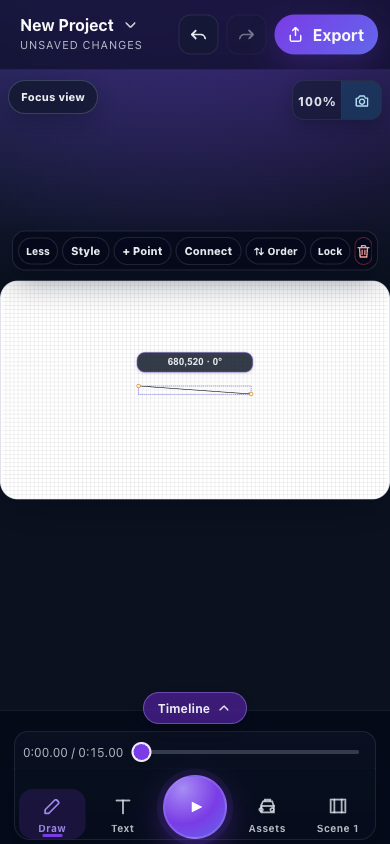
- Less / MoreCollapses or expands the contextual action row.
- Style and + PointStyle changes route, stroke, render, and arrowhead settings; + Point adds an editable route waypoint.
- ConnectBegins the guided start-target then end-target attachment flow.
- Order, Lock, DeleteControls stacking, protects the connector, or removes it.
- Selected smart arrowEndpoint handles remain tied to the same connector object while actions are open.
Attach both endpoints
- With the standalone connector selected, open More.
- Tap Connect.
- Tap the object that should own the start endpoint.
- Wait for the prompt to change to Select end object.
- Tap the second target object.
- Confirm Scribe reports Connector linked.
- Move either target and confirm its endpoint follows.
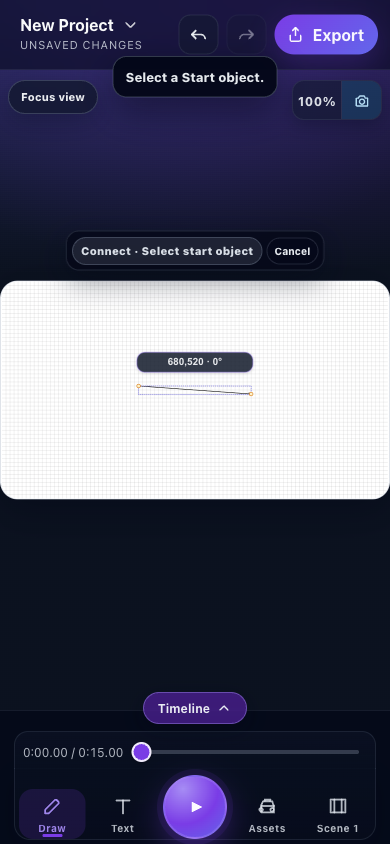
- Current requestThe toast names which endpoint target must be selected next.
- Target-pick modeCanvas taps now choose the requested target instead of changing normal selection.
- CancelLeaves the attachment flow and restores normal canvas selection.
- Connector being attachedThe connector remains selected while you choose its two target objects.
If you tap an invalid target, the prompt remains active so you can choose another object. Tap Cancel, use the Mobile back action, or press Escape on a connected keyboard to leave target-pick mode.
Restyle or manage an existing connection
- Open More → Style to change Straight, Curved, or Elbow route, stroke settings, render style, and supported arrowheads.
- Use + Point, then tap the canvas route, to create an editable waypoint; select a route point to expose Delete Point.
- Once either endpoint is attached, Connect becomes Connection.
- Open Connection to see Start and End status.
- Use Change Target or Attach Target for one endpoint.
- Use Detach for one endpoint or Detach All for both.
Mobile Lite attaches with the Auto anchor. Use the desktop Smart Connector inspector when a named Top, Right, Bottom, Left, or Center anchor is required.
Other Mobile Lite selection differences
- Tap an object to select it.
- Use contextual actions and sheets for supported transforms.
- Multi-selection and grouping are presented in compact controls.
- Connected smart strokes remain project-native objects and use the same connector geometry during rendering.
- Desktop and Mobile Lite arrange controls differently; do not use desktop pixel positions to locate a mobile action.
Limitations
- Locked objects are inspectable but cannot be dragged, resized, rotated, deleted, animated, or added to a multi-selection until unlocked.
- Inactive-scene and hidden objects are not canvas-selection targets.
- Multi-selection does not expose the normal single-object transformer.
- Text resizing changes its box width, not font size.
- Group selection intentionally limits child transforms.
- The desktop creation menu offers Straight, Curved, and Elbow. Mobile Lite starts from Straight, exposes those three routes in Style, and can build waypoint-based geometry with + Point.
- Smart connector attachment applies to supported target objects in the active project state.
- Mobile Lite uses
Autoendpoint anchors; named-side anchor selection currently requires the desktop inspector. - Connector following does not automatically solve layer overlap, camera framing, or animation readability.
Troubleshooting and recovery
Clicking an object does not select it
- Pause playback.
- Press
Escapeto cancel connector target-pick or leave group editing. - Select the object's scene.
- Try its timeline track.
- If Locked appears, choose Unlock before editing.
Dragging creates a marquee instead of moving
- Begin the drag on the object's visible body, not empty canvas.
- Confirm the select tool is active.
- Zoom in if the object has a very small hit area.
- Select its timeline track first, then return to the object.
A group cannot be created
- Select at least two eligible objects.
- Remove locked or inactive-scene items from the intended set.
- Confirm you are not already inside an incompatible group-edit state.
- Retry with
Ctrl/Cmd+G.
A connector will not attach
- Select the connector itself.
- Choose Attach Target for the correct Start or End row.
- Click a different supported canvas object, not the connector.
- Press
Escape, then retry if the pick state became stale. - Check that both objects belong to the active scene/project context.
A connector does not follow as expected
- Confirm the endpoint status says Attached, not Free.
- Change the anchor to Auto or the intended side.
- Ensure you moved the target object, not only the viewport.
- Undo the last geometry change and reattach the endpoint if necessary.
Keyboard and accessibility notes
Shift,Ctrl, orCmdplus click toggles eligible objects in multi-selection.Ctrl/Cmd+Aselects all eligible active-scene objects when focus is not in an editable field.Ctrl/Cmd+Ggroups;Shift+Ctrl/Cmd+Gungroups the selected unlocked group.DeleteorBackspaceremoves eligible unlocked selection.Escapecancels connector picking, exits group editing, or clears selection according to context.Ctrl/Cmd+Zundoes;Shift+Ctrl/Cmd+ZorCtrl/Cmd+Yredoes where supported.- The smart connector split button supports arrow-key movement,
Enter/Spaceactivation, submenu navigation, andEscapewith focus restoration. - Connector Start/End anchors use labeled select controls; attachment actions are named buttons rather than icon-only targets.