Workspace tour
The desktop workspace keeps project structure around a central canvas: global project actions are above it, creation tools are to the left, object properties appear on the right, and scene/timing controls sit below.
What the workspace is
The workspace is the editing shell around your project. It does not store a second copy of the project: the canvas, scene cards, timeline rows, inspector, and audio lanes are different views of the same project state.
Use this tour:
- before creating your first project;
- when a selected object seems to “disappear” into another panel;
- when deciding whether an action belongs to a scene, object, timeline, or project; or
- after moving from Mobile Lite to desktop.
Prerequisites
Open or create a desktop project. For the clearest tour, pause playback and start with a blank scene. Sign-in is not required.
1. Identify the major regions
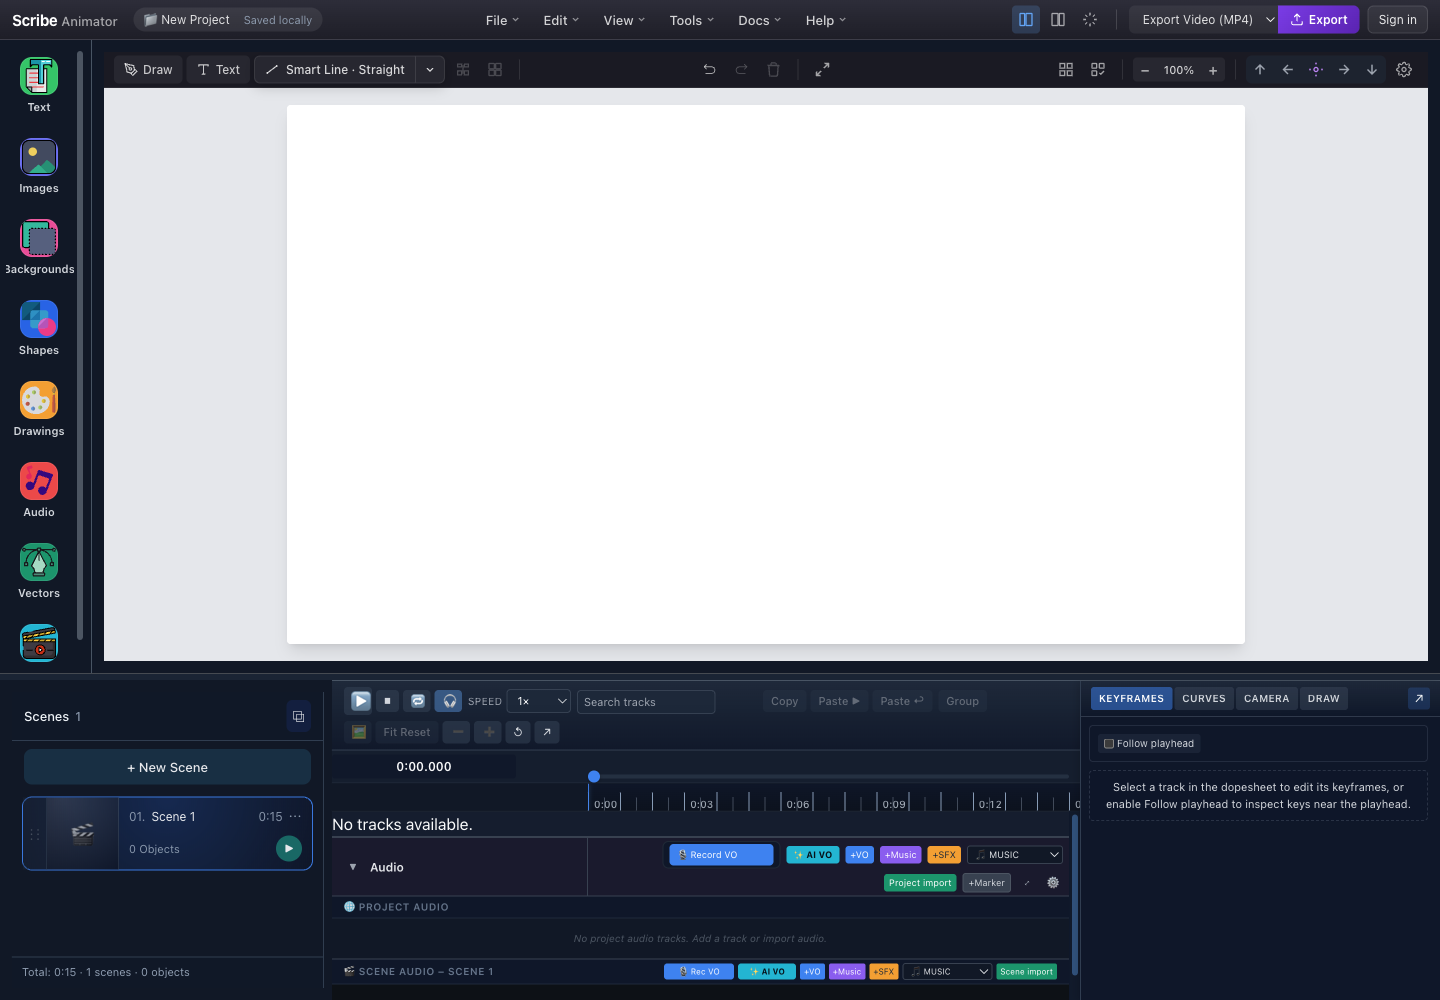
- Project and application headerShows project/save state and contains File, Edit, View, Tools, Docs, Help, exporter, Export, and Sign in.
- Creation railOpens focused libraries for text, images, backgrounds, shapes, drawings, audio, vectors, and templates.
- Canvas toolbarHolds Draw, instant Text, smart-line variants, undo/redo, delete, view arrangement, zoom, fit, and canvas settings.
- Canvas and pasteboardThe white page is the visible frame. The surrounding gray area is editing space, not exported content.
- Scene managerCreates, selects, plays, renames, duplicates, reorders, times, and deletes scenes.
- Timeline and object tracksControls playback, playhead time, track selection, object timing, and the project/scene audio lanes.
- Timeline detail drawersSwitch between Keyframes, Curves, Camera, and Draw details for the active timeline selection.
Why the regions are separated
| Region | Use it when… | Avoid using it for… |
|---|---|---|
| Header | Starting, saving, loading, exporting, changing global view, getting help | Fine object positioning |
| Creation rail | Adding prepared or imported content | Reordering existing objects |
| Canvas toolbar | Adding a default text/connector, changing tool or viewport, undoing a recent action | Project backup |
| Canvas | Direct selection, movement, resize, rotation, and connector handles | Exact timing |
| Scene manager | Structuring the video into beats or shots | Independent animation inside one scene |
| Timeline | Playback, timing, track/key selection, audio alignment | Changing text content or color |
| Detail drawers | Editing selected keys, curves, camera, or draw data | Selecting unrelated scene content |
2. Read the header correctly
The left side of the header shows:
- the Scribe Animator brand;
- the active project name;
- an unsaved-change dot when the project is dirty; and
- Saved locally or Saved to library after a successful save.
The center menus separate responsibilities:
- File: new project, local/library save, load, demo, export,
.scribepackage, AI JSON, and project organization; - Edit: undo, redo, clear history, duplicate, selection, copy/paste, and canvas cleanup;
- View: layout and density controls;
- Tools: creation and specialist tools;
- Docs: documentation routes; and
- Help: shortcuts, support, about, and release information.
The right side selects an exporter, starts Export, and opens account actions.
Edit menu: history, clipboard, and canvas cleanup
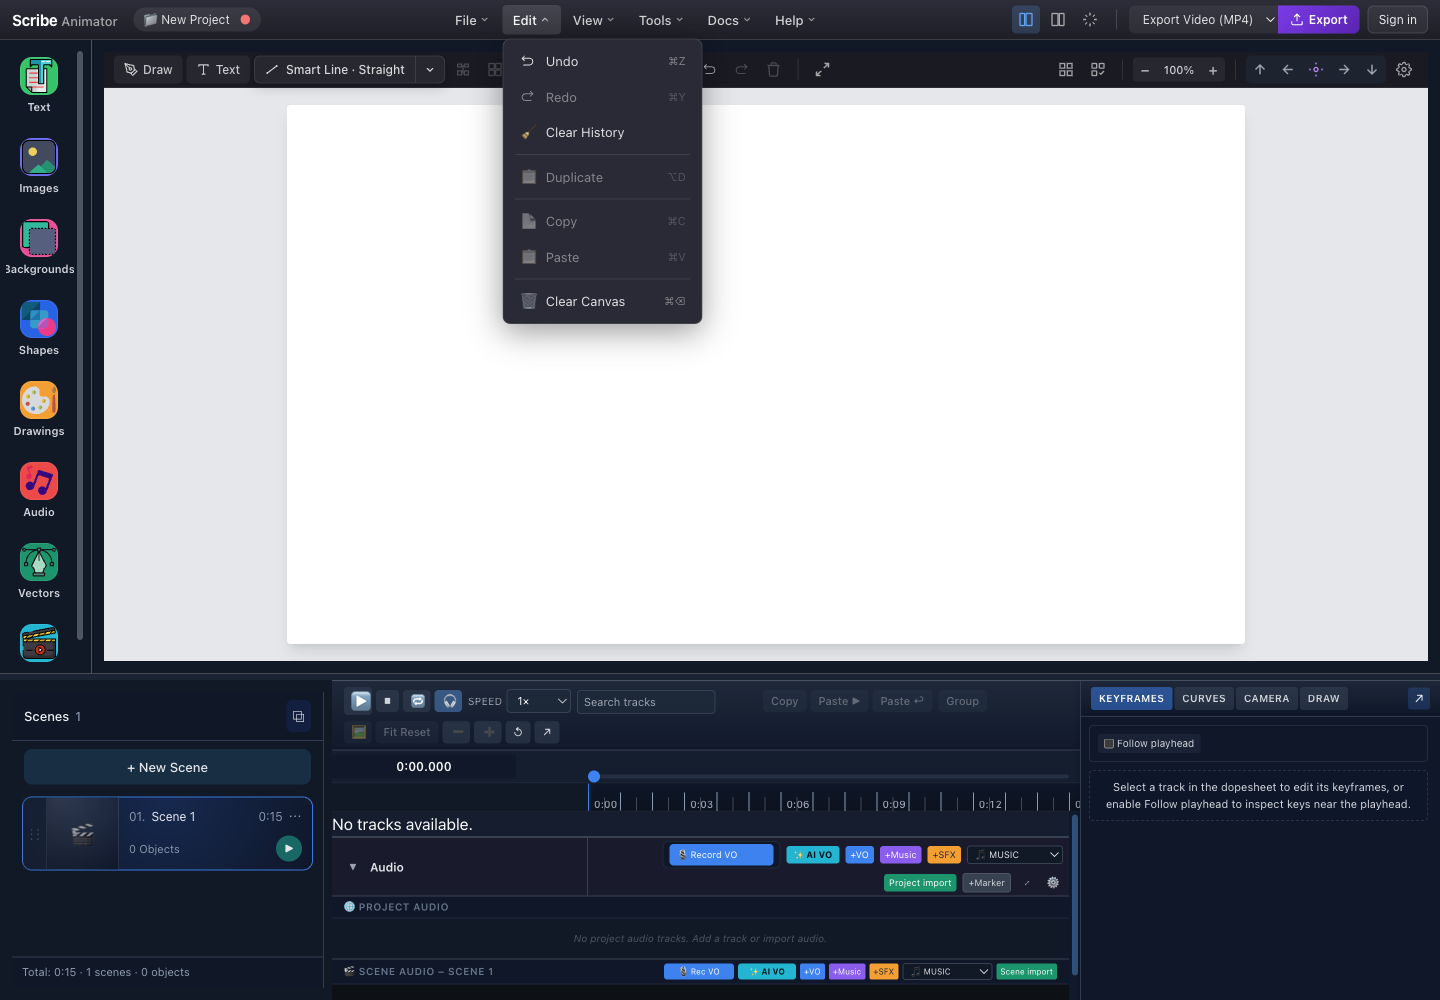
- Undo and RedoMove backward or forward through reversible editor commands. The buttons disable at the end of the available history.
- Clear HistoryDrops the undo/redo stack without deleting current canvas content. Use it only when earlier reversals are no longer needed.
- Duplicate, Copy, and PasteOperate on the current compatible selection. They remain disabled when nothing eligible is selected or copied.
- Clear CanvasRemoves scene content as a deliberate bulk edit. Save a checkpoint before using it on work you may need.
View menu: make room without changing the project
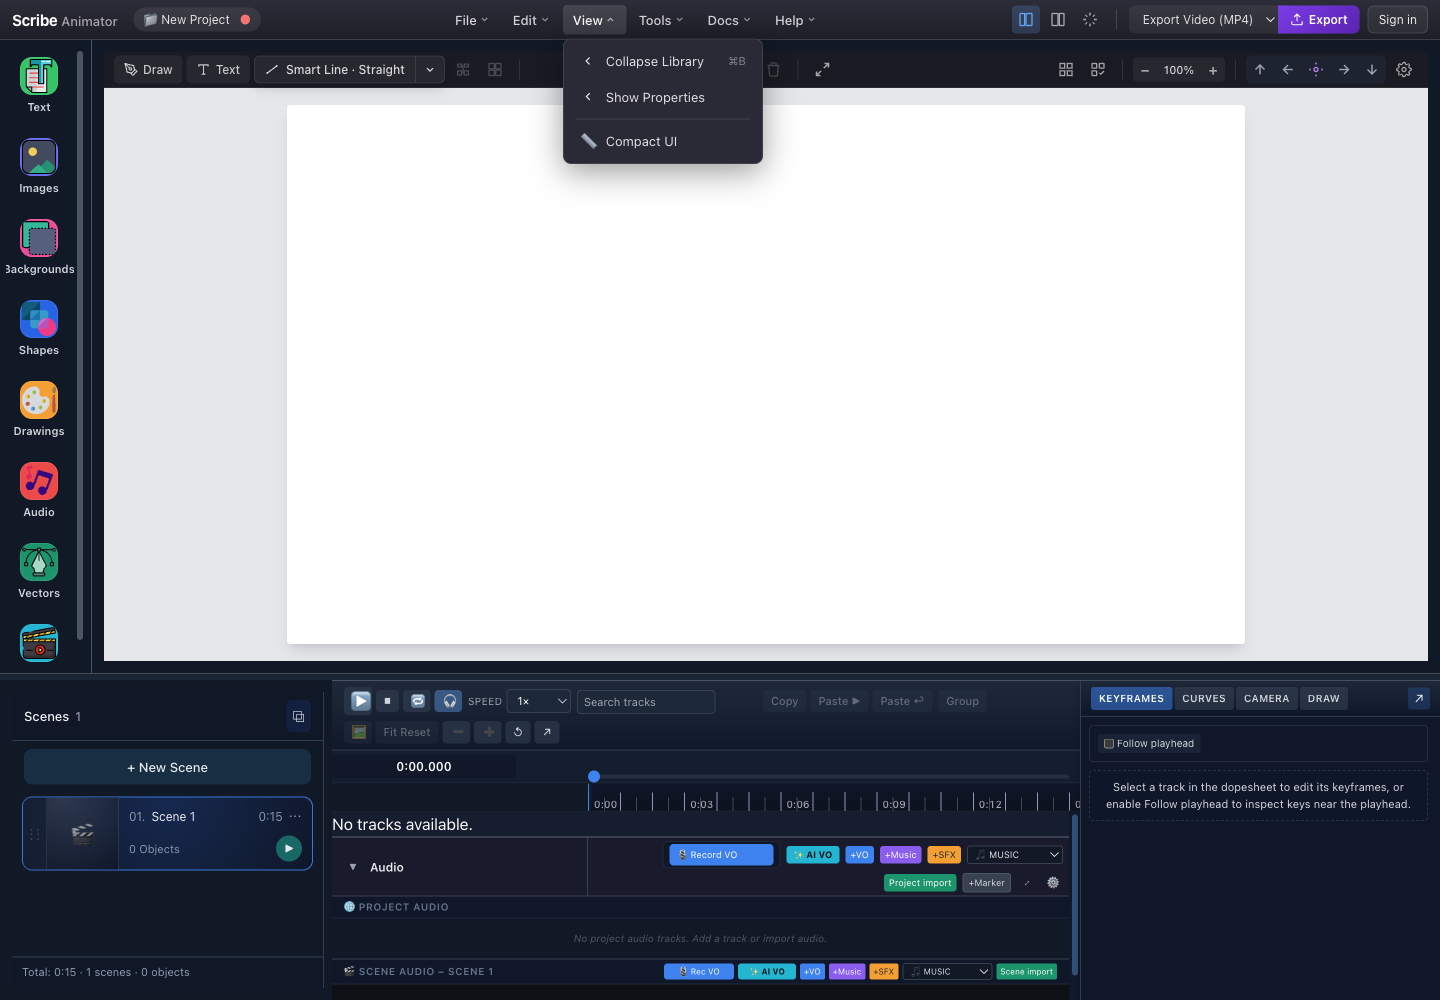
- Collapse or show LibraryReclaims the left side of the workspace while preserving the active project and scene.
- Show or hide PropertiesControls the right inspector. The label reflects the action that will happen next.
- Compact UIUses denser controls when screen space matters. It changes layout density, not project dimensions.
Tools menu: open specialist surfaces
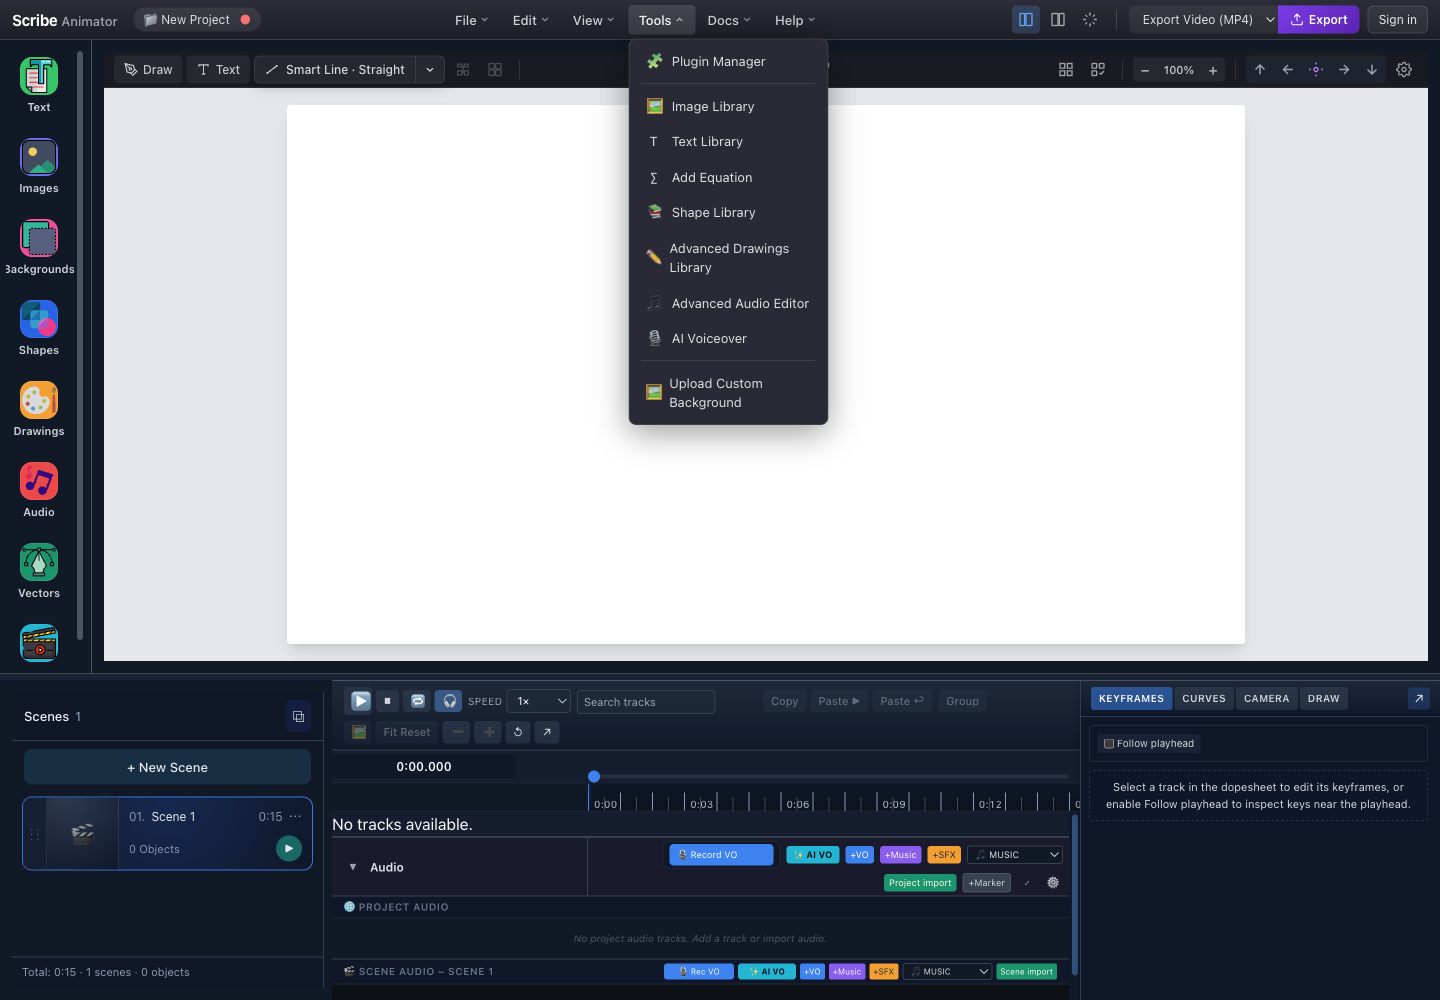
- Plugin ManagerReviews registered capabilities, activation, diagnostics, and permission information.
- Content libraries and equationsOpens image, text, equation, shape, or advanced drawing surfaces without changing the current selection first.
- Audio and AI voiceoverOpens the advanced audio editor or voiceover workflow. Microphone and model availability still follow platform permissions.
- Upload Custom BackgroundStarts the validated local-background intake path. It is distinct from merely changing the canvas board color.
Expected result
After making a change, the project badge displays the dirty indicator. After File → Save Locally, it displays Saved locally with the checkpoint time available as supporting state.
3. Use the two creation entry points
There are two different ways to add some content:
- The left rail opens a searchable library or specialist panel.
- The canvas toolbar performs a fast default action.
For example:
- left-rail Text opens blocks and presets; choosing a tile inserts it;
- toolbar Text inserts a selected default
New Textobject; - the smart-line main button inserts the currently selected line/arrow route;
- the smart-line chevron opens the line/arrow variant menu.
Use the library when style or content matters. Use the toolbar when you need a neutral object quickly.
Limitations
- Some libraries load content asynchronously and can show an empty or retry state.
- An asset can be unavailable because of network, permissions, or a disabled plugin.
- Imported files may require validation or preprocessing before becoming canvas objects.
4. Understand canvas versus viewport
The white rectangle represents project coordinates. Zooming or fitting changes how you see those coordinates; it does not resize the project.
- Click an object to select it.
- Drag the object to change its project position.
- Drag a transform handle to resize it.
- Use the rotation handle for supported object types.
- Click empty canvas to clear selection.
- Hold
Ctrl/Cmdwhile scrolling over the canvas to zoom toward the pointer. - Press
Zwith a selected object and no text field focused to zoom to that selection.
Use Canvas Settings only when changing canvas/grid behavior. Use the zoom controls when you merely need a closer view.
Expected result
At a different zoom, the artwork occupies more or less screen space but keeps the same project coordinates and export size.
5. Follow a selection across the workspace
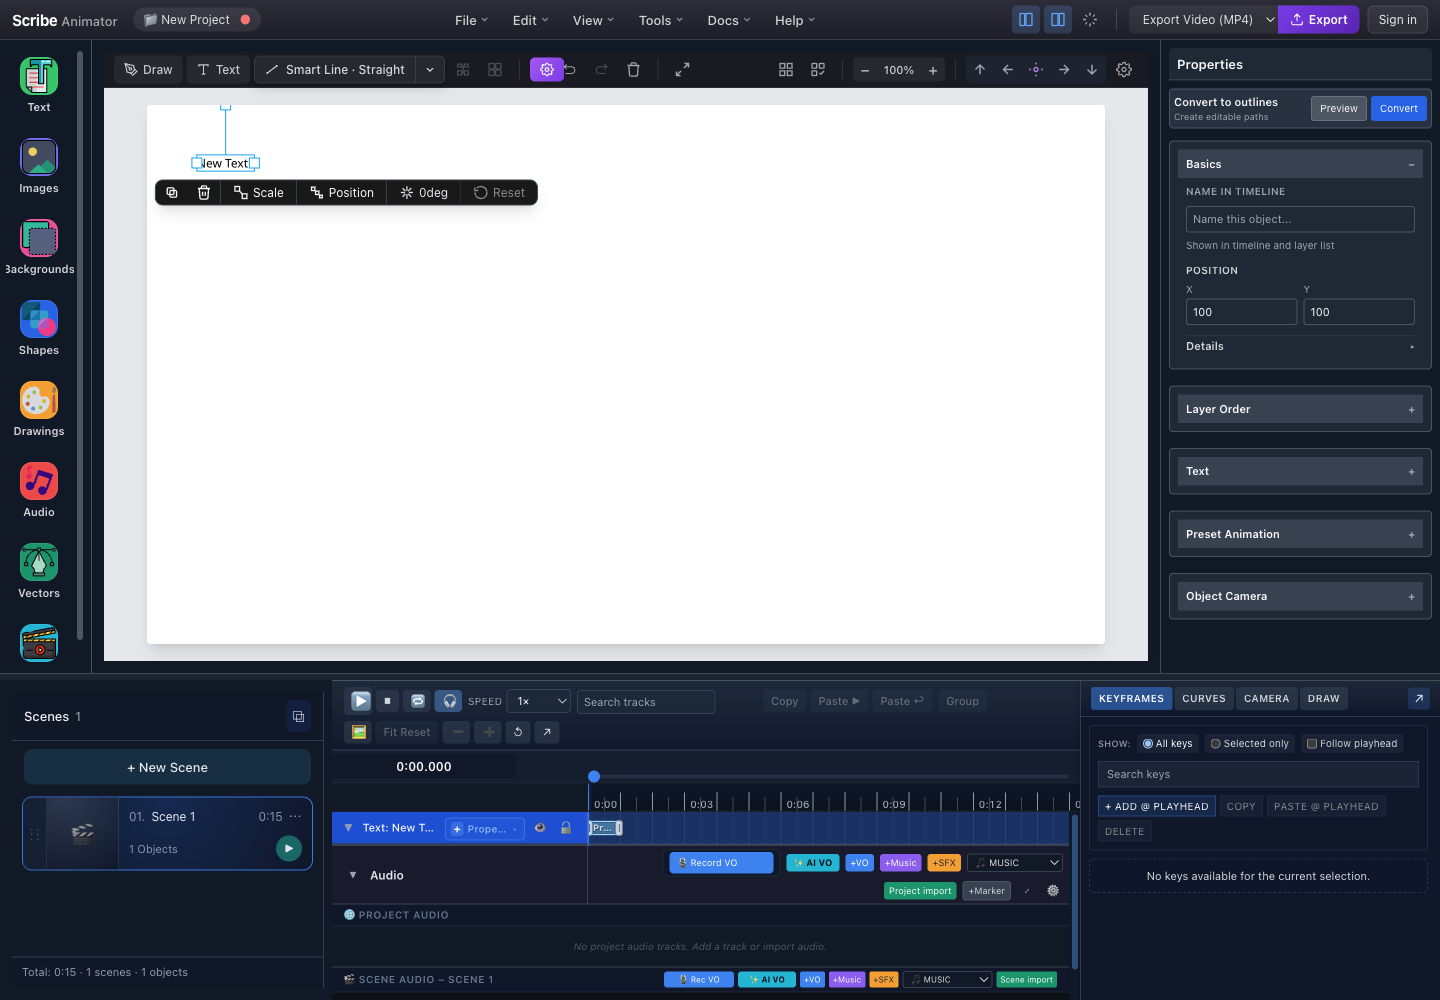
- Selected objectThe blue bounds identify the active text object. Supported objects expose transform handles.
- Contextual canvas actionsDuplicate, delete, scale, position/layer, and rotation actions apply to this object.
- PropertiesBasics opens first; type-specific, layer, animation, camera, and draw sections appear only when eligible.
- Object trackThe selected object's track is blue and supplies timing context to the lower and right-side timeline controls.
- Keyframe detailsThis drawer reports that no keys exist until the selected track receives custom keyframes.
The right panel opens when an object is selected and hides when selection is cleared. Its sections depend on object type:
- Basics: timeline name, X/Y position, type, and ID;
- Layer Order: front, forward, backward, and back;
- Text/Icon: content, typography theme, font size, fill, and font;
- Preset Animation or Draw Animation: timing source, start, duration, type, easing, and path-follow controls;
- Object Camera: only when the object is eligible; and
- type-specific sections for vector paths, static SVG colors, smart strokes, connectors, groups, and other supported objects.
Do not expect every section for every object. A group, for example, exposes Edit group and Ungroup instead of normal resize/rotation controls.
6. Use scenes for structure
A scene is a timed section of the project with its own active content and scene-level state.
- Select a scene card to make it active.
- Use + New Scene for a new shot or beat.
- Open the scene actions menu to rename, duplicate, delete, set duration, transition, thumbnail color, or label where offered.
- Drag scene cards to reorder them.
- Use the scene card play button to preview that scene.
Scene-local objects from another scene are not rendered or eligible for canvas multi-selection in the active scene. This prevents edits from crossing scene boundaries accidentally.
When to add a scene
Add one when the composition, narration beat, or camera setup changes. Keep objects in the same scene when they need to overlap or animate independently within one shot.
7. Use the timeline for time
The timeline combines:
- global play/pause and current time;
- the playhead and ruler;
- object tracks for the active scene;
- track selection and grouping controls;
- project audio lanes;
- scene audio lanes; and
- Keyframes, Curves, Camera, and Draw drawers.
Select a canvas object or track before opening a detail drawer. If a drawer says no track or no keys are available, it is reporting missing context rather than a loading failure.
The audio region deliberately separates PROJECT AUDIO from SCENE AUDIO. Project audio spans project time; scene audio belongs to the named scene.
8. Adjust available space
Use layout controls before reducing browser zoom:
Ctrl/Cmd+Btoggles the left panel.- The header panel buttons toggle left and right layouts.
- Use canvas Fit/zoom controls to fit artwork without changing browser scale.
- Drag supported panel separators when a resize cursor appears.
- Use View density options if controls feel too spacious or compact.
The editor persists supported left/right panel widths locally. A very narrow browser may collapse or condense controls rather than preserve the full desktop arrangement.
Mobile Lite differences
Mobile Lite is a constrained composition of the same project domains, not a pixel-for-pixel desktop layout:
- the canvas remains central;
- creation and editing tools open as sheets;
- Play is a primary bottom action;
- project navigation and Help live in the project menu; and
- some advanced desktop controls are condensed or unavailable.
Do not use desktop pixel positions to locate Mobile Lite controls. Follow the Mobile Lite guide or the in-product tutorial for its sheet-based flow.
Limitations
- The workspace screenshot shows a wide desktop layout; smaller screens may collapse panels.
- Locked objects can be selected for inspection but cannot be transformed, deleted, animated, or added to a multi-selection.
- Playback limits editing and viewport actions.
- A multi-selection displays high-contrast outlines but not a normal single-object transformer.
- Detail drawers depend on an eligible track/object selection.
- Local layout preferences do not sync as project data.
Troubleshooting
The Properties panel is missing
- Pause playback.
- Select an object or its timeline track.
- Confirm the object is in the active scene.
- Use the right-panel header toggle if the layout was manually hidden.
An object is visible but cannot be edited
- It may be locked. Select it for inspection and unlock it before editing.
- You may be in group-edit or connector-target mode; press
Escape. - Playback may still be active.
The canvas is too small
- Toggle the left panel with
Ctrl/Cmd+B. - Close the right panel when exact properties are not needed.
- Use the canvas fit control.
- Restore normal browser zoom before diagnosing canvas scaling.
The timeline appears empty
- Confirm that the active scene contains objects.
- Select the correct scene card.
- Clear a search term in the track search field.
- An empty new scene legitimately reports No tracks available.
Keyboard and accessibility notes
- Header and smart-line menus are buttons with expanded state and keyboard navigation.
Ctrl/Cmd+Btoggles the left panel.Ctrl/Cmd+Ssaves locally;Shift+Ctrl/Cmd+Ssaves to the library.Ctrl/Cmd+Zundoes andShift+Ctrl/Cmd+ZorCtrl/Cmd+Yredoes.Ctrl/Cmd+Aselects all eligible objects when focus is not in a text field.Escapedeselects, exits group editing, or cancels connector target selection.Delete/Backspaceremoves the current unlocked selection.Ctrl/Cmd+Ggroups two or more selected objects; addShiftto ungroup the selected unlocked group.- Keyboard shortcuts intentionally defer to text fields, textareas, content-editable surfaces, and relevant audio controls.