Use camera moves and path following
The camera controls what the viewer sees. Path Follow controls where an object moves. They are separate systems: a follower can move while the camera stays fixed, or the camera can follow an object whose movement comes from a path binding.
The Desktop camera states on this page were created and verified in the real local editor at 1440 × 1000 on 27 July 2026. The fixture includes a manual key, an Object Camera action, a Draw-step Camera action, and a reproduced blocking overlap. Mobile Lite uses a focused camera sheet over the same scene data. No documentation-only canvas is used in this guide.
Choose a scene camera mode
| Mode | Use it when | Main limitation |
|---|---|---|
| Fixed Scene Camera | One saved view should frame the entire scene | It does not move during the scene |
| Track | You need manual, object-driven, or draw-step camera actions at exact times | Requires timing and overlap review |
| Follow Hand | The view should stay with the active drawing hand | Requires a valid hand-draw sequence |
| Follow Object | The view should track a moving subject | Requires an eligible target object |
Use the least complex mode that communicates the idea. Fixed framing is usually more readable for text-heavy scenes.
A scene has one active mode: Fixed Scene Camera, Track, Follow Hand, or Follow Object. Object Camera and Draw-step Camera are not additional scene modes. They create timed actions inside the shared Track. Switching to Fixed or either Follow mode keeps those actions saved but makes them inactive; switching back to Track activates them again.
How the camera systems interact
There are three camera authoring surfaces, but only one camera is evaluated during playback and export:
| Surface or feature | What it owns | Where you edit it | Target and timing | When it runs | Choose it when |
|---|---|---|---|---|---|
| CAMERA drawer | Scene mode, manual Track keys, status, bookmarks, and scene-entry transitions | Timeline → CAMERA | The whole scene and shared playhead | The selected scene mode always decides the runtime source; manual keys run only in Track | You need a fixed shot, an exact manual move, a live follow mode, or an overview of all camera sources |
| Object Camera | A generated Track action owned by one eligible object | Select the object → Properties → Object Camera | Captured object bounds plus an explicit start and move duration | Track only | A text, image, static SVG, or shape needs one timed close-up or wider shot |
| Draw-step Camera | A generated Track action owned by one drawing step | Timeline → DRAW → expand the step → Camera | That step's path/reveal bounds and step-constrained timing | Track only | The framing should change for a particular vector drawing step |
The CAMERA drawer is the coordinator, not a fourth competing editor. It reports how many manual, Object Camera, and Draw-step Camera actions exist and compiles them into one time-ordered camera track.
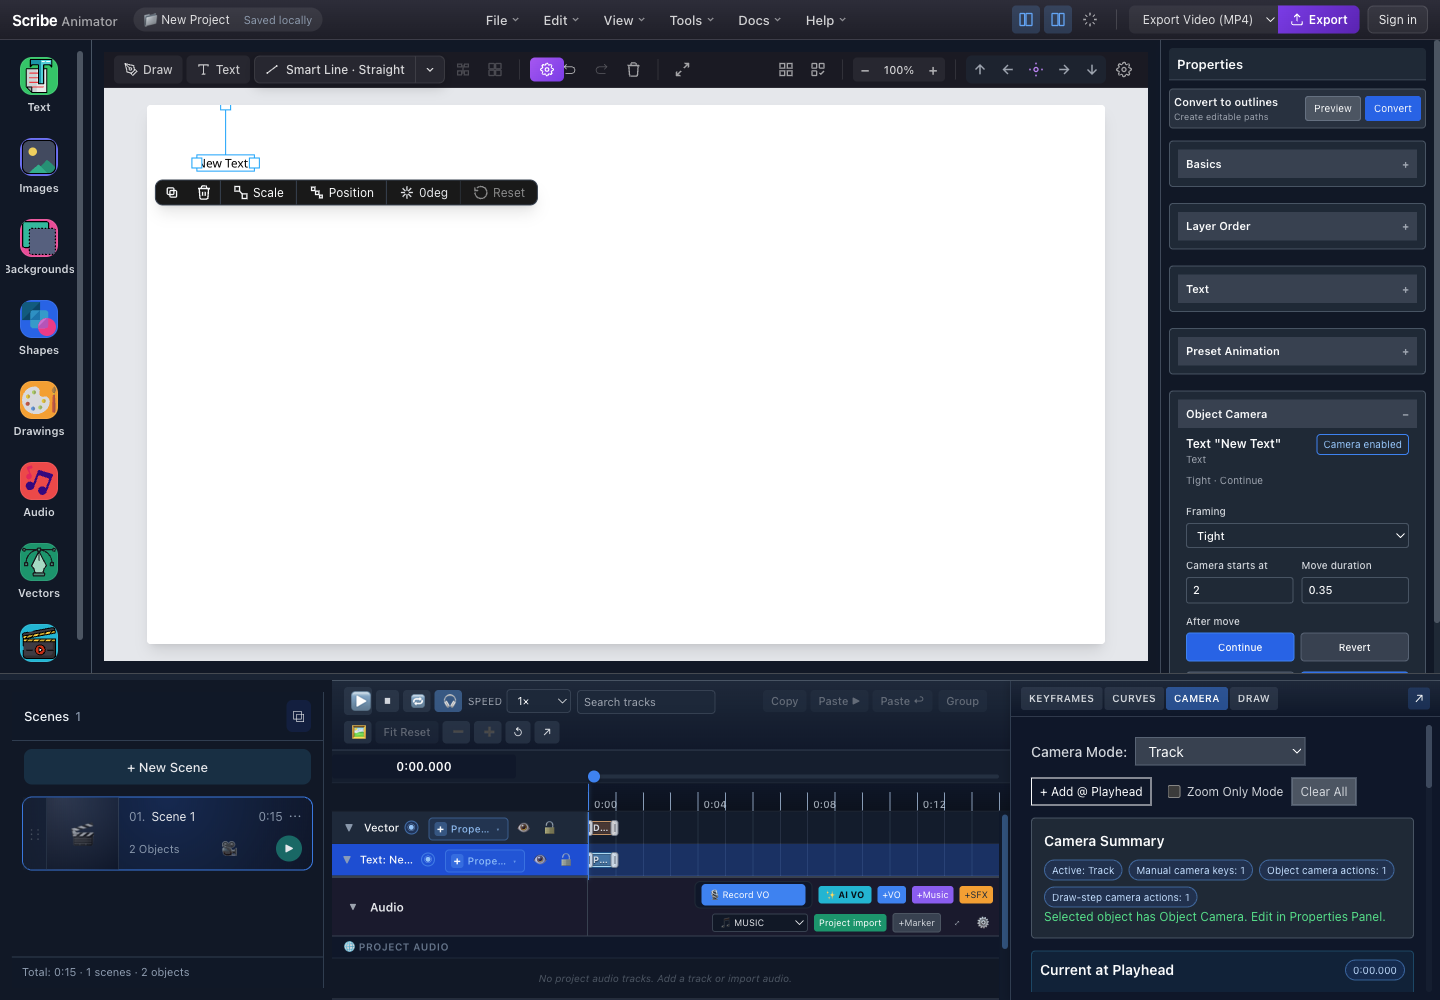
- Object-owned actionThe selected text exposes its editable Object Camera controls in Properties.
- Track is activeManual, Object Camera, and Draw-step Camera actions are evaluated only in Track mode.
- Three source countsCamera Summary independently reports manual keys, object actions, and draw-step actions.
- One shared timelineAll camera actions resolve against the scene-local ruler and playhead.
Object Camera: a timed shot, not a live follower
Object Camera captures the selected object's current approximate bounds when you choose Add Camera or Update Camera. It changes the viewer's framing; it does not move, scale, or animate the object itself.
- Select an eligible text, image, static SVG, or shape with usable bounds.
- Switch the scene to Track.
- Open Properties → Object Camera.
- Set:
- Framing: Tight, Medium, or Wide;
- Camera starts at: scene-local start time;
- Move duration:
0.1to2seconds; - After move: Continue or Revert; and
- Hold when Revert is selected.
- Choose Add Camera. Later changes require Update Camera.
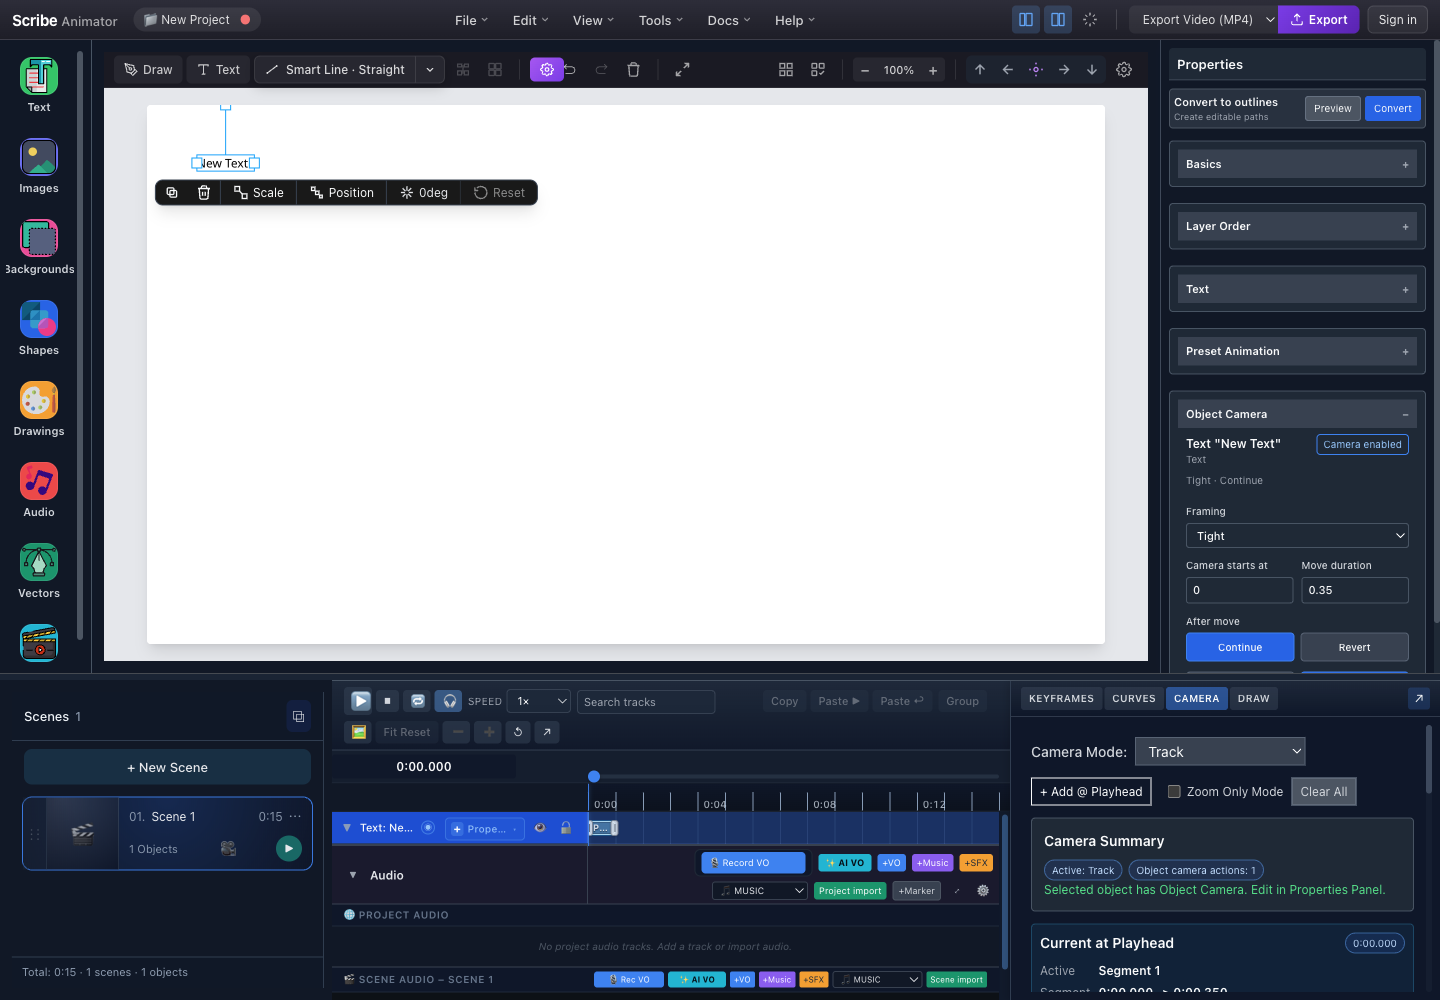
- Object Camera editorFraming, start time, move duration, Continue/Revert, and Add/Update/Remove belong to the selected object.
- Camera enabledThis badge confirms that the selected object owns a saved camera action.
- Scene modeThe generated action runs because the scene Camera Mode is Track.
- Object action countCamera Summary reports one Object Camera action and links editing back to Properties.
Continue reaches the generated shot and leaves that framing active until a later Track action changes it. Revert reaches the shot, holds for the configured range, and returns toward the prior framing over the move duration.
Object Camera is intentionally not shown for drawable vector paths. If text is converted to outlines, or the selection otherwise contains drawable paths, Properties switches to a Draw-step Camera summary.
Draw-step Camera: framing owned by one drawing step
Draw-step Camera uses the selected step's path or revealed path range when available, rather than always framing the whole drawable object. It is useful when a large diagram should move through several local drawing areas.
- Create or import a drawable vector.
- Use DRAW → AUTO-PLAN, or add a Draw step manually.
- Switch CAMERA → Camera Mode to Track.
- Return to DRAW and expand the intended step.
- In that step's Camera area, set framing, start offset, move duration, Continue/Revert, and hold.
- Choose Add Camera.
- Open CAMERA and confirm a
Dsource appears.
AUTO-PLAN creates Draw steps. It does not automatically enable a camera for every step. Add only the step cameras that improve the explanation.
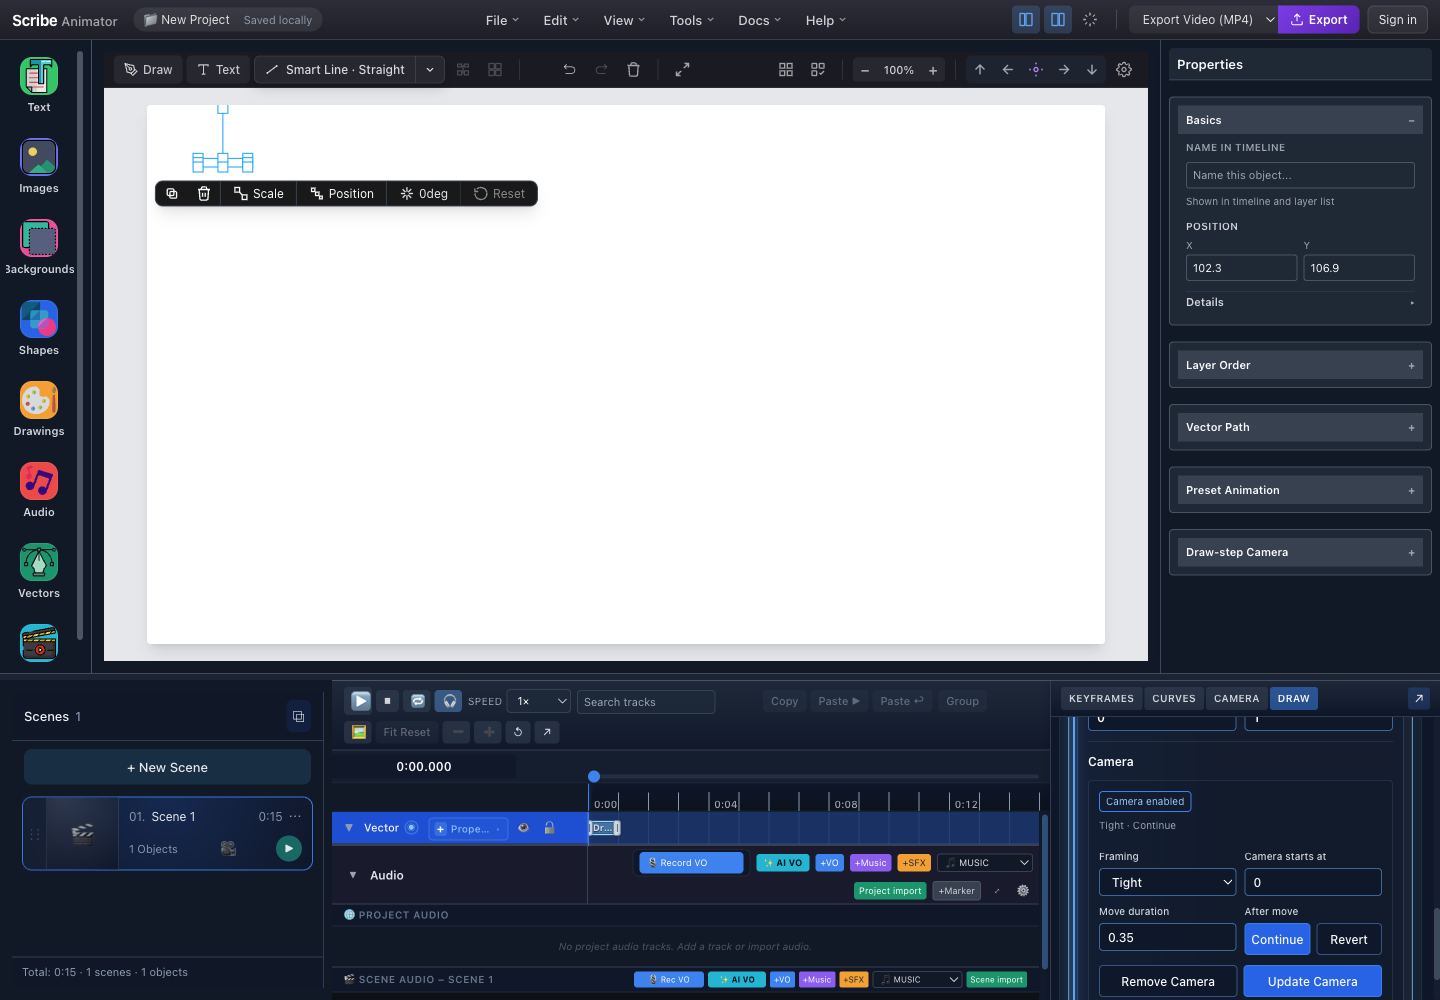
- DRAW drawerOpen the DRAW drawer, then expand the owning step to reach its Camera controls.
- Step-owned CameraThis editor belongs to one Draw step, not to the whole drawable object.
- Camera enabledThe step recipe is saved and has generated Track keys.
- Update or removeEdit the source recipe here so generated keys stay consistent.
The start and return timing is constrained by the Draw step, the next configured step-camera action, and the scene end. If the requested timing no longer fits, shorten the move or hold, retime the step, or move the next camera action.
The source badges in the CAMERA drawer
The Track key table labels provenance so you can tell what created each camera key:
M— a manual camera key added from CAMERA;O— a generated Object Camera key whose source editor is Properties;D— a generated Draw-step Camera key whose source editor is the expanded DRAW step.
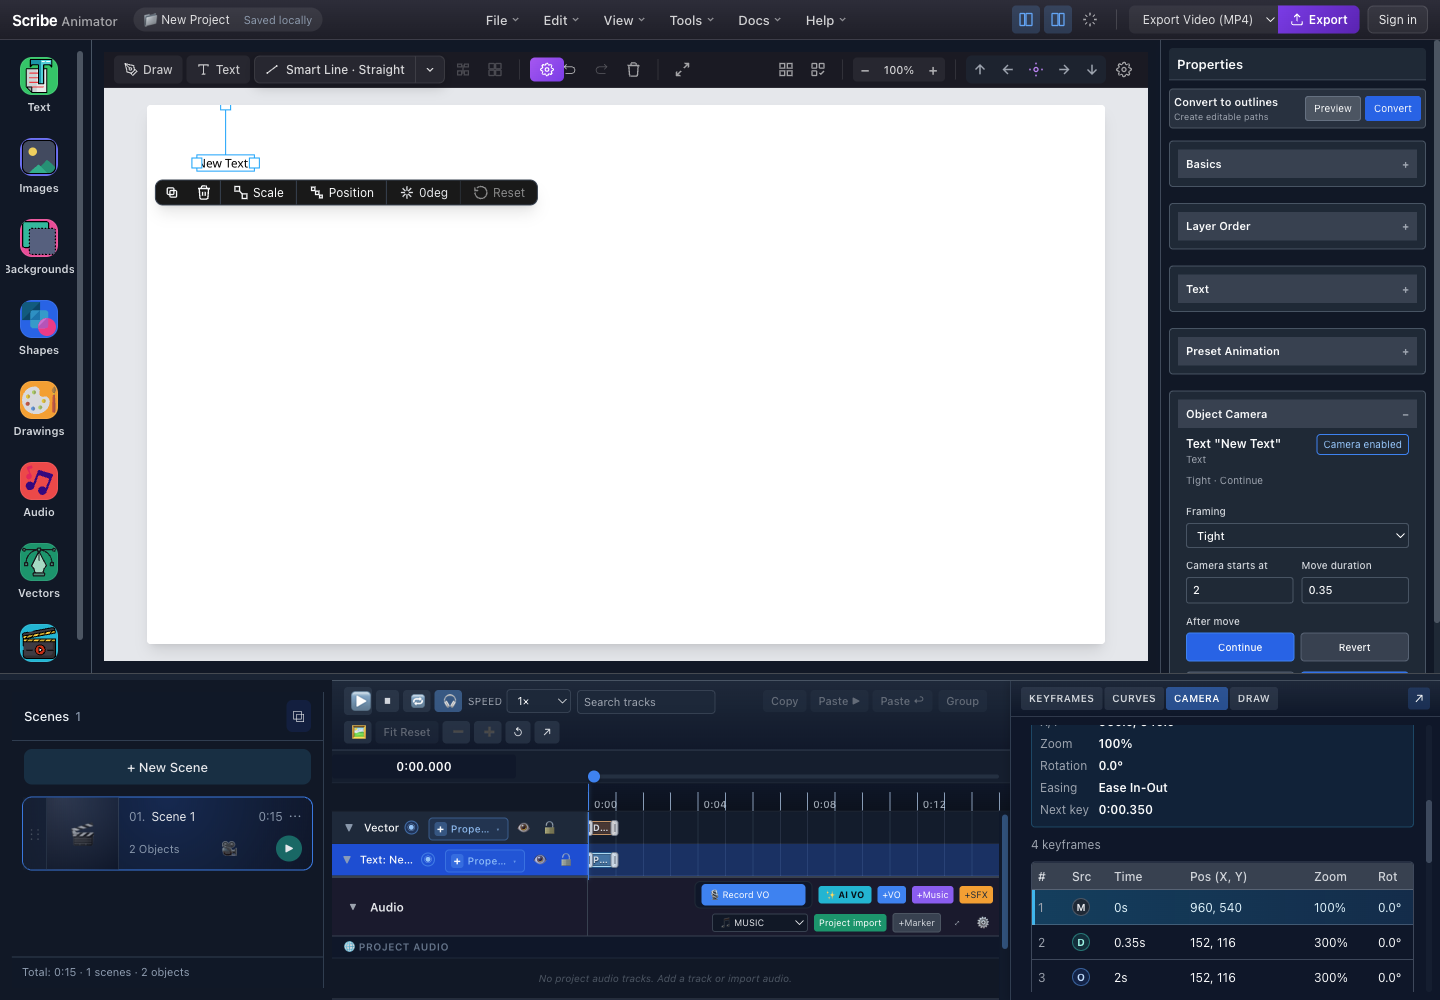
- CAMERA drawerThe shared Track is inspected from the scene-level Camera drawer.
- M, D, and O rowsManual, Draw-step, and Object keys are time-sorted into one camera track.
- Edit O at the sourceGenerated Object Camera rows should be changed from the selected object’s Properties panel.
- Shared playheadEvery source uses the same scene-local time.
Edit generated actions at their source. Use Properties for O, the owning DRAW step for D, and the Camera key table primarily for M plus inspection. Deleting a generated row without removing its source recipe can allow that row to be generated again.
Conflict and precedence rules
| Situation | What Scribe does | What you should do |
|---|---|---|
| Scene mode is Fixed, Follow Hand, or Follow Object | Manual, Object Camera, and Draw-step Camera actions stay saved but are inactive | Switch back to Track when those actions should run |
| Object Camera overlaps Draw-step Camera | The conflict is blocking; neither generated action wins and Add/Update is disabled | Separate their time ranges, shorten a move/hold, or remove one action |
| One action ends exactly when the other starts | Boundary contact is allowed; it is not treated as an overlap | Preview the cut or transition for visual continuity |
| A manual key timestamp falls inside a generated action | Scribe warns, preserves the manual key, and the affected generated interval can be skipped | Move the manual key or generated range unless the override is intentional |
| Multiple Object Camera actions overlap each other | Compatible object actions can be grouped into a wider union shot; a grouped Revert request makes the group revert | Preview the resulting composition and separate actions when a wide union is not intended |
| Draw-step actions are close together | Each step action is ordered and constrained by the next configured action | Shorten the earlier move/hold or retime the Draw steps |
| A camera transition enters the scene | When both endpoint poses resolve, the entry blend temporarily takes precedence over the active mode | Preview across the scene boundary, not only inside the scene |
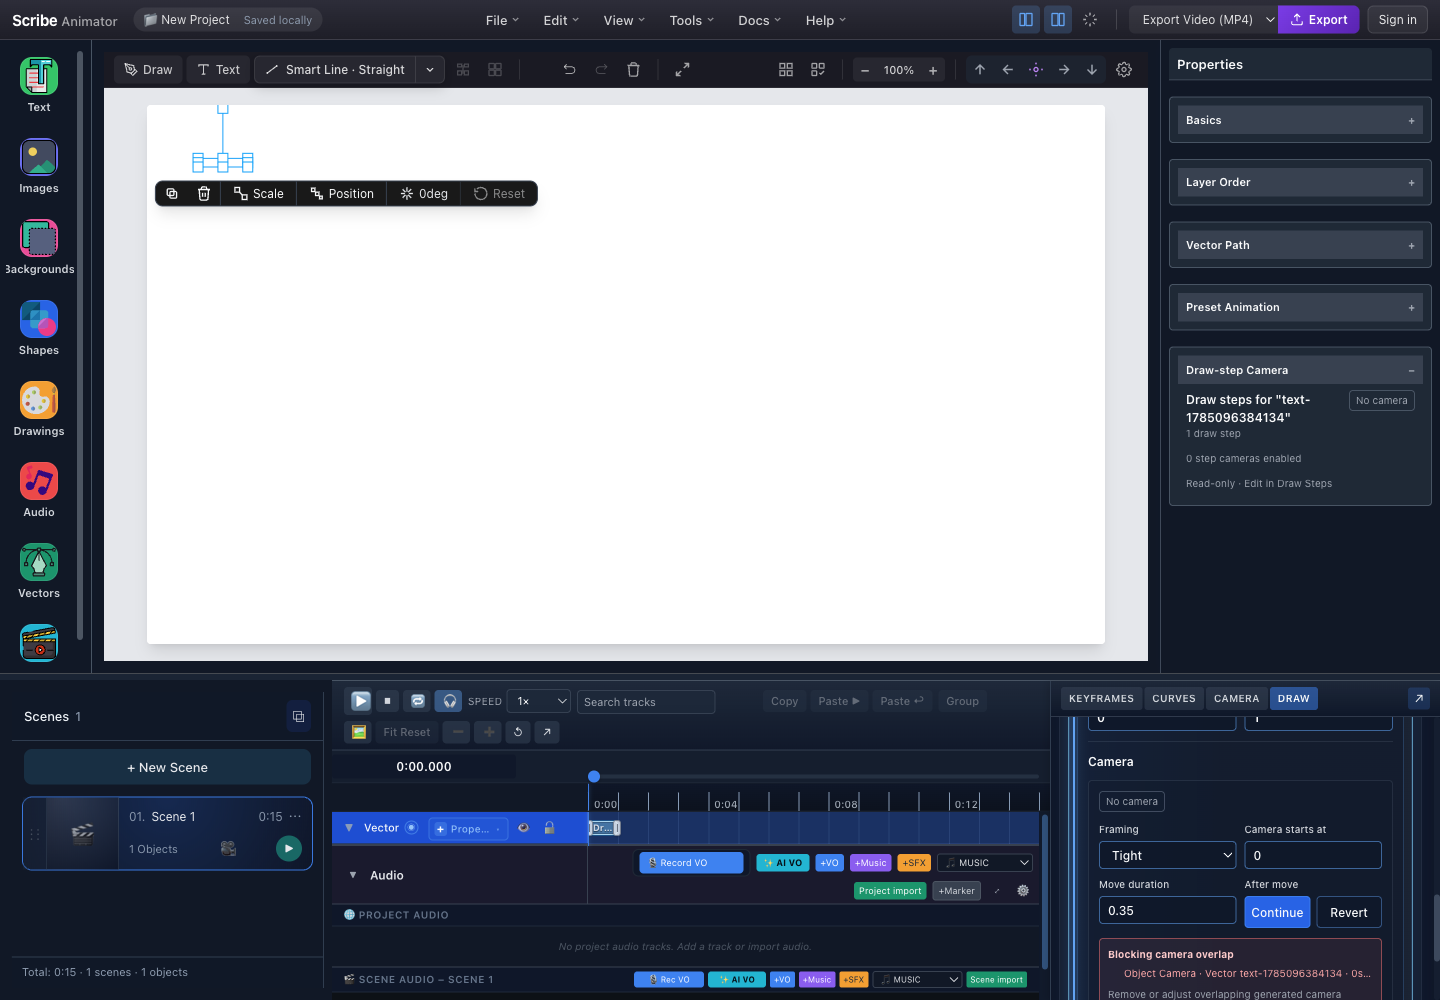
- Read-only Properties summaryFor a drawable selection, Properties points camera editing back to Draw Steps.
- Proposed Draw-step actionThe expanded step owns this framing and timing recipe.
- Blocking overlapAn Object Camera action already occupies this range, so the Draw-step action cannot be added.
CAMERA → Clear All clears the current camera Track keys. It does not necessarily remove the saved Object Camera recipes in Properties or Draw-step Camera recipes in DRAW. Remove generated actions from their source editors when you want them gone permanently.
Similar names that mean different behavior
| Do not confuse | Difference |
|---|---|
| Object Camera vs Follow Object | Object Camera is a bounded, timed Track action around captured object bounds. Follow Object is a scene-wide live mode that continuously samples the target's evaluated animated position. |
| Draw-step Camera vs Follow Hand | Draw-step Camera generates a shot for one configured Draw step. Follow Hand is a scene-wide live mode that continuously samples the active drawing hand. |
| Apply bookmark vs Add as Track key | Apply changes the saved scene pose; it does not switch modes. + KF inserts the bookmark pose into Track at the playhead. |
When Follow Hand or Follow Object is active, the saved scene pose remains available as the zoom/rotation reference and fallback. The saved Track actions are not deleted.
Quick choice guide
| Goal | Choose |
|---|---|
| One stable composition for the whole scene | Fixed Scene Camera |
| Exact pan/zoom/rotation at authored times | Track with manual M keys |
| One timed close-up around text, image, static SVG, or shape | Object Camera in Properties |
| A camera move tied to one vector drawing step | Draw-step Camera in DRAW |
| Keep the active drawing hand on screen continuously | Follow Hand |
| Keep following an animated subject continuously | Follow Object |
Before you frame
- Set the final project aspect ratio and canvas dimensions.
- Place critical text away from the frame edges.
- Finish major object layout and draw planning.
- Select the intended scene.
- Stop playback.
- Open the timeline and choose CAMERA.
- Export a
.scribebackup before replacing a long camera track.
The editor viewport is an authoring view. A saved scene camera is project data. Panning the editor does not automatically save a viewer-facing camera pose.
Camera drawer anatomy
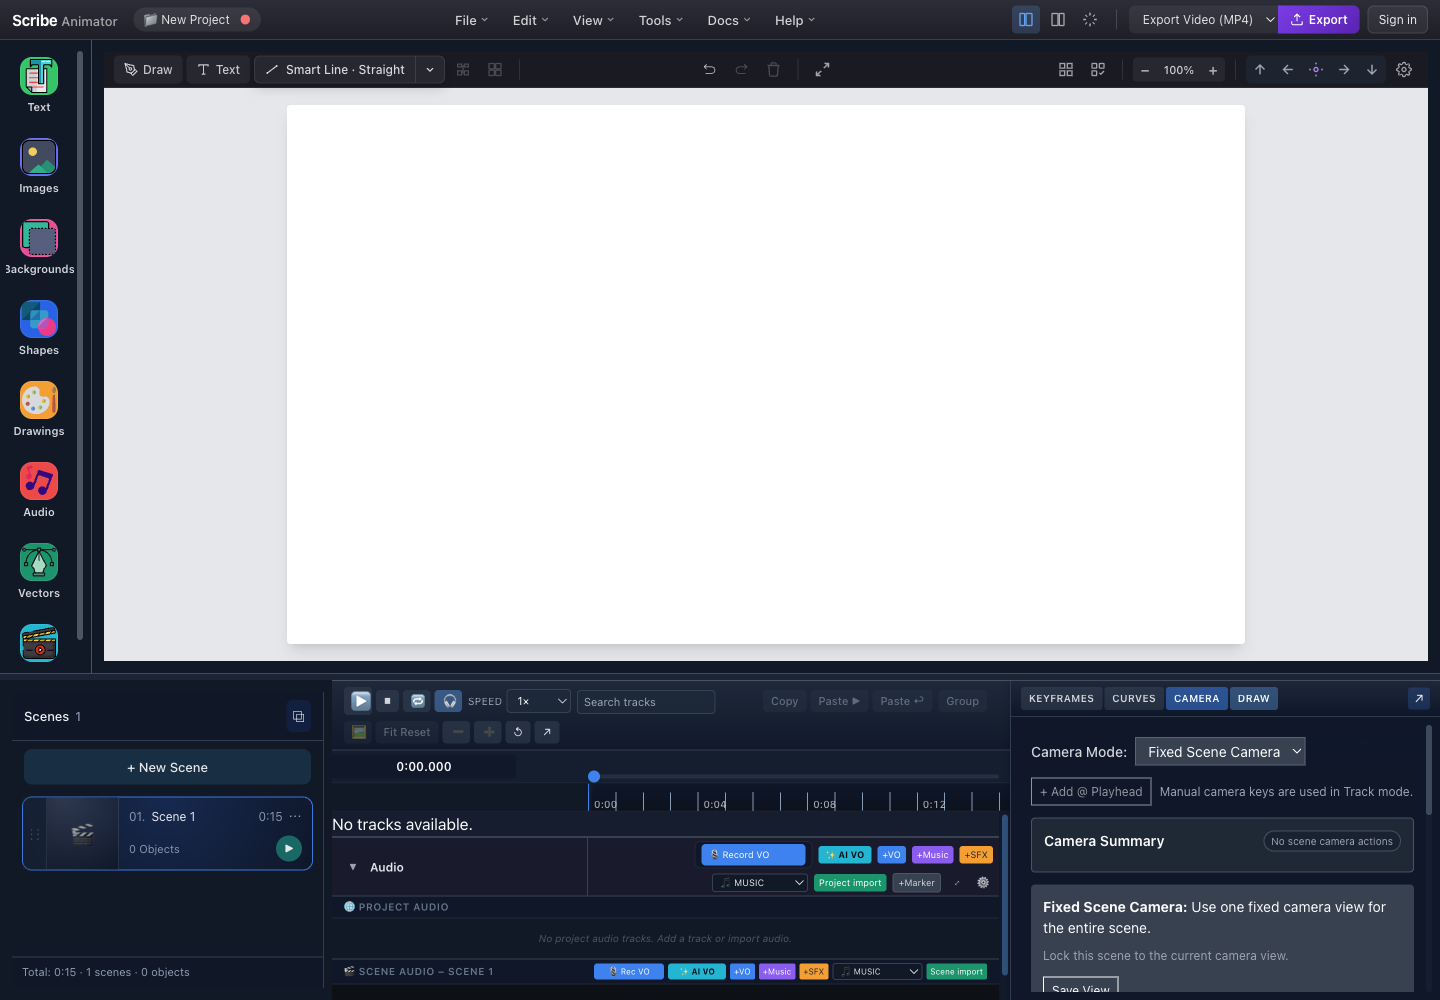
- CAMERA tabOpens scene camera authoring beside KEYFRAMES, CURVES, and DRAW.
- Camera ModeChoose Fixed Scene Camera, Track, Follow Hand, or Follow Object.
- Camera SummaryReports active modes, keys, object/draw-step actions, overlaps, bookmarks, and transitions.
- Mode-specific controlsFixed mode saves the current view; other modes expose keys or follow targets.
- PlayheadTrack-mode camera keys are captured at this shared time.
Tutorial 1: save a fixed scene view
Use fixed mode for a stable scene or a fast, safe first framing pass.
- Choose Fixed Scene Camera from Camera Mode.
- Pan and zoom the editor view until the entire intended frame is visible.
- Choose Save View.
- Read Camera Summary and confirm a fixed scene camera is active.
- Use Jump to View to return the editor viewport to the saved pose.
- Adjust the viewport and choose Update View when the framing changes.
- Press Play from the scene start.
Expected result: playback uses one saved position, zoom, and rotation for the complete scene.
Use Remove to delete the scene's fixed pose. Removing camera data does not delete scene objects.
Tutorial 2: animate a camera track
Use Track mode for a planned pan, zoom, or rotation.
- Choose Track.
- Move the playhead to the first camera moment.
- Position and zoom the editor view.
- Choose + Add @ Playhead.
- Move the playhead later.
- Set the next view and add another key.
- Inspect Current at Playhead:
- active source;
- current segment;
- X/Y position;
- zoom;
- rotation;
- easing; and
- next key.
- Edit a key's time, position, zoom, rotation, or easing in the key table.
- Preview through the complete segment.
Expected result: the camera interpolates between authored poses while canvas objects keep their own geometry.
Track controls
| Control | Behavior |
|---|---|
| + Add @ Playhead | Captures the current pan/zoom, or the supported current pose, at the playhead |
| Zoom Only Mode | Keeps the focal point stable while authoring zoom-only keys |
| Clear All | Clears the current Track key array after confirmation; generated Object/Draw-step source recipes can rebuild their keys |
| Key source | Identifies manual (M), Object Camera (O), or Draw-step Camera (D) provenance |
| Time | Scene-local key time |
| Pos (X, Y) | Camera center/translation values |
| Zoom | Magnification; verify edge clipping after changes |
| Rot | Camera rotation |
| Easing | Linear, Ease In, Ease Out, Ease In-Out, and cubic variants |
Do not place two incompatible camera actions over the same time without reading the overlap warning. Blocking overlaps should be resolved before export.
Tutorial 3: add an Object Camera action
Use this workflow for a timed shot around one eligible, non-drawable object.
- Switch CAMERA → Camera Mode to Track.
- Select the intended text, image, static SVG, or shape.
- Expand Properties → Object Camera.
- Choose Tight, Medium, or Wide framing.
- Enter the scene-local start time and a move duration between
0.1and2seconds. - Choose Continue to keep the new framing, or Revert and set a hold before returning.
- Resolve any blocking overlap named below the controls.
- Choose Add Camera.
- Open CAMERA and confirm Object camera actions: 1 plus
Osource rows. - Preview from before the action starts.
Expected result: the camera moves to the generated framing at the requested time without changing the object's own transform.
If the object's geometry or timing changes later, return to Properties and choose Update Camera. Use Remove Camera there instead of deleting only generated rows.
Tutorial 4: add a Draw-step Camera action
Use this workflow to frame one path range while it is being drawn.
- Select a drawable vector and create Draw steps with AUTO-PLAN or + STEP.
- Switch CAMERA → Camera Mode to Track.
- Open DRAW and expand the intended step.
- Find that step's Camera area.
- Choose Tight, Medium, or Wide framing.
- Set the start offset and move duration so they fit inside the step.
- Choose Continue or Revert; for Revert, set a hold that leaves enough time to return before the next action or scene end.
- Resolve any blocking Object Camera overlap.
- Choose Add Camera.
- Confirm
Dsource rows in CAMERA, then preview the complete step.
Expected result: the camera frames that step's path/reveal bounds where available, rather than blindly fitting the complete drawable.
The Draw-step Camera card in Properties is read-only by design. It confirms how many step cameras exist and points you back to DRAW for editing.
Tutorial 5: follow the drawing hand
- Prepare valid Draw steps and a hand/tool.
- Open CAMERA.
- Choose Follow Hand.
- Preview from before the first draw step.
- Check fast corners, long moves, and scene edges.
- If the view feels nervous, simplify the draw plan or use fixed/track framing instead.
Expected result: the camera smoothly follows the active hand position during drawable steps.
Follow Hand cannot invent a hand position for raster content or a scene with no active draw step.
Tutorial 6: follow an object
- Add and name the subject object.
- Open CAMERA and choose Follow Object.
- Choose the object in Target Object.
- Confirm the success message identifies the target.
- Animate the object or bind it to a path.
- Preview through its complete movement.
Expected result: the camera tracks the target's evaluated position. If the object follows a path, the camera uses that runtime position.
If the target is missing, the camera falls back to a static position. Rebind after deleting or replacing a target.
Tutorial 7: save and reuse camera bookmarks
Bookmarks preserve useful shots without adding movement by themselves.
- Position the editor view.
- Enter a bookmark name.
- Save the bookmark.
- Use the bookmark action to apply it to the scene.
- In Track mode, apply it as a keyframe at the playhead when needed.
- Mark a bookmark as home/default when appropriate.
- Rename or delete obsolete bookmarks.
Use names such as Wide context, Title close-up, or Diagram detail, not Camera 1.
Tutorial 8: transition from the previous scene camera
- Give the previous and current scenes valid camera views.
- Open the current scene's camera transition section.
- Enable Camera Transition from Previous Scene.
- Set duration and easing.
- Preview across the scene boundary.
Expected result: the current scene begins from the previous scene's camera view, then moves to the current scene view.
A camera transition does not replace a scene visual transition. Review both together when both are enabled.
Tutorial 9: bind an object to a path
Path Follow authoring is in the selected object's Preset Animation/animation properties and its timeline track.
- Create or import a suitable path.
- Add the follower object.
- Select the follower, not the path.
- Expand Preset Animation and find Path Follow.
- Choose Bind path or begin the binding interaction.
- Select the intended path on the canvas, or choose it from Bound path.
- Configure:
- Enabled to turn evaluation on or off without discarding the binding;
- Rotate with path to align the follower with the path tangent;
- Reverse to traverse in the opposite direction;
- Rotation (deg) for an orientation correction;
- Offset X and Offset Y for visual alignment.
- Set the object's visible animation timing.
- Preview from start to end.
Expected result: the follower moves along the selected path during its authored range. The source path remains independently selectable.
Use Clear binding when the association is no longer needed. Disabling is better when you may restore the same path later.
Camera and path-follow coordination
- Make the path-follow motion correct before configuring Follow Object.
- Preview the follower without camera motion.
- Add the camera mode.
- Check rotation and offsets at the start, middle, and end.
- Verify smart connectors after moving targets.
- Export a short test to confirm runtime parity.
Limitations and safety
- Export aspect ratio defines the final frame; the surrounding editor viewport is not exported.
- Track mode requires at least two meaningful poses to create visible movement.
- Follow Hand requires drawable steps and a valid hand position.
- Follow Object requires an existing eligible target.
- Object Camera captures approximate bounds when it is added or updated; update the action after materially changing the owner's geometry or timing.
- Object Camera is edited in Properties; Draw-step Camera is edited inside the owning Draw step. Drawable vectors do not use the Properties Object Camera editor.
- Draw-step Camera timing is constrained by its Draw step, the next configured camera action, and the scene end.
- Manual/Object/Draw actions remain stored but inactive when the scene uses Fixed, Follow Hand, or Follow Object.
- Object-versus-Draw-step overlap is blocking; manual overlap is warning-only because a manual key can take priority.
- A camera transition needs both endpoint poses before an entry blend can be resolved.
- Path Follow authoring is currently richer on Desktop; Mobile Lite can preserve and preview project data while exposing a constrained camera interface.
- Deleting a followed object or bound path can invalidate the relationship.
- Extreme camera zoom or rapid movement can make text unreadable or induce motion discomfort.
- Static SVG export does not preserve camera motion or path-follow animation.
Troubleshooting and recovery
| Problem | Recovery |
|---|---|
| Playback ignores the editor view | Save/update the Fixed Scene Camera or add Track keys; viewport changes alone are not project camera data |
| + Add @ Playhead is disabled | Switch to Track mode |
| Camera does not move | Confirm at least two keys with different poses and valid timing |
| Saved Object/Draw actions do not run | Switch the scene back to Track; Fixed and Follow modes preserve those actions but do not evaluate them |
| Add Camera or Update Camera is disabled | Confirm Track mode, an eligible owner with usable bounds, valid timing, and no blocking generated overlap |
| Object Camera disappeared after converting text to outlines | The object became drawable; use the Properties summary to find its editable Draw-step Camera in DRAW |
| Draw-step Camera is read-only in Properties | Expand the owning step in the DRAW drawer; Properties intentionally reports status only |
| Auto-plan created steps but no camera movement | Auto-plan does not enable step cameras; add the required cameras inside individual steps |
| A generated action returned after Clear All | Remove its saved recipe from Properties or the owning Draw step, then rebuild/inspect the Track |
| Object and Draw-step actions block each other | Separate start/move/hold ranges, retime the Draw step, or remove one generated action |
| Manual key overrides part of an automatic shot | Move the manual key or the automatic range unless the override is intentional |
| Camera jumps | Look for duplicate-time keys, blocking overlaps, or a very short transition |
| Follow Hand has no target | Verify Draw steps and active hand/tool data |
| Follow Object says no target | Add an eligible object or reselect one that still exists |
| Object Camera does not continuously follow movement | Use Follow Object for live scene-wide tracking; Object Camera is a bounded Track action |
| Scene-entry transition does not blend | Verify that both previous-end and current-start camera poses resolve |
| Subject drifts during zoom | Try Zoom Only Mode or correct the authored X/Y pose |
| Follower points sideways | Enable Rotate with path and adjust Rotation (deg) |
| Follower is offset | Correct Offset X/Y rather than moving the source path blindly |
| Binding overlay blocks normal selection | Finish or cancel binding mode with Escape |
| Export framing differs | Confirm project aspect ratio, preview camera mode, and test the actual exporter |