Assets & SVG Icons - Complete Guide
Learn how to browse reusable drawing assets and import SVG or raster artwork into Scribe Animator. The library catalog is service-provided and can change; do not treat a historical icon count as a product guarantee.
Current visual orientation
The Drawings library is for reusable catalog items. Vectors opens a local-file pipeline. Use local Vector Import when you need deterministic input or the account-backed catalog is unavailable.
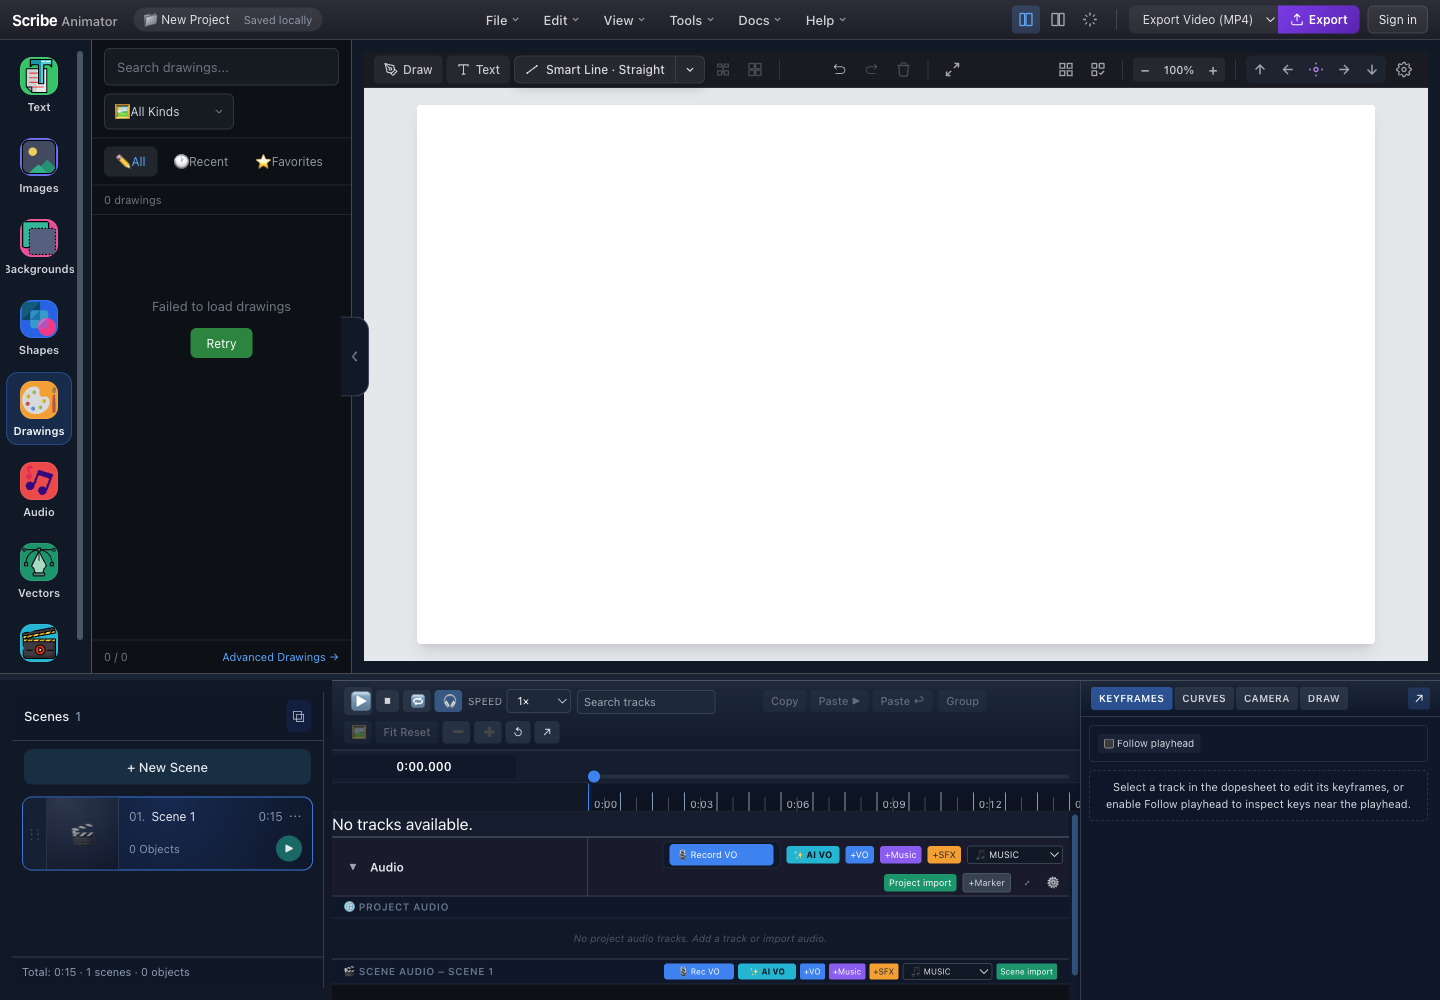
- Drawings libraryOpen the reusable drawing catalog from the left rail.
- Search and kind filterSearch loaded catalog items and narrow them by kind.
- All, Recent, and FavoritesSwitch between the complete loaded catalog, recent choices, and favorites.
- RetryA catalog network or service failure is recoverable and does not block local Vector Import.
- Advanced DrawingsOpen the advanced drawing workflow when the compact catalog is not enough.
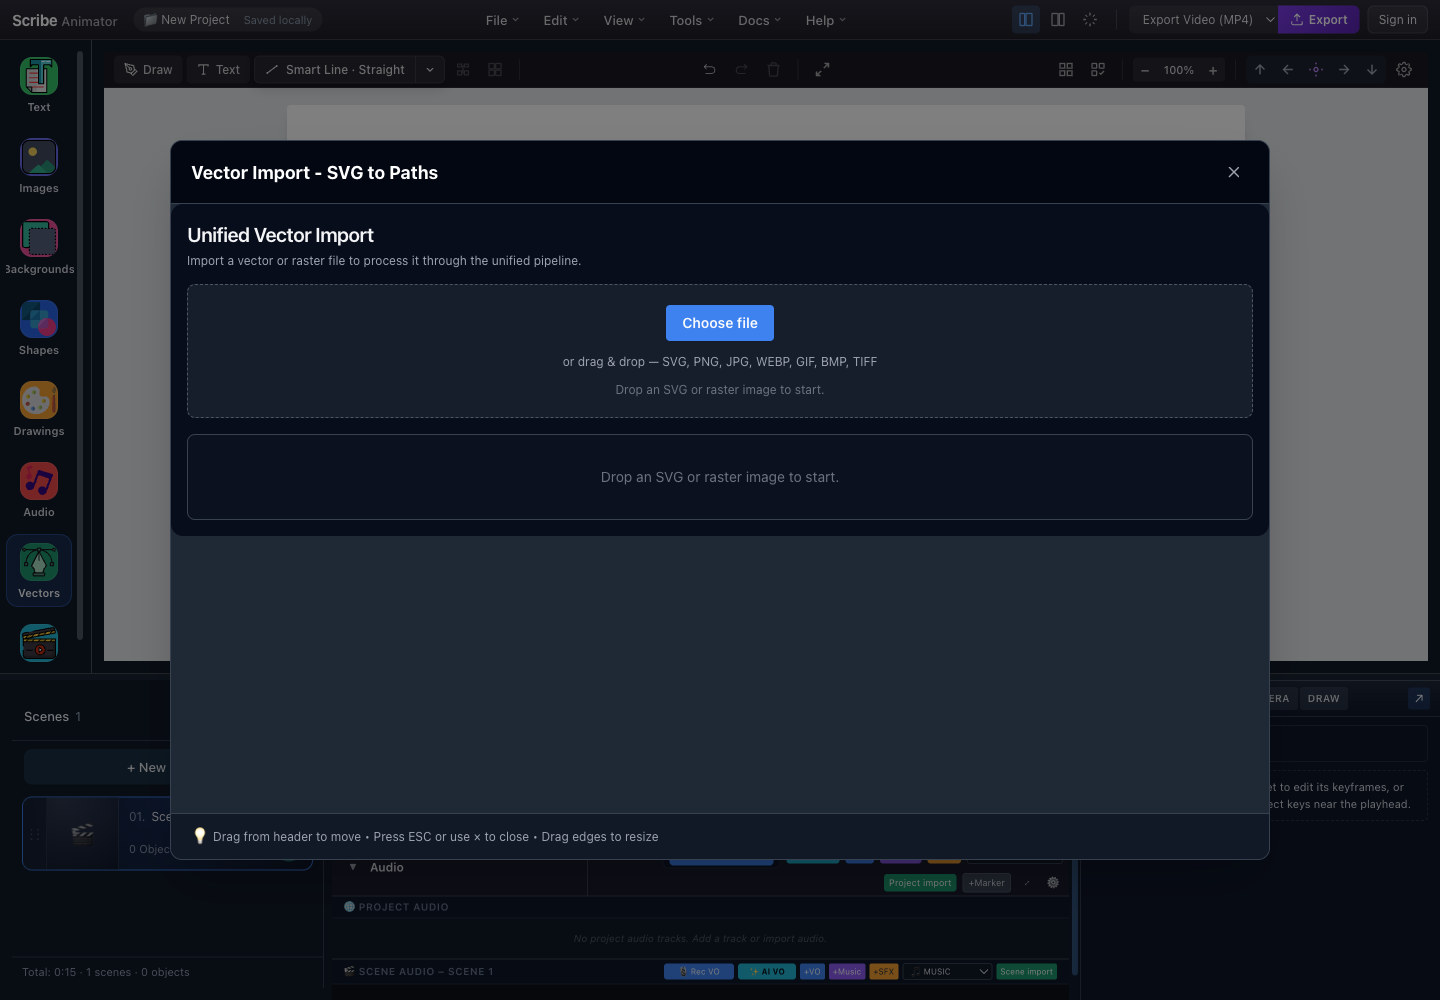
- Choose fileSelect a supported local SVG or raster file.
- Drop zone and formatsDrag SVG, PNG, JPG, WEBP, GIF, BMP, or TIFF into this area.
- Processing resultThe processed preview, settings, diagnostics, and commit action appear here after intake.
- Close safelyClose with this button or Escape without committing an unfinished import.
These captures and control locations were checked against the running Desktop editor with browser-based UI review on July 26, 2026. Catalog size, category counts, and availability are not compatibility guarantees. For the current decision guide, supported-format boundaries, tracing limits, and exact commit checks, follow Import SVG and vector artwork.
Application Layout Overview
Use the authentic screenshots above as the workspace reference. The left rail opens Drawings, Vectors, and Images; committed objects appear on the canvas; Properties and the timeline edit the selected object's appearance, transform, layer order, animation, and timing.
Asset Feature Access Points:
- Left Sidebar → Drawings — Browse the currently available drawing catalog
- Left Sidebar → Vectors — Import a local SVG or raster file through the vector pipeline
- Left Sidebar → Images — Browse account-backed images; local image import is a separate action
Quick Start: Adding SVG Icons
Method 1: Asset Library (Recommended)
- Open Drawings from the left rail.
- Wait for the catalog to load. If the real panel shows the failure state captured above, use Retry once or switch to local Vector Import.
- Search or narrow the loaded catalog with the available filter.
- Select an item to add it to the active scene.
- Confirm that the new object is selected on the canvas before editing it.
Method 2: Vector Import (External SVGs)
- Open Vectors from the left rail.
- Choose a trusted local file or drop it into the intake area shown above.
- Review the processed preview, diagnostics, path count, and available settings.
- Commit the result only after it looks correct.
- Confirm the selected result on the canvas. Closing before commit leaves the scene unchanged.
The Drawings library contains service-provided reusable artwork. Use it for quick discovery when the catalog is available; use Vectors for a local file you control.
Asset Library Overview
The Asset Library provides instant access to a curated collection of SVG icons.
Library Statistics
| Metric | Value |
|---|---|
| Total Icons | Catalog-defined; can change |
| Format | SVG (Vector) |
| Categories | Catalog-defined |
| Searchable | ✅ Yes |
| Pre-optimized | ✅ Yes |
Asset Library Panel
The real Drawings panel contains:
| Control or state | Purpose |
|---|---|
| Search | Filters items already loaded from the service |
| Kind filter | Narrows the loaded catalog without changing the scene |
| All, Recent, Favorites | Changes the collection being browsed |
| Result cards | Add the chosen drawing to the active scene |
| Retry | Repeats a failed catalog request once |
| Advanced Drawings | Opens the more detailed drawing workflow |
The screenshot above intentionally shows a retryable service failure. It proves the controls and recovery boundary, not a populated or successful catalog result.
Icon Categories
Browse icons by category for quick discovery.
Available Categories
| Category | Icons | Description |
|---|---|---|
| All | Current catalog | Full loaded collection |
| Arrows | Varies | Directional arrows and navigation |
| Business | Varies | Office, charts, documents |
| Communication | Varies | Email, chat, phone, messaging |
| Devices | Varies | Computer, mobile, hardware |
| Education | Varies | School, learning, books |
| Files | Varies | Documents, folders, media |
| Health | Varies | Medical, fitness, wellness |
| Media | Varies | Play, pause, audio, video |
| Navigation | Varies | Maps, location, directions |
| Shopping | Varies | Cart, payment, e-commerce |
| Social | Varies | Social media, sharing |
| Technology | Varies | Code, server, database |
| Travel | Varies | Transportation, places |
| Weather | Varies | Sun, cloud, rain, snow |
| UI Elements | Varies | Buttons, checkboxes, menus |
Category Selection
- Open the available kind or category filter.
- Choose All to remove the category constraint, or choose one available category.
- Combine the filter with search when the loaded collection is large.
- Clear the filter if an expected item disappears.
The service controls the live category list. The names in the table above are discovery examples, not a guaranteed fixed menu.
Combine category filtering with search for the fastest results. For example, select "Business" category then search "chart" to find business chart icons quickly.
Searching Icons
Find icons quickly using the search feature.
Search Interface
Type a name, keyword, or category into Search. The panel filters the items that are actually loaded; it does not guarantee a particular result count. Clear the query to restore the current collection, and use Retry before diagnosing an empty service-backed catalog as a missing asset.
Search Tips
| Search Term | What It Finds |
|---|---|
arrow | All arrow-related icons |
user | User, profile, person icons |
check | Checkmarks, verification icons |
settings | Gear, cog, configuration icons |
play | Media playback icons |
home | House, home navigation icons |
Search is case-insensitive and matches partial words. Searching "arr" will find "arrow", "arrange", etc.
Adding Icons to Canvas
Click to Add
- Find the required drawing in a successfully loaded catalog.
- Select its card once.
- Look for selection bounds on the canvas and a corresponding object track.
- If nothing appears, verify the active scene, zoom out, and retry only after the catalog is healthy.
Icon Object Properties
When you add an icon to canvas, it becomes an SVG object with these properties:
| Property group | What it controls |
|---|---|
| Position and size | X/Y placement, width, height, scale, and rotation |
| Appearance | Supported stroke, fill, opacity, and path styling |
| Animation | Entrance or drawing behavior, start time, and duration |
| Layer order | Whether the object appears in front of or behind other objects |
The exact fields depend on the imported object's type and path data. Trust the visible Properties sections rather than assuming every SVG exposes every field.
Vector Import Panel
For importing your own SVG files, use the Vector Import panel.
Opening Vector Import
Use the authentic Vector Import screenshot above. The empty state exposes the chooser, drop zone, accepted visible formats, result region, and safe close action. It does not prove a successful import or show post-processing controls.
Import Workflow
- Choose or drop a supported local file.
- Wait for intake, sanitization, and processing to finish.
- Inspect the real preview, warnings, path statistics, and available controls.
- Choose static placement or drawing behavior only when the processed result offers it.
- Add the result to the canvas, then verify selection, fidelity, and timing.
Do not infer success from the empty screenshot above. A commit action is meaningful only after the real result state appears.
Supported Formats
| Format | Extension | Supported |
|---|---|---|
| SVG | .svg | ✅ Yes |
| Compressed SVG | .svgz | ✅ Yes |
| Bitmap in SVG | embedded PNG/JPG | ⚠️ Converted |
| Animated SVG | SMIL animations | ⚠️ Static only |
Animated SVGs (with SMIL or CSS animations) are imported as static images. The animation is not preserved — Scribe Animator applies its own drawing animation to the paths.
SVG Processing Pipeline
When you import or add an SVG, it goes through a processing pipeline.
Pipeline Steps
The pipeline runs these stages in order:
- Intake and classify the selected file.
- Parse and sanitize SVG markup or decode raster input.
- Extract, flatten, validate, and measure supported geometry.
- Normalize and optimize the resulting paths.
- Plan drawing order only when drawing behavior is requested.
- Return validated object data for preview and commit.
An error stops the pipeline before scene data is changed.
Pipeline Statistics
When processing an SVG, you'll see stats like:
| Statistic | Why it matters |
|---|---|
| Input and output size | Shows whether normalization changed payload size |
| Extracted, dropped, and retained paths | Reveals filtering and resulting complexity |
| Processing duration | Helps diagnose unusually expensive input |
| Profile or mode | Records the configuration that produced the result |
Values are file-dependent; example counts are not guaranteed output.
The pipeline automatically drops tiny paths (less than 3px) that would be invisible when animated. This keeps your animations clean and fast.
Raster Image Tracing
Import bitmap images (PNG, JPG) and convert them to animatable vectors.
Trace Panel
After a supported raster file is processed:
- Compare the original and traced previews.
- Choose the trace profile or mode actually offered by the result.
- Adjust threshold, layers, corner handling, or speckle removal only when exposed.
- Watch path count and estimated complexity.
- Cancel if fidelity or complexity is unacceptable; otherwise add the traced result.
The v2 screenshot above is an empty intake state and must not be treated as evidence of a successful trace.
Trace Modes
| Mode | Best For | Description |
|---|---|---|
| Black & White | Logos, line art | Single-color threshold trace |
| Color | Illustrations | Multi-color layer trace |
| Grayscale | Photos | Gradient layer trace |
Trace Settings Explained
| Setting | Range | Effect |
|---|---|---|
| Threshold | 0–255 | Brightness cutoff for B&W mode |
| Layers | 2–16 | Number of color layers to detect |
| Corner | 0–180° | Angle at which to create sharp corners |
| Speckle | 0–100 | Remove noise smaller than this size |
Photo-quality images may generate hundreds of paths, which can slow down animations. For photos, consider using the Image import instead of vector tracing.
Animation Settings
Configure how imported SVGs are animated.
Draw Settings Panel
| Setting group | Decision |
|---|---|
| Duration or speed | Choose fixed timing or a path-length-based rate when offered |
| Preview styling | Check stroke color and supported width adjustment |
| Fill behavior | Decide whether fill appears during or after drawing |
| Path filtering | Reduce tiny paths or excessive path counts |
| Hand follower | Enable only when a compatible hand, tool, and draw plan exist |
The processed result and real DRAW drawer are authoritative; controls can vary by object and mode.
Speed Options
| Option | Value | Use Case |
|---|---|---|
| Duration | 1–60 sec | Fixed animation time regardless of complexity |
| Speed (PPS) | 100–2000 | Consistent pixels-per-second rate |
Use Duration mode for consistent timing across icons. Use Speed mode when complex icons should take longer than simple ones.
Custom Assets
Upload and manage your own assets for reuse.
Custom Assets Panel
The current library surfaces vary by asset kind and account state. Use Drawings or Images for service-backed items and Vector Import for a trusted local file. Do not assume a separate Custom Assets modal, fixed count, per-card delete action, or local-only storage unless the running build exposes those controls.
Supported Upload Formats
| Format | Extension | Max Size |
|---|---|---|
| SVG | .svg | 10 MB |
| PNG | .png | 10 MB |
| JPEG | .jpg, .jpeg | 10 MB |
| WebP | .webp | 10 MB |
Custom assets are stored locally in your browser. Clearing browser data will remove them. Export your project to preserve custom assets.
Backend API Reference
For developers: access icons programmatically.
API Endpoints
| Endpoint | Method | Description |
|---|---|---|
/api/assets | GET | List all available icons |
/api/assets/:id | GET | Get specific icon details |
/api/assets/serve/:id | GET | Serve icon SVG content |
/api/assets/search?q= | GET | Search icons by keyword |
Icon URL Format
Use the public API origin configured for your supported Scribe integration. For same-origin application requests, the asset route is:
/api/assets/serve/<asset-id>
Do not depend on a private development hostname or copy an ID from another account or environment.
Using Icons in Templates
{
  "requiredAssets": [
    {
      "type": "url",
      "url": "/api/assets/serve/<asset-id>",
      "mime": "image/svg+xml"
    }
  ]
}
Keyboard Shortcuts
| Shortcut | Action |
|---|---|
Delete / Backspace | Delete selected object |
Ctrl/⌘ + D | Duplicate selected object |
Ctrl/⌘ + C | Copy selected object |
Ctrl/⌘ + V | Paste copied object |
Common Workflows
Workflow 1: Add Icon from Library
- Open Drawings.
- Search for check after the catalog loads.
- Select a matching card.
- Confirm the new canvas selection, then resize and position it.
Workflow 2: Import Custom Logo
- Open Vectors.
- Choose or drop the logo SVG.
- Review warnings, preview fidelity, path count, and supported draw settings.
- Add the result and verify it on the canvas.
Workflow 3: Trace a Sketch
- Open Vectors and select a trusted PNG or JPEG sketch.
- Choose a trace profile that matches line art, grayscale, or color artwork.
- Adjust controls while watching fidelity and path count.
- Commit only when the preview is usable, then verify selection and drawing timing.
Troubleshooting
Icon Not Appearing
| Issue | Solution |
|---|---|
| Click doesn't add icon | Check if canvas is focused; click on canvas first |
| Icon appears off-screen | Pan the canvas or zoom out to find it |
| Icon is too small | Select and resize using corner handles |
Import Errors
| Error | Cause | Solution |
|---|---|---|
| "Invalid SVG" | Malformed XML | Validate SVG at svgomg.net first |
| "File too large" | Over 10 MB limit | Optimize SVG or compress image |
| "Too many paths" | Complex SVG | Simplify in vector editor, or increase max paths |
Performance Issues
| Symptom | Cause | Solution |
|---|---|---|
| Slow animation | Too many paths | Reduce path count, increase min length filter |
| Canvas lag | Large SVG | Reduce canvas size or icon count |
| Import hangs | Complex tracing | Use simpler image or reduce layers |
SVGs with gradients or filters may not animate correctly. For best results, use flat-color SVGs with solid strokes and fills.
Best Practices
Choosing Icons
- Use the library first — Pre-optimized icons animate best
- Match icon style — Keep consistent stroke widths across icons
- Consider complexity — Simple icons animate faster and cleaner
Importing Custom SVGs
- Optimize first — Use SVGO or svgomg.net to clean up SVGs
- Flatten layers — Merge groups and flatten transforms
- Remove filters — Blur, shadow effects don't animate
- Expand strokes — Convert strokes to paths for consistent appearance
Performance Tips
- Limit icon count — Keep under 50 SVG objects per scene
- Use path filtering — Enable min length filter to drop tiny paths
- Batch animations — Stagger start times instead of simultaneous
- Reuse objects — Duplicate rather than importing multiple times
Pro tip: For logos with complex paths, consider tracing a simplified version or recreating key elements manually for the cleanest animation.
Summary
| Feature | Location | Purpose |
|---|---|---|
| Drawings library | Left Sidebar → Drawings | Browse the currently available catalog |
| Vector Import | Left Sidebar → 🧩 Vectors | Import your own SVG files |
| Custom Assets | Left Sidebar → 🖼️ Images | Manage uploaded assets |
| Raster Tracing | Vector Import Panel | Convert PNG/JPG to vectors |
The Asset Library and Vector Import tools give you complete flexibility for adding visual elements to your animations — from quick icon searches to custom logo imports and image tracing.
Related Documentation:
- Background & Canvas Settings — For canvas configuration
- Typography Text Guide — For adding and styling text
- Images & Vectors Guide — For detailed image handling