Images & Vectors - Complete Guide
Learn how to import, manage, and animate images and SVG vectors in Scribe Animator. This guide covers the Images panel, Vector Import workflow, Image Library management, and Inspector properties.
Visual orientation
The Images library and Vector Import solve different problems. The library browses account-backed image assets; Vector Import processes a local SVG or raster file into canvas-ready content.
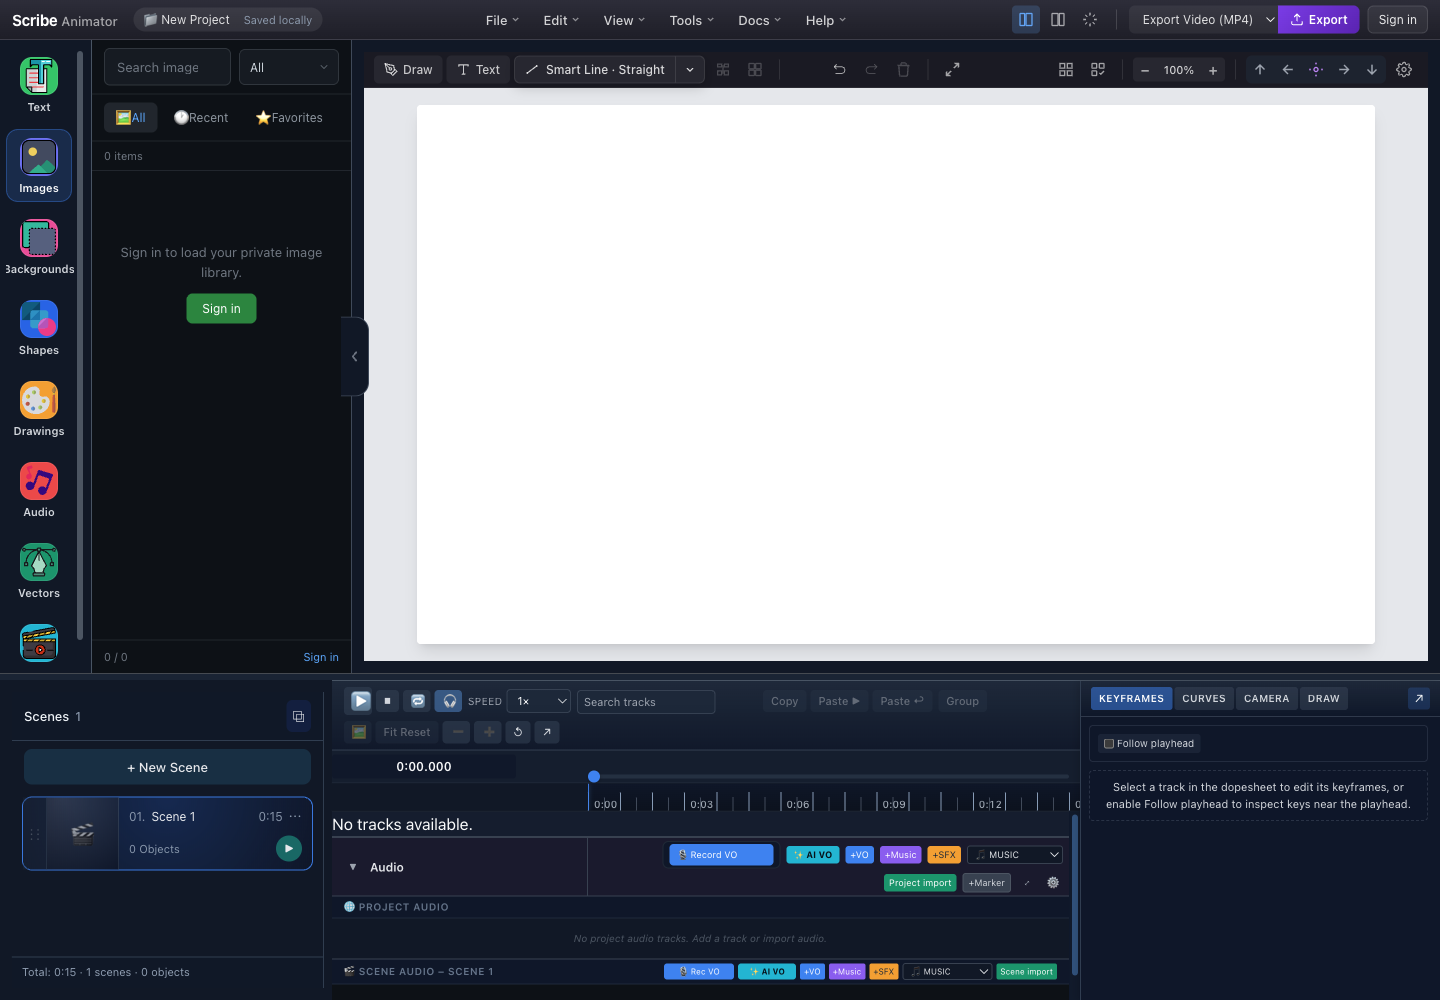
- Images libraryOpen the image library from the left rail.
- SearchSearch the loaded image library by name or indexed metadata.
- Type filterLimit the library to the requested asset type after items are available.
- All, Recent, and FavoritesSwitch between the complete library, recently used items, and starred items.
- Account boundarySign in to load a private image library. This empty state is not an import failure.
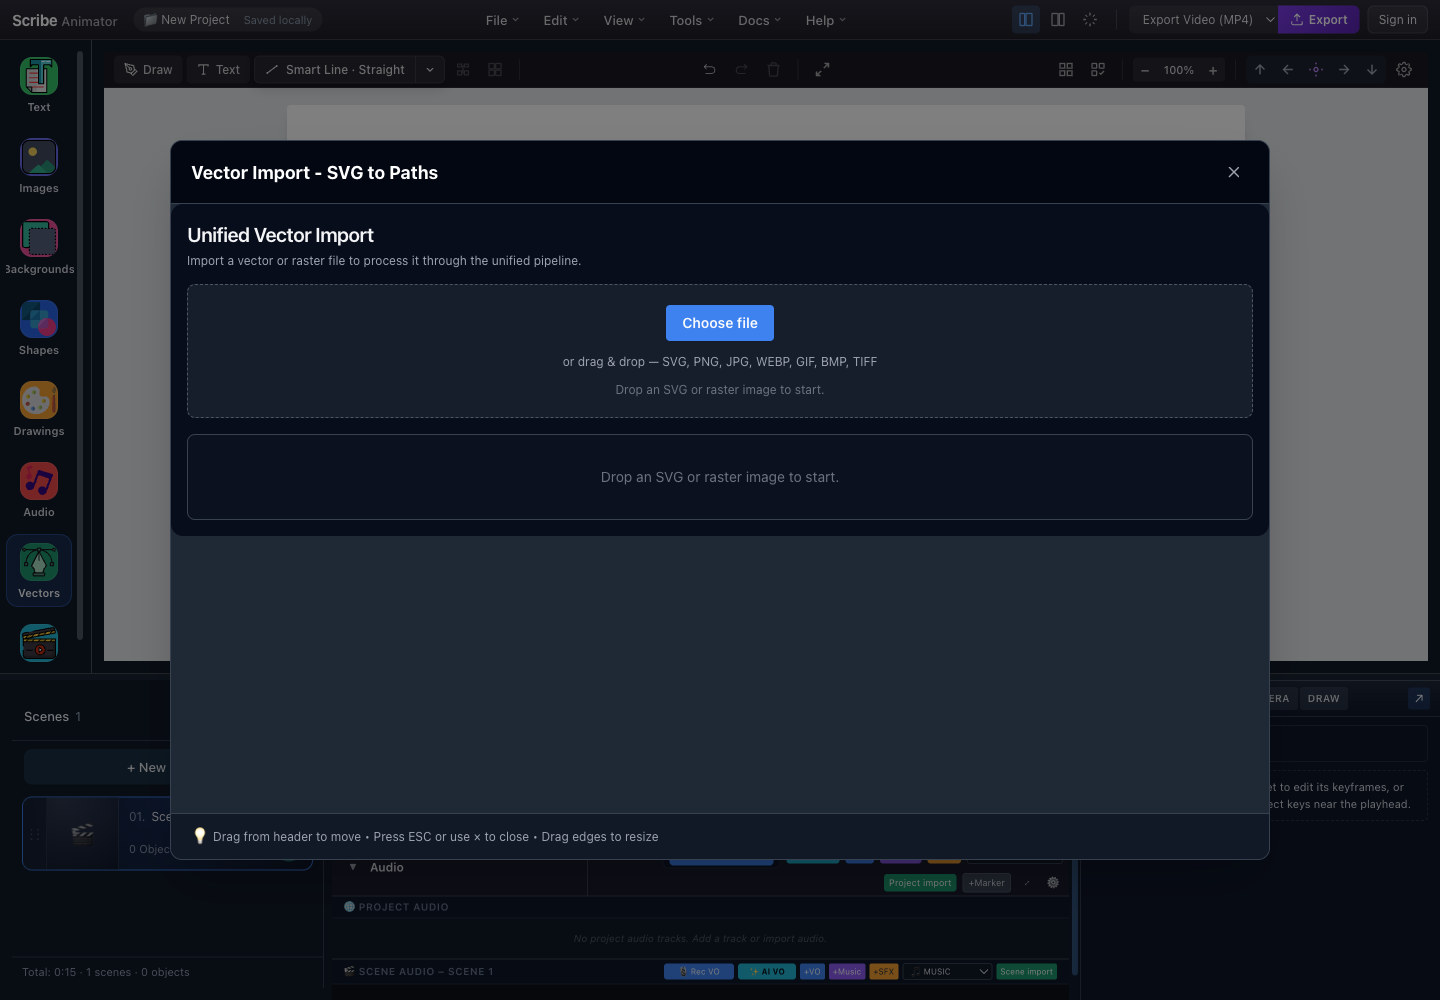
- Choose fileOpen the system picker for a supported SVG or raster image.
- Drop zone and formatsDrag a supported SVG, PNG, JPG, WEBP, GIF, BMP, or TIFF into this area.
- Processing resultAfter intake, preview and processing controls replace this empty result area.
- Close safelyClose the dialog with this button or Escape without adding an unfinished import.
These captures and control locations were checked against the running desktop editor with browser-based UI review on July 26, 2026. The current header has no separate Share button. For a focused end-user workflow—including when to use the library, local files, or backgrounds—follow Add images, assets, and backgrounds.
Application Layout Overview
Use the two authentic captures above as the workspace reference. Images opens the account-backed library; Vector Import accepts a trusted local file; committed content appears on the canvas; selecting it exposes its real Properties and timeline track.
Image Feature Access Points:
- Left Sidebar → 🖼️ Images — Browse and add images from your library
- Left Sidebar → 📁 Assets → Vector Import — Import new SVG/raster files
- Right Sidebar → Inspector → Image Section — Edit selected image properties
- Canvas → Drag & Drop — Quick import by dropping files directly
Image Types: SVG vs Raster
Scribe Animator supports two main types of images:
| Characteristic | SVG/vector | Raster/bitmap |
|---|---|---|
| Common formats | SVG; compressed SVG only when the visible intake supports it | PNG, JPEG, WebP, GIF, BMP, TIFF when accepted by the current picker |
| Scaling | Geometry remains sharp | Enlarging beyond source resolution can blur or pixelate |
| Editing | Supported paths can be styled and planned for drawing | Pixels are not editable vector paths |
| Best use | Icons, logos, diagrams, illustrations, drawing reveals | Photos, screenshots, textures, and backgrounds |
| Typical cost | Often compact but complexity depends on path count | File size and memory depend on dimensions and encoding |
Animated or embedded behavior is format- and pipeline-dependent. Verify playback and export instead of assuming source animation survives import.
When in doubt, use SVG for icons and illustrations — they look crisp at any size and enable the signature hand-drawing animation effect!
Animated GIFs retain their animation when added to the canvas. They play automatically during preview and export.
Quick Start: Adding Images
Method 1: Drag & Drop (Fastest)
- Save the project before importing an unfamiliar file.
- Drag a supported local image onto the real canvas or the visible intake target.
- Wait for validation and processing.
- Confirm the new object is selected and appears in the active scene.
- Undo immediately if the wrong scene, size, or placement was affected.
Method 2: Images Panel (Left Sidebar)
- Open Images from the left rail.
- Sign in only when you need the private account-backed library shown in the screenshot.
- Search or filter the loaded collection.
- Select an available image card.
- Verify the new canvas selection. The signed-out screenshot above is not a populated-library success state.
Method 3: Vector Import Panel (For SVGs)
- Open Vector Import from the left rail.
- Choose or drop a trusted local SVG or raster file.
- Review the processed preview, warnings, path count, and controls.
- Commit only after the result is correct, then verify it on the canvas.
Drag & Drop is fastest for quick imports. Use the Vector Import Panel when you need fine control over SVG processing and animation settings.
Left Sidebar: Images Panel
When you click the Images icon in the left sidebar, the Images Library opens.
Images Panel Layout
| Control or state | Purpose |
|---|---|
| Search | Filters the library that has actually loaded |
| Type filter | Narrows results by the supported asset kind |
| All, Recent, Favorites | Changes the active library collection |
| Asset card | Adds an available item to the active scene |
| Account boundary | Explains why a private library is empty while signed out |
The v2 screenshot intentionally shows the signed-out state. It must not be described as proof of populated cards, favorites sync, or successful account loading.
Filter Options
| Filter | Icon | Description |
|---|---|---|
| All | 📦 | Shows all images (raster + SVG) |
| Images | 🖼️ | Shows only raster images (PNG, JPG, etc.) |
| SVG | 📐 | Shows only vector images (SVG) |
Tab Navigation
| Tab | Shows |
|---|---|
| All | The complete collection currently available to this account/session |
| Recent | Recently used items, when history exists |
| Favorites | Items starred in the account-backed library |
Switching tabs does not import or modify the scene until an item is selected.
Favorites & Sync
- Click the ⭐ icon on any image to add/remove from favorites
- When signed in, favorites sync across all your devices
- Local favorites work even when offline
Favorites sync requires an active internet connection. Offline changes sync automatically when you reconnect.
Vector Import Panel
The Vector Import panel is your advanced tool for importing and processing SVG and raster files.
Accessing Vector Import
Open Vector Import through the dedicated Vectors or import entry exposed by the current build. Dragging a supported file can also invoke controlled intake where that host supports it. Do not rely on an older Advanced Image label unless it is visible in the running editor.
Vector Import Panel Layout
The authentic empty-state capture above contains four stable regions:
- Choose file opens the system picker.
- The drop zone lists the formats accepted by the visible intake.
- The lower result area is replaced by preview, diagnostics, and commit controls after processing.
- Close or Escape exits without committing an unfinished result.
An empty result area is not evidence of a successful conversion.
Processing Presets
| Preset | Description | Best For |
|---|---|---|
| Editor Safe | Balanced quality and performance | Most use cases |
| High Quality | Maximum path fidelity | Detailed illustrations |
| Fast Preview | Quick processing, lower quality | Testing/previewing |
| Minimal | Smallest output | Simple icons |
Processing Profiles
| Profile | Description |
|---|---|
| Standard | Default processing for most SVGs |
| Detailed | Preserves more small details |
| Simplified | Reduces path complexity |
Start with Editor Safe preset — it works well for 90% of SVGs. Only switch to High Quality if you notice missing details in complex illustrations.
High Quality preset can significantly increase processing time for complex SVGs. Use it only when absolutely necessary.
Reveal Modes (Animation)
| Reveal behavior | What viewers see | Appropriate source |
|---|---|---|
| Static/instant | The object is visible without a drawing reveal | Raster or vector |
| Fade/entrance preset | The whole object enters as one visual element | Raster or vector when offered |
| Draw/reveal | Supported vector paths are revealed over time | SVG/vector geometry with a valid draw plan |
The processed result and the real animation/Draw controls determine availability. Source SVG animation is not preserved as editor behavior.
Raster Image Tracing (Convert to SVG)
Raster images (PNG, JPG, etc.) can be traced/converted to SVG for hand-draw animation.
How Raster Tracing Works
Raster tracing follows this sequence:
- Decode and normalize the raster source.
- Choose the available line-art, grayscale, or color profile.
- Adjust trace controls while comparing source and result.
- Inspect path count, fidelity, and estimated drawing cost.
- Commit only when the vector result is usable.
The current v2 capture is intake-only; a traced result must be verified in its real processed state.
Trace Settings
| Setting | Description | Range |
|---|---|---|
| Mode | Color mode | BW (black/white), Color, Grayscale |
| Layers | Color depth | 2–256 (more = detailed, slower) |
| Threshold | BW cutoff point | 0–255 |
| Curve Fit | Path smoothness | Spline (smooth) / Polygon (sharp) |
| Corner | Corner detection | 0–180 degrees |
| Speckle | Noise removal | 0–100 (higher = removes more) |
Raster tracing works best on images with clear edges and good contrast. Photos with gradients may not trace well.
For best tracing results: use images with high contrast, solid colors, and clean edges. Logos and line art trace beautifully!
Tracing complex photographs produces poor results and very large SVG files. Use raster format (PNG/JPG) for photos instead.
Right Sidebar: Inspector Panel (Image Section)
When you select an image or SVG on the canvas, the Inspector panel shows the Image section.
Inspector Image Section Layout
| Image Properties group | Purpose |
|---|---|
| Size and transform | Width, height, position, scale, rotation, and aspect behavior |
| Appearance | Opacity and supported fit/crop presentation |
| Animation | Entrance behavior, start time, and duration |
| Layer order | Front/back placement relative to other objects |
| Accessibility/metadata | Use visible labels or metadata fields when the object type supports them |
Exact fields depend on object type. Select the real object and follow the visible inspector.
Image Properties Reference
| Property | Description | How to Use |
|---|---|---|
| Width | Image width in pixels | Type value or use canvas handles |
| Height | Image height in pixels | Type value or use canvas handles |
| Opacity | Transparency level (0-100%) | Drag slider or type percentage |
Additional Properties (SVG Only)
For SVG images, additional options may appear:
When the selected object contains editable SVG paths, additional path controls can include stroke, fill, draw mode, speed, filtering, and hand-follow behavior. These controls do not appear for ordinary raster images, and not every SVG exposes every option.
Image Library Management
Custom Assets Panel (Advanced)
Access the full Image Library via the Advanced Image → button.
Library management depends on the active host and account state. Use the visible Images library for account-backed items and controlled local import for files. Do not assume a separate Custom Assets modal, upload button, fixed count, per-card delete action, or browser-only persistence unless the running build exposes it.
Library Actions
| Action | Icon | Description |
|---|---|---|
| Delete | 🗑️ | Remove image from library (cannot undo) |
| Download | 📥 | Download original file to your computer |
| Add to Canvas | Click image | Places image on current canvas |
Delete is permanent! Deleted images cannot be recovered. Make sure you have a backup before removing images from your library.
Upload Guidelines
| Requirement | Guidance |
|---|---|
| Format | Use a format listed by the current picker; convert uncommon camera/editor formats first |
| File size | Keep sources below the enforced upload/import limit and optimize before intake |
| Dimensions | Avoid unnecessarily large rasters; large decoded images increase memory pressure |
| SVG safety | Scripts, external executable content, and unsupported references are sanitized or rejected |
| Rights | Import only assets you are allowed to use and distribute |
A platform picker may show more file types than the processing pipeline can decode.
Working with Images on Canvas
Selection & Transformation
When an image is selected:
- drag inside the selection to move it;
- use corner handles to resize while preserving aspect behavior when enabled;
- use the rotation control when exposed;
- use the contextual toolbar or Properties for precise transforms;
- verify the corresponding timeline track before changing animation or timing; and
- use Undo immediately after an unintended transform.
Hold Shift while dragging corner handles to unlock aspect ratio temporarily. This allows free-form scaling but may distort images.
All transformations (move, resize, rotate) are undo-able. Press ⌘Z (Mac) or Ctrl+Z (Windows) to revert changes.
Layering
Control which images appear in front or behind:
| Layer command | Result |
|---|---|
| Bring Forward | Moves the object one step toward the front |
| Bring to Front | Places it above all eligible scene objects |
| Send Backward | Moves it one step toward the back |
| Send to Back | Places it below all eligible scene objects |
Layer order changes overlap, not the object's canvas coordinates or timeline timing.
Image Animation
Images can be animated using the Animation section in the Inspector.
Animation Types for Images
| Animation choice | Result | Notes |
|---|---|---|
| None/instant | Object is present without an entrance | Availability label can vary |
| Fade or entrance preset | Whole object appears with the selected motion | Works only when the preset supports the object type |
| Draw/reveal | Vector paths reveal over time | Requires eligible SVG geometry and a valid draw plan |
| Exit behavior | Object leaves or hides when supported | Verify export because not every object/preset supports it |
Use the actual Animation and Draw controls to confirm names and limits.
Hand Animation (SVG Draw)
For SVGs with Draw In animation, you can enable the hand animation:
For an eligible SVG drawing reveal:
- Select the vector object.
- Choose drawing behavior in the real Animation or DRAW surface.
- Pick a compatible hand and tool when hand following is required.
- Set duration or speed and inspect the generated draw steps.
- Preview the complete scene and verify the hand follows the intended geometry.
Raster images must be traced into eligible vector geometry before path drawing is possible.
The Draw In animation with hand creates the signature whiteboard animation effect. Use it for key visuals to maximize engagement!
Draw In animation only works with SVG images. Raster images (PNG, JPG) will show "Fade In" or "Instant" instead. Convert rasters to SVG via tracing if needed.
Keyboard Shortcuts
| Shortcut | Action |
|---|---|
⌘V / Ctrl+V | Paste image from clipboard |
Delete / Backspace | Delete selected image |
⌘C / Ctrl+C | Copy selected image |
⌘D / Ctrl+D | Duplicate selected image |
⌘Z / Ctrl+Z | Undo |
⌘⇧Z / Ctrl+Shift+Z | Redo |
Arrow keys | Nudge image (1px) |
Shift + Arrow | Nudge image (10px) |
] | Bring Forward |
[ | Send Backward |
⌘] / Ctrl+] | Bring to Front |
⌘[ / Ctrl+[ | Send to Back |
Validation Rules
Scribe Animator enforces certain validation rules to ensure images import and render correctly.
File Upload Validation
| Upload rule | Documented boundary |
|---|---|
| File size | Empty files are rejected; files over the current hard limit are rejected |
| Visible raster formats | PNG, JPEG, WebP, GIF, BMP, and TIFF when listed by intake |
| Visible vector formats | SVG; SVGZ only through an intake that explicitly accepts it |
| Filename | Extremely long names can be rejected or normalized |
| SVG security | Scripts and unsafe external references are removed or blocked |
| Complexity | Excessive paths can be rejected or require simplification |
The running picker and validation error are authoritative; legacy 10 MB or 50,000-path examples are not universal guarantees.
Image Dimension Validation
| Dimension property | Lower boundary | Practical upper boundary |
|---|---|---|
| Width | At least 1 px | Pipeline/device dependent; avoid sources above 10,000 px |
| Height | At least 1 px | Pipeline/device dependent; avoid sources above 10,000 px |
| Aspect ratio | Source-dependent | Usually preserved until deliberately unlocked |
Rasters above 4096 × 4096 can materially increase decode and canvas memory. Resize before import when full resolution is unnecessary.
Opacity Validation
| Opacity input | Result |
|---|---|
| 0% | Fully transparent |
| 100% | Fully opaque |
| Below 0 or above 100 | Clamped or rejected by the active control |
| Non-numeric | Rejected; keep the last valid value |
Confirm the live canvas after editing; a transparent object can still exist and remain selectable.
Animation Timing Validation
| Timing field | Safe rule |
|---|---|
| Start time | Keep within the active scene/project timing range |
| Duration | Use a positive duration; drawing reveals need enough time for their paths |
| Hand speed | Use the range exposed by the active hand/draw control |
Invalid values can be clamped, normalized, or rejected. Read the visible message and verify the timeline instead of relying on legacy defaults such as 2 seconds or 1×.
Files exceeding 10MB will be rejected during upload. Compress large images before importing using tools like TinyPNG or ImageOptim.
SVG files are automatically sanitized on import. Script tags, external references, and potentially dangerous content are removed for security.
Best Practices
Image Guidelines
Do:
- use SVG for scalable icons, logos, and illustrations;
- use PNG when transparency is required and JPEG/WebP for suitable photos;
- optimize files before import;
- keep source dimensions appropriate for delivery;
- name files descriptively; and
- verify licensing and attribution requirements.
Avoid:
- importing unnecessarily large files;
- enlarging low-resolution rasters;
- filling one scene with too many heavy images; and
- assuming every SVG is drawable or every remote asset remains available.
SVG Tips
For reliable SVG drawing:
- export real stroke/path geometry rather than depending only on filled shapes;
- remove hidden layers, unused elements, scripts, and external executable content;
- simplify excessive path detail;
- keep embedded raster content intentional;
- inspect generated draw order; and
- preview before final export.
Export options called Outline Strokes can help for some artwork, but outlined fills and centerline strokes draw differently. Verify the actual result.
Before importing SVGs from Illustrator or Figma, export with "Outline Strokes" option enabled. This ensures Draw In animation works correctly!
Name your image files descriptively (e.g., company-logo-blue.svg instead of image1.svg). This makes searching and organizing much easier.
Troubleshooting
Common Issues
| Problem | Possible Cause | Solution |
|---|---|---|
| Image appears blurry | Scaled up too much | Use higher resolution source |
| SVG not drawing | No strokes in SVG | Check SVG has stroke paths, not just fills |
| Import fails | File too large | Reduce file size, try different format |
| Hand not showing | Animation type wrong | Set animation to "Draw In" |
| Image not loading | File corrupted | Try re-exporting from source app |
| Slow performance | Too many images | Reduce image count or file sizes |
File Format Issues
| Problem | Safe recovery |
|---|---|
| SVG is rejected | Validate XML, remove scripts/external references, simplify it, and re-export from the source editor |
| SVG imports but will not draw | Confirm it contains eligible path/stroke geometry and generate a draw plan |
| Raster is blank or corrupt | Re-export as PNG/JPEG/WebP, reduce dimensions, and retry from a copy |
| Import is too complex | Reduce dimensions, layers, or path count before retrying |
Do not clear all browser storage as a first troubleshooting step; protect the project and source file first.
Summary: Where to Find Everything
| Goal | Current workflow |
|---|---|
| Browse private images | Open Images, sign in when required, then search/filter the loaded library |
| Import a trusted local file | Open Vector Import or use the supported controlled drop path |
| Edit size or opacity | Select the object and use its visible Properties controls |
| Change layer order | Select the object and use the contextual or Properties layer actions |
| Animate an image | Select it and use the supported Animation controls |
| Draw an SVG | Generate and verify a draw plan in the real DRAW workflow |
| Trace a raster | Process it through Vector Import, inspect the traced result, then commit |
Questions? Check out our Documentation or visit app.ohotech.com to start creating!