Add images, assets, and backgrounds
Images can play two very different roles in Scribe Animator:
- an image object belongs to a scene, can be selected and transformed, and can participate in the timeline; or
- a background sits behind scene content and establishes the board or visual environment.
Choose the role before importing. It is much easier than rebuilding a background object—or replacing a background with an object—after timing and layout are complete.
What to use, when, and why
| Need | Use | Why |
|---|---|---|
| Reuse an image already saved to your account | Images library | Search, type filters, recents, and favorites make repeated placement faster |
| Place a file from the current device | Local image import / Advanced Image | Does not require the file to exist in the private library first |
| Keep the image as a normal visual layer | Add as Graphic | Best for photos, logos, screenshots, and artwork that should appear as one object |
| Turn artwork into drawable vector paths | Add as Drawing | Runs the SVG or raster-to-vector path workflow needed for draw reveals |
| Use one visual treatment throughout the project | Project background | Every scene inherits one consistent board unless it has an override |
| Give one scene a different environment | Scene background | Creates a local override without changing the rest of the project |
| Animate, crop, transform, or time a “background” | Add it as an image object | A canvas background is not a normal selectable timeline object |
For uncertain artwork, add it as a graphic first. Raster tracing can create many paths, while a normal image remains lightweight and visually faithful.
Understand the Images library
The screenshot below shows the Desktop Images surface before an account library has been loaded.
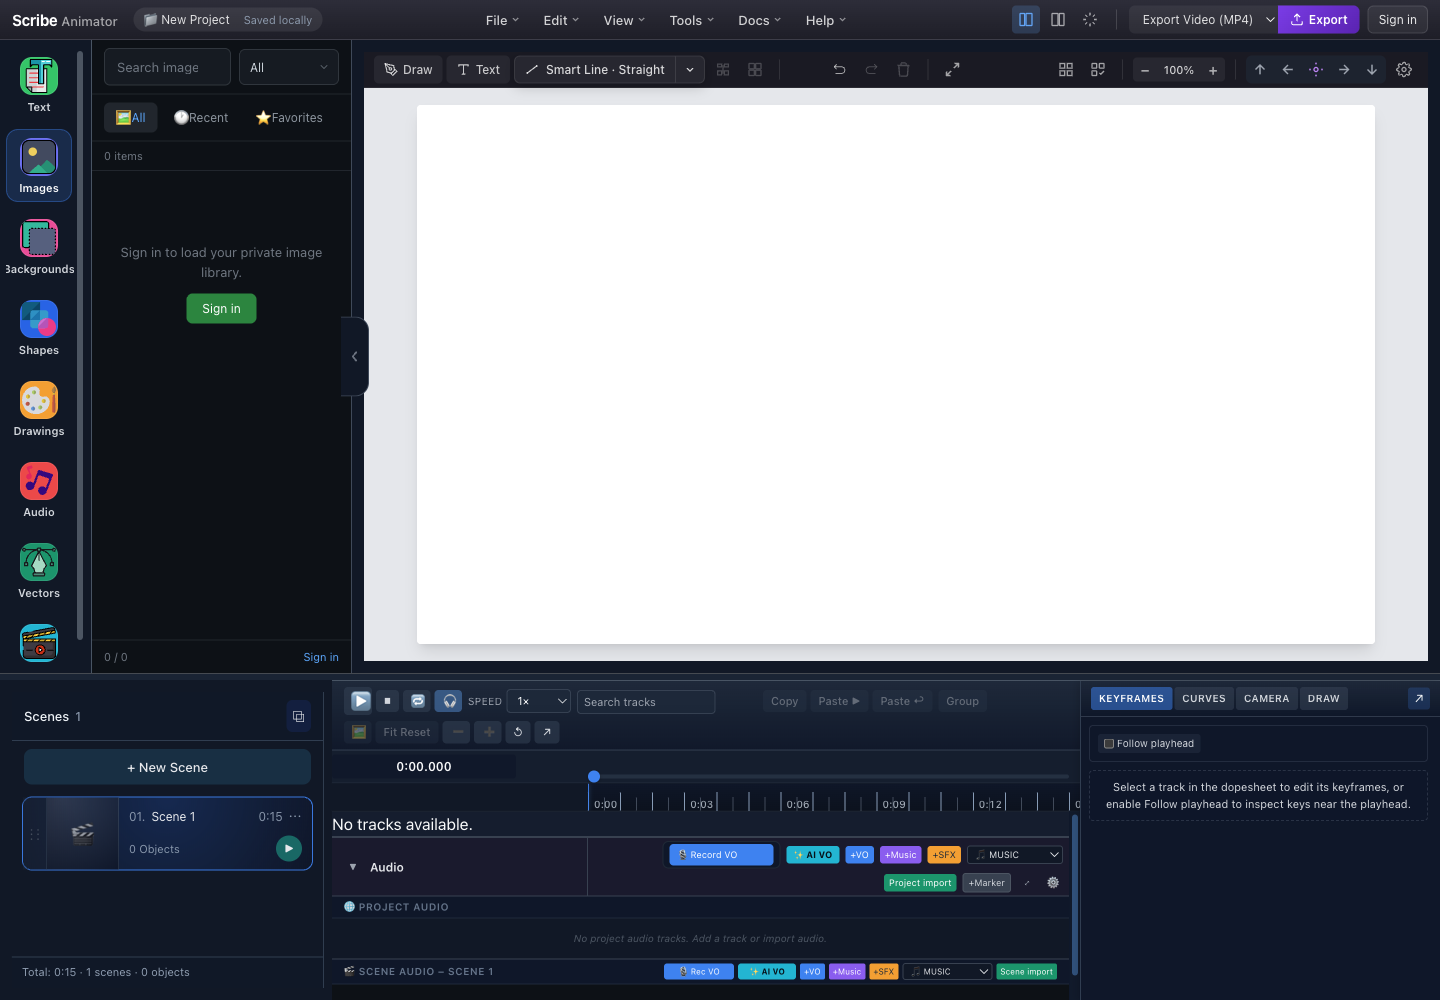
- Images toolOpens saved raster and SVG assets without leaving the editor.
- Search and kind filterSearch by asset name, then narrow the results to all items, raster images, or SVGs.
- All, Recent, and FavoritesAll shows the library; Recent records recently used items; Favorites keeps frequently reused assets close.
- Account-backed empty stateSign in only when you want to load the private image library. Local device import remains a separate workflow.
What each library state means
- All is the complete currently loaded library.
- Recent is device-local usage history and is useful when assembling several scenes from the same visual set.
- Favorites are device-local while signed out and can sync to the signed-in account.
- 0 items is not an import failure when you are signed out; it means the private library was not loaded.
- Sign in loads account-owned media. It is not required merely to place a local file into a local project.
Workflow A: add a saved library image
Use this when the image already exists in your Scribe image or SVG library.
- Pause playback if the project is currently playing.
- Open Images.
- Select All, Recent, or Favorites.
- Use the kind filter if you specifically need a raster image or an SVG.
- Search using the asset name or a distinctive keyword.
- Select the thumbnail and review the larger choice prompt.
- Choose:
- Add as Graphic to place the original visual as a normal scene object; or
- Add as Drawing to create drawable paths.
- Select the placed object on the canvas.
- Move it into position and resize from a corner when you want to preserve its proportions.
- Preview the scene and confirm that the object appears at the intended time.
Expected result: a new, selected object appears in the active scene. Choosing Drawing may take longer and can produce multiple paths; choosing Graphic preserves the source appearance.
Workflow B: add a local image
Use local import for a new photo, logo, exported slide, or screenshot that has not been saved to the private library.
- Confirm that a project and active scene exist.
- Pause playback. Mobile Lite intentionally refuses media insertion while playback is active.
- Open the image import route:
- on Desktop, use the Advanced Image action exposed from the Images workflow;
- on Mobile Lite, open Assets → Images and choose the device-file action.
- Choose a supported file.
- Wait for preprocessing. The pipeline decodes the source, inspects it, reduces it when required by the configured size limit, and emits an appropriate WebP, JPEG, or PNG result.
- Place the processed image.
- Check the canvas, selection, and timeline rather than relying only on a success message.
On Mobile Lite, an inserted image is centered and constrained to a maximum inserted dimension of 512 canvas units. Its initial animation is None, so it remains visible instead of unexpectedly animating.
Current format differences
| Surface | Current local image choices |
|---|---|
| Mobile Lite image insertion | PNG, JPEG, WebP, GIF |
| Desktop custom background | JPEG, PNG, GIF |
| Mobile Lite custom background | PNG, JPEG, WebP |
| Vector Import | SVG plus a broader raster set; see Import SVG and vector artwork |
These lists describe the current file pickers. A browser may still reject a damaged file even when its extension is listed.
What happens to local files
- Signed out: Mobile Lite preprocesses the file if needed and uses an isolated local blob URL. A cloud account is not mandatory for the edit.
- Signed in: Mobile Lite preprocesses the file, uploads it to the user library, and uses the returned served URL.
- Large source: the preprocessor attempts to reduce the file within the active media limit. If it cannot, the editor reports the failure instead of silently inserting an unusable asset.
Set a project or scene background
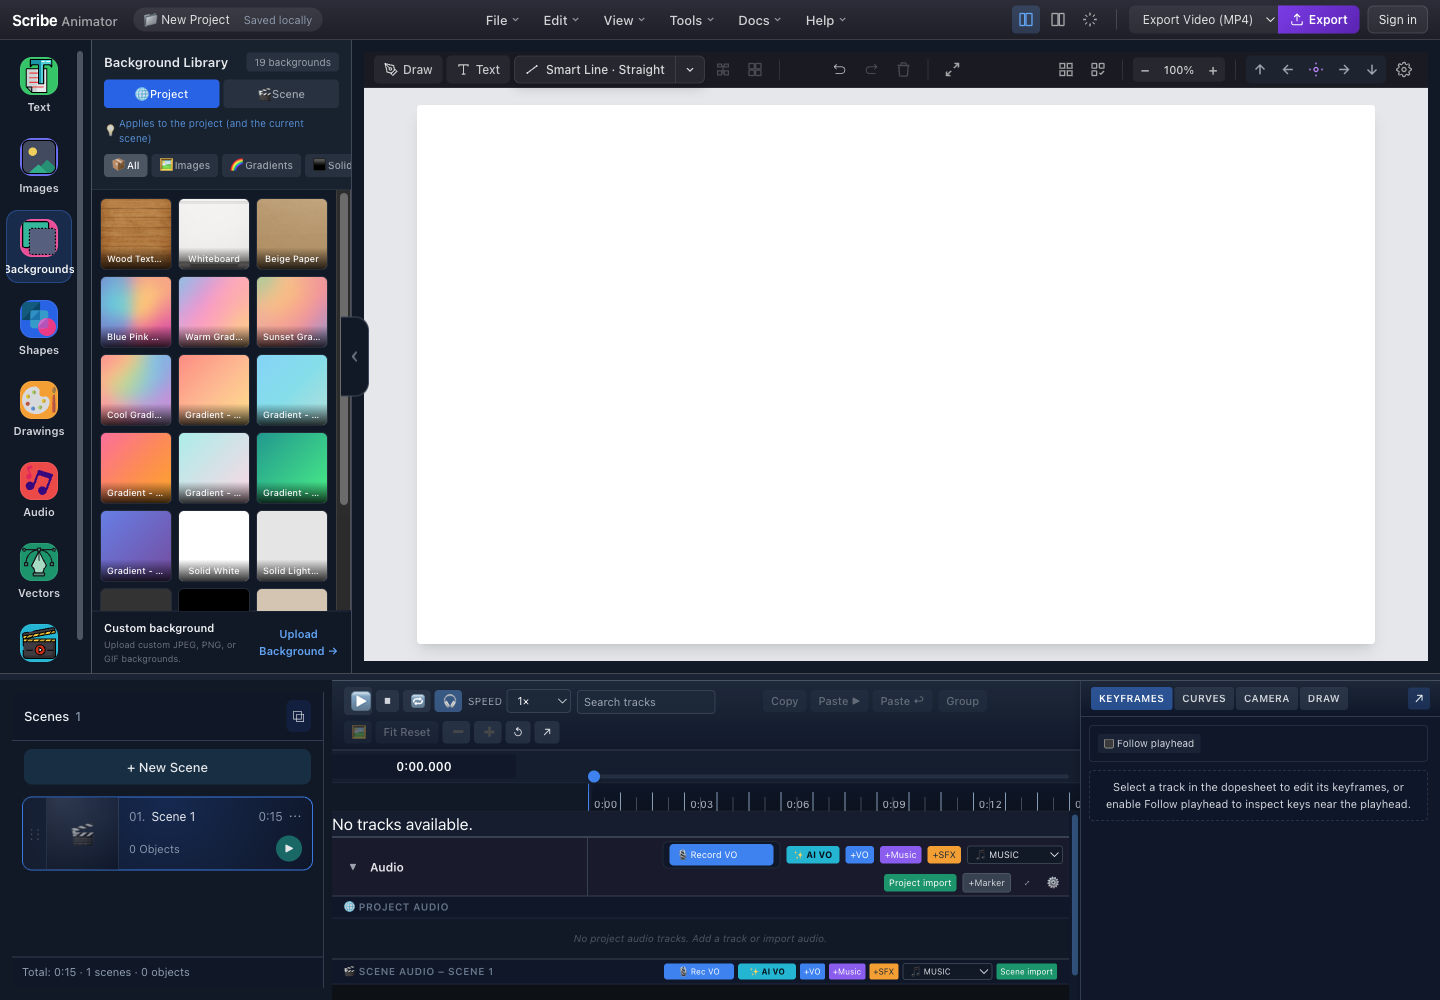
- Project or Scene scopeProject changes the shared background. Scene creates an override for only the active scene.
- Background type filtersShow all built-ins or narrow the grid to images, gradients, or solid colors.
- Built-in background gridSelecting a tile applies it immediately to the chosen scope.
- Custom backgroundUpload a supported image when the built-in images, gradients, and solids do not fit the project.
- Live canvas resultInspect the full composition after every change, especially when text contrast depends on the background.
Project scope
Use Project when most or all scenes should share one visual environment.
- Open Background.
- Select Project before choosing a tile.
- Filter to Images, Gradients, or Solids, or remain on All.
- Select a built-in background.
- Inspect the active scene and at least one other scene.
The project background updates immediately. Existing scene overrides remain local and continue to win in their scenes; choose Use Project on a scene when you want it to inherit the new project surface.
Scene scope
Use Scene for a deliberate visual break—for example, a title card, warning, chapter divider, or call to action.
- Select the scene that should differ.
- Open Background and choose Scene.
- Select a background.
- Move to another scene and confirm that it still uses the project background.
- To remove the local difference, return to the scene and choose Use Project.
The Scene control is unavailable when no active scene exists.
Custom background upload
- Choose Project or Scene first.
- Expand Custom background and select Upload Background.
- Choose a format supported by that editor surface.
- Wait for automatic compression.
- Confirm the image is applied to the intended scope.
Desktop stores the processed custom background as project data. Mobile Lite can use a local processed URL while signed out or a returned library URL while signed in.
Configure canvas size and board style
Background selection does not change the canvas aspect ratio. Set size separately in canvas or project settings.
Desktop canvas presets currently include:
- YouTube — 1920 × 1080;
- Square — 1080 × 1080;
- Vertical — 1080 × 1920;
- Widescreen — 2560 × 1080; and
- HD — 1440 × 1080.
You can also enter a custom width and height. Desktop and Mobile Lite use the same semantic board styles: Whiteboard, Blackboard, Green Chalkboard, Glassboard, Paper, Kraft Paper, Blueprint, and Custom. Named styles can be applied to the whole project or retained as a scene override; they are not flattened into an anonymous background color. Changes are live; close Desktop settings with × or Esc when finished.
Blackboard uses a dark charcoal or muted-green base plus deterministic fine grain, faint board streaks, and erased-chalk residue. It is a board-only effect, so it does not add noise to photographs, video, text, or colored fills.
Choose a stroke material
Canvas/Project settings also provide a default material for new drawings:
- Solid preserves the clean vector appearance;
- Marker adds restrained physical density and softness;
- Chalk adds deterministic grain and edge breakup; and
- Pencil adds a fine, lower-opacity graphite texture;
- Crayon adds waxy, colorful granular deposition;
- Dry Marker adds directional depleted-ink streaks;
- Ink Brush adds an expressive dense core and feathered edge; and
- Highlighter adds one broad translucent emphasis pass.
Blackboard suggests warm-white Chalk, Paper suggests graphite Pencil, Kraft Paper suggests Ink Brush, and Blueprint suggests a light Marker for new paths. Existing artwork retains its authored colors and material. Material is independent from the hand and tool: choosing Chalk material does not force a chalk sprite, and a missing chalk-tool asset does not prevent the stroke effect.
For a single drawable object, use its Properties material control. For one drawing step, expand the step and choose Stroke Material; Inherit returns to the object/default behavior. Partial draw reveals, authored dashes, camera motion, and video export retain the selected material.
For surface recommendations, contrast guidance, outlined-text behavior, and static SVG differences, follow Choose board surfaces and stroke materials.
Canvas-size changes do not magically recompose every object for a new aspect ratio. Set the target format early, then inspect every scene after any later size change.
Verify the result
For an image object, confirm all of the following:
- it belongs to the intended scene;
- its proportions, crop, and placement are correct;
- it does not cover important text or controls;
- its timeline visibility matches the story beat; and
- preview and export framing match the canvas.
For a background, confirm:
- Project versus Scene scope is correct;
- text remains readable;
- a scene override was not unintentionally cleared;
- transitions between differently colored scenes are comfortable; and
- the image still looks acceptable at the export aspect ratio.
Limits, security, and offline behavior
- Media-size limits depend on the active application configuration or plan; the editor reports the effective limit when a file is too large.
- Image preprocessing reduces oversized sources but cannot repair corrupted image data.
- Private-library loading, favorites sync, and signed-in uploads require the relevant account and network services.
- Local placement can work without authentication. Built-in backgrounds and local preprocessing can work offline after the required application assets are available.
- Blob-backed local images belong to the local project/session environment. Do not assume they have been uploaded merely because they are visible on the canvas.
- Use trusted media. Image decoding is still performed by the browser, and unusually large dimensions consume memory even when the compressed file is small.
- A background is project or scene state, not a selectable object. Use a normal image object when you need animation, transforms, selection, or timeline control.
Desktop and Mobile Lite differences
| Task | Desktop | Mobile Lite |
|---|---|---|
| Private image library | Search, kind filters, All/Recent/Favorites | Image library plus local device actions |
| Local placement | Advanced Image workflow | Assets → Images device-file workflow |
| Signed-out image | Local project use is available | Local processed blob URL |
| Signed-in image | Account library is available | Processed file uploads and uses returned URL |
| Initial placement | Place and transform in the canvas editor | Centered, max inserted dimension 512, animation None |
| Custom background formats | JPEG, PNG, GIF | PNG, JPEG, WebP |
| Background scope | Project/Scene library | Background tab with equivalent project/scene state |
Troubleshooting and recovery
| Symptom | What it means | Recovery |
|---|---|---|
| “Sign in to load your private image library” | The account library is unavailable, not the whole image feature | Sign in for cloud media, or use the local import workflow |
| Search shows no items | Filters or query exclude the asset, or the library is empty | Clear search, return to All, change the kind filter, or import locally |
| Import refuses to start | Playback is active, there is no project, or the file type is unsupported | Pause, open/create a project, then choose a listed format |
| File is too large | The preprocessor could not fit it within the active limit | Resize/crop at source, export as WebP/JPEG, and retry |
| Image is blurry | A small raster was enlarged or heavily compressed | Use a higher-resolution source or an SVG when available |
| “Drawing” result is too complex | Raster tracing produced too many paths | Undo, add it as a graphic, or simplify the source before tracing |
| Wrong scenes changed background | The scope was set to Project | Undo if available, then apply the intended background with Scene selected |
| Scene will not follow the project background | It has a local override | Select that scene and choose Use Project |
| Local image disappears after moving environments | A blob/local asset was never uploaded or packaged | Re-import it, save/package the project with assets, or sign in and upload where supported |