Build with scenes and templates
A scene is one ordered story beat with its own duration, objects, timeline state, background override, audio relationships, camera state, and transition into it. A project plays scenes in order on one global timeline.
A template is reusable project data. Depending on its type, it can add content to one scene, replace one scene, or replace the complete project.
The distinction matters: scene management changes the structure you already have; template application can create or replace structure.
When and why to create a new scene
Create a separate scene when one or more of these changes:
- the audience's task or message;
- the background or visual environment;
- narration topic;
- camera framing strategy;
- the set of objects that should remain editable together;
- the pacing or transition; or
- the reusable template you want to apply.
Keep content in one scene when it is one continuous beat and only object timing changes. Too many tiny scenes make narration, transitions, and later reordering harder to manage.
Useful scene names describe intent: Problem, Three benefits, Product demo, and Call to action are more helpful than a list of generic names.
Understand the scene manager and global time
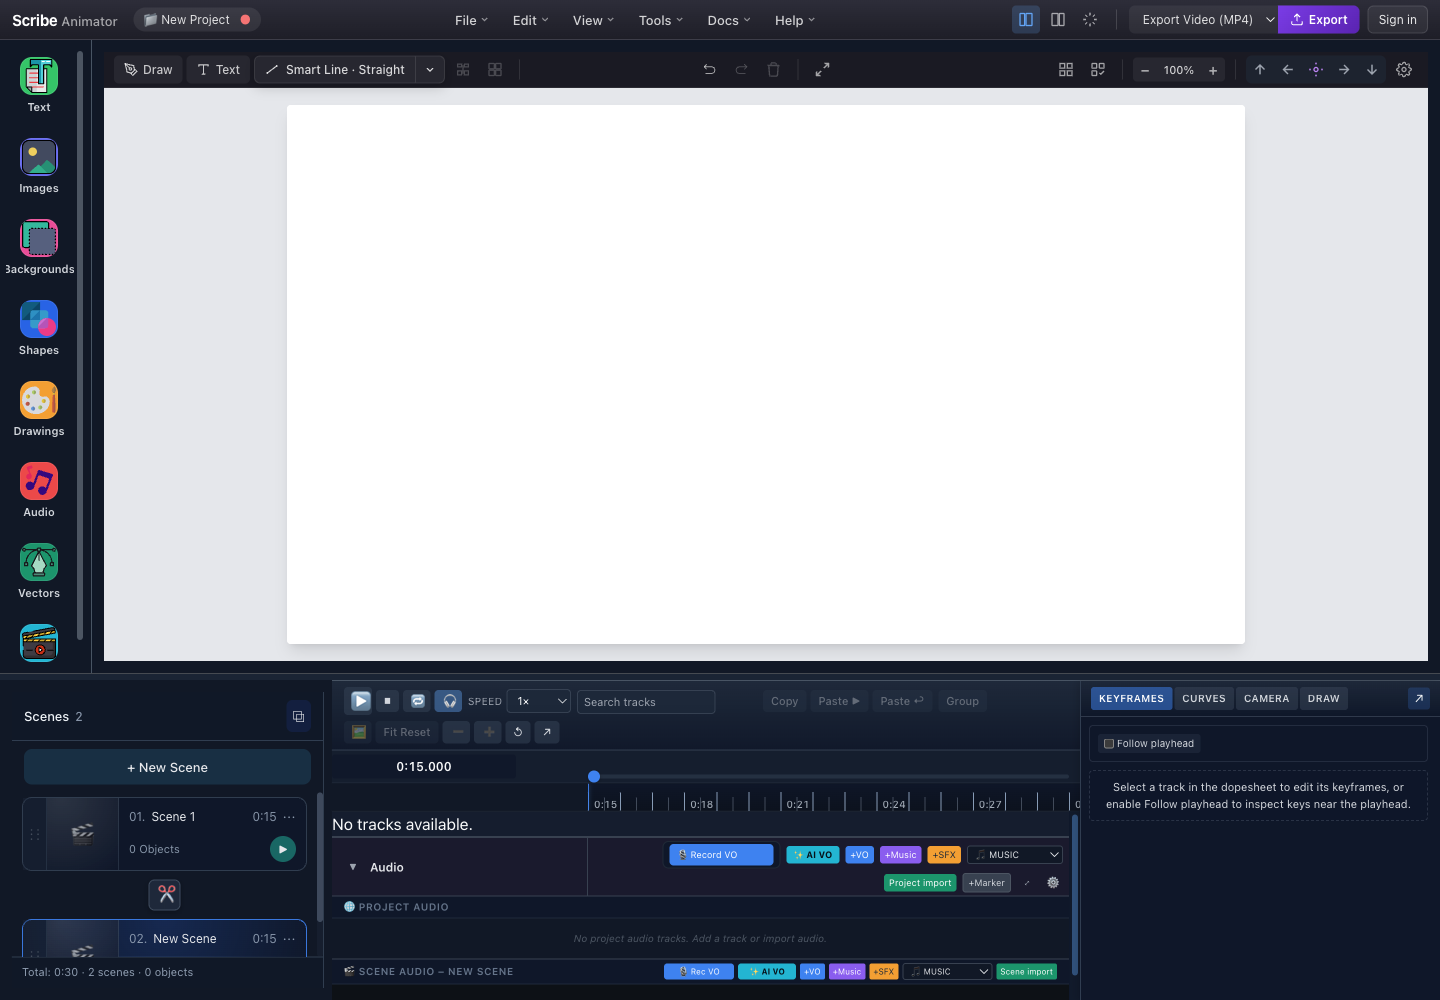
- Scene countThe scene manager reports two ordered scenes in this project.
- New SceneCreates a scene immediately after the active scene and selects the result.
- First sceneThe card reports its order, name, duration, object count, and scene-play action.
- Transition into the next sceneThe scissors control sits between cards; its transition belongs to the incoming scene.
- Active second sceneThe blue outline identifies the selected scene; its card starts immediately after Scene 1.
- Global playhead at 0:15Scene-local time 0:00 in the second scene maps to global project time 0:15.
The timing model
Scene start time is the sum of the durations of every earlier scene.
For the screenshot:
- Scene 1: global 0:00–0:15;
- Scene 2: global 0:15–0:30; and
- total project duration: 0:30.
Changing the duration or order of an earlier scene changes the global start time of later scenes. Always preview the full project after either operation.
Workflow A: create and select scenes
- Pause playback.
- Select the scene after which the new beat should appear.
- Choose + New Scene.
- Confirm the new scene becomes active.
- Rename it immediately.
- Set a duration based on narration, reading time, and animation.
- Add content only after confirming the correct active scene.
A new scene defaults to 15 seconds. On Desktop, creating it pauses playback, disables loop playback, inserts it after the active scene, selects it, and seeks to its global start.
Selecting another Desktop scene also pauses playback and disables loop so a stale loop range cannot pull the playhead back. If that scene has a valid remembered playhead position, the manager can restore it; otherwise it seeks to the scene start.
Workflow B: rename and label a scene
- Open the scene card's ⋯ actions.
- Choose Rename.
- Enter a non-empty descriptive name.
- Press Enter or commit the edit; use Escape to cancel on Desktop.
- Optionally set a short thumbnail label such as
IntroorCTA. - Optionally choose a thumbnail color to scan a long project faster.
Names explain narrative purpose. Thumbnail labels and colors are organization aids; they do not change the canvas background.
Workflow C: duplicate a scene safely
Duplication is the quickest way to preserve visual continuity while changing one beat.
- Finish the source scene's essential layout.
- Open ⋯ → Duplicate, or use the Mobile Lite copy action.
- Confirm a new scene named with (Copy) appears immediately after the source and becomes active.
- Rename the copy.
- Change its content without editing the source.
- Preview both scenes and their boundary.
The real duplicate command copies more than the scene card. It clones scene objects and timeline data with new IDs, remaps duplicated scene state, and clones scene audio relationships. This prevents the copy from sharing object IDs with the source.
Still verify manually: external or unavailable media cannot be repaired by ID remapping, and a copied transition or duration may not suit the new story beat.
Workflow D: reorder scenes
- Pause playback.
- Drag a scene's reorder handle toward its new position.
- Drop it on the intended index.
- Confirm the scene order and active selection.
- Scrub every affected boundary.
- Preview narration, object timing, camera behavior, and transitions from at least one scene before the moved scene.
Desktop uses the ⋮⋮ drag handle. Mobile Lite uses a touch/pointer drag handle and disables reordering during playback.
Reordering preserves the scene but changes its global start time. Project-level audio or markers may therefore relate differently to the visual sequence after the move.
Workflow E: set scene duration
Duration must accommodate:
- spoken narration;
- reading time after text is fully visible;
- all object animations and draw steps;
- camera movement;
- scene-scoped audio; and
- the transition into the next scene.
Desktop
- Open the scene card's ⋯ menu.
- Select the current duration.
- Enter a value from 1 to 30 seconds.
- Desktop accepts millisecond precision through a
0.001second step. - Commit with Enter or ✓; cancel with Escape.
Mobile Lite
- Tap the displayed duration or open the scene menu.
- Enter 1 to 60 seconds.
- Save the value.
The shared scene state clamps updates to 1–60 seconds, while the current Desktop control deliberately exposes the narrower 1–30 second range. Changing the active Desktop scene duration updates its playback range immediately.
Record or place the narration first when it controls pacing. Set the scene to cover the spoken line, then add a short reading or transition margin.
Workflow F: add a transition
The control between two scene cards edits the transition into the next scene.
- Pause playback.
- Select the scissors/transition control between the outgoing and incoming scenes.
- Choose a transition type.
- Set its duration.
- Preview from before the end of the outgoing scene.
Current transition choices include:
- None (Cut);
- Fade to Black and Crossfade;
- Wipe in four directions;
- Slide in four directions;
- Zoom In and Zoom Out; and
- Iris In/Open and Iris Out/Close.
Desktop starts a newly chosen transition at 500 ms and exposes 200–2,000 ms in 100 ms steps. Mobile Lite exposes 100–2,000 ms in 50 ms steps.
Use cuts for speed and continuity. Use a transition only when it communicates a meaningful change; repeated long transitions consume reading time and slow the project.
Workflow G: delete a scene
- Select the scene and verify its name, content, and position.
- Save or package a recovery copy if the scene contains irreplaceable work.
- Choose Delete.
- Read the confirmation and confirm only the intended scene.
- Verify the remaining active scene and global timeline.
The delete command removes the scene, its scoped objects, and associated timeline data. Desktop explicitly warns that the action cannot be undone. Mobile Lite prevents deleting the final remaining scene and displays You must have at least 1 scene.
Choose the correct template type
Template type determines application behavior:
| Type | Existing-project behavior | Confirmation |
|---|---|---|
| Block | Adds new elements to the active scene; existing content remains | No impact confirmation |
| Scene | Starts an empty target scene or replaces the current scene's contents; other scenes remain | Yes |
| Project | Starts a pristine project or replaces the entire current project, including scenes and project-level content | Yes |
Never infer type from the preview alone. Read the BLOCK, SCENE, or PROJECT badge and the impact text.
Browse the template library
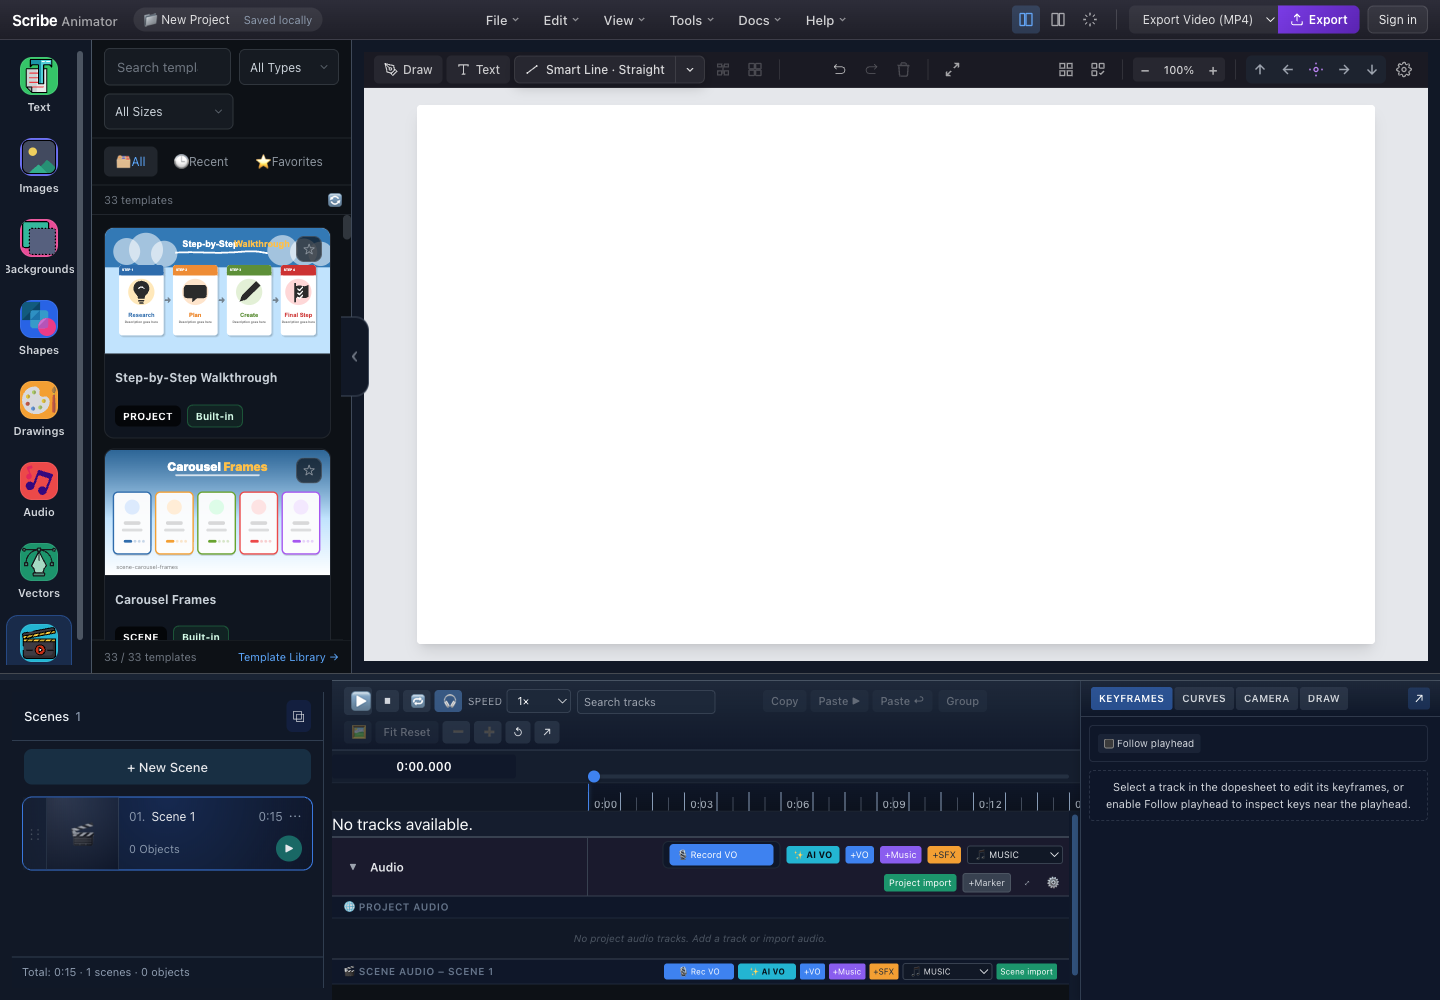
- SearchMatches template name, description, and tags.
- Type filterNarrow results to scene, block, or project templates before selecting one.
- Aspect-ratio filterDesktop filters by All Sizes, 16:9, 9:16, or 1:1.
- All, Recent, and FavoritesRecent keeps the last 50 applied template IDs; Favorites are device-local while signed out and sync when signed in.
- Project template cardThe PROJECT badge signals complete-project impact. Built-in identifies its source.
- Scene template cardA SCENE template targets the active scene and does not replace the other scenes.
- Full Template LibraryOpens the advanced library when the quick picker is not enough.
Apply a template without losing work
- Pause playback and select the intended target scene.
- Save, duplicate, or package the current project before applying a Scene or Project template to valuable work.
- Open Templates.
- Filter by type first.
- Filter by aspect ratio close to the target canvas.
- Search by purpose, not only appearance—for example,
walkthrough,carousel,intro, orcomparison. - Select a card.
- Read:
- the type badge;
- Adds to scene, Starts/Replaces scene, or Starts/Replaces project;
- source such as Built-in; and
- any reported impact count.
- Choose the apply action.
- For Scene or Project impact, read the confirmation:
- cancel leaves the current work unchanged;
- confirm continues with the stated replacement.
- If the template exposes editable slots, complete the customization form before final application.
- Wait for completion, then read warnings.
- Inspect scenes, objects, timeline, backgrounds, camera, audio, and total duration.
- Preview the complete affected range.
What the apply pipeline does
- Block: inserts remapped objects into the active scene. A table block additionally asks for row and column counts.
- Scene: replaces only the target scene's scoped content and timing state, resolves its background, loads draw behavior, and restores supported camera behavior.
- Project: creates a new project instance from the complete template and hydrates its scenes, objects, audio settings, and timeline data.
- IDs are remapped to avoid collisions with existing objects, scenes, tracks, and bindings.
- Validation warnings are shown rather than silently ignored.
ID remapping prevents structural collisions. It does not guarantee that missing external assets, unsupported fonts, or an unsuitable aspect ratio will look correct.
Customize template slots
Some templates declare editable slots for text or visual replacements.
- Select the template and choose its apply action.
- When the customization form opens, review every named slot.
- Replace only the intended values.
- Check required slots before applying.
- Apply with the completed slot values.
- Inspect framing, wrapping, and timing in the real canvas.
The slot form appears before the template is committed. If you cancel it, the pending template is not applied.
Limits, safety, and offline behavior
- Built-in templates are validated JSON/project data and previews, not arbitrary scripts.
- Applying a template does not execute third-party code or plugins embedded in its content.
- Built-in templates can work offline after their manifest, JSON, previews, and required assets are available to the app.
- Cloud or account-owned template sources, favorite sync, and unavailable remote assets require their host services.
- Recents and signed-out favorites use local device storage. Up to 50 recent template IDs are retained by the quick picker.
- A template may carry canvas dimensions that differ from the current project. Filtering by aspect ratio reduces surprises but does not guarantee automatic responsive layout.
- Scene and project replacement are intentionally confirmed because their effect is broader than normal object insertion.
- Template warnings require review; “applied” does not mean every optional asset or visual constraint was perfect.
Desktop and Mobile Lite differences
| Task | Desktop | Mobile Lite |
|---|---|---|
| Scene access | Docked or floating Scene Manager | Quick scene switcher plus Manage scenes modal |
| Edit during playback | Scene commands pause or coordinate playback | Scene editing controls are disabled; the sheet says Pause playback to edit scenes |
| Duration control | 1–30 s, 0.001 s step | 1–60 s |
| Reorder | Drag ⋮⋮ handle | Touch/pointer drag handle |
| Delete final scene | Destructive confirmation path | Explicitly blocked; at least one scene required |
| Transition duration | 200–2,000 ms, 100 ms step | 100–2,000 ms, 50 ms step |
| Template filters | Search, type, 16:9/9:16/1:1, All/Recent/Favorites | Type, size including 4:3, search, and quick tags such as Social, Short, List, Compare |
| Template impact | Typed confirmation and slot customization | Same impact model and slot customization in a touch layout |
Verify the result
After scene changes:
- scene order tells the intended story;
- names and thumbnail labels are unambiguous;
- every object belongs to the intended scene;
- narration and scene duration agree;
- global timeline offsets remain correct;
- transitions point into the intended scene; and
- the full project plays through without an unexpected seek or loop.
After template application:
- the applied type matches your intent;
- no unrelated scene or project content was replaced;
- editable slots contain final values;
- IDs, tracks, draw steps, and camera behavior load;
- required assets and fonts resolve;
- backgrounds and aspect ratio are correct; and
- warnings have been addressed or consciously accepted.
Troubleshooting and recovery
| Symptom | Likely cause | Recovery |
|---|---|---|
| New content appears in the wrong scene | A different scene was active | Undo if available, select the intended scene, and insert/apply again |
| New Scene button or Mobile scene controls are disabled | Playback is active | Pause playback and retry |
| Scene begins at an unexpected global time | Earlier scene duration or order changed | Recalculate from earlier scene durations and inspect the global timeline |
| Duplicate is missing content | Source had unavailable external assets or unsupported state | Keep the source, restore assets, then duplicate again |
| Rename does not save | The new name is blank or unchanged | Enter a non-empty descriptive name |
| Desktop rejects a 45-second duration | Desktop UI exposes 1–30 seconds | Split the beat or use Mobile Lite's 1–60 second control only when the longer scene is intentional |
| Transition seems attached to the wrong card | Transitions belong to the incoming scene | Edit the control between cards and verify the label says transition into the next scene |
| Delete is blocked on Mobile | It is the only remaining scene | Create another scene before deleting |
| Template card adds instead of replaces | It is a BLOCK template | Use a SCENE or PROJECT template only after reading its impact confirmation |
| Current scene disappeared after template apply | A SCENE template replaced its contents | Restore the backup/copy, or cancel before confirmation next time |
| Entire project changed | A PROJECT template was confirmed | Restore the saved/package copy; do not rely on object-level recovery for complete replacement |
| Template looks stretched or clipped | Aspect ratio or required assets differ | Restore, choose a matching size filter, or reposition content after apply |
| Apply reports warnings | Optional/required content could not map perfectly | Read each warning, fix missing assets/fonts, and preview before continuing |
| Favorites differ across devices | Signed-out favorites are local or sync is pending | Sign in, reconnect, and allow favorite sync to complete |