Scenes - Complete Guide
Learn how to organize your whiteboard animation into multiple scenes in Scribe Animator. This guide covers scene creation, management, transitions, and best practices for effective storytelling.
Current visual orientation
The scene manager, canvas, and timeline share one project state. Selecting a scene changes the active editing context; it does not create a separate tutorial canvas.
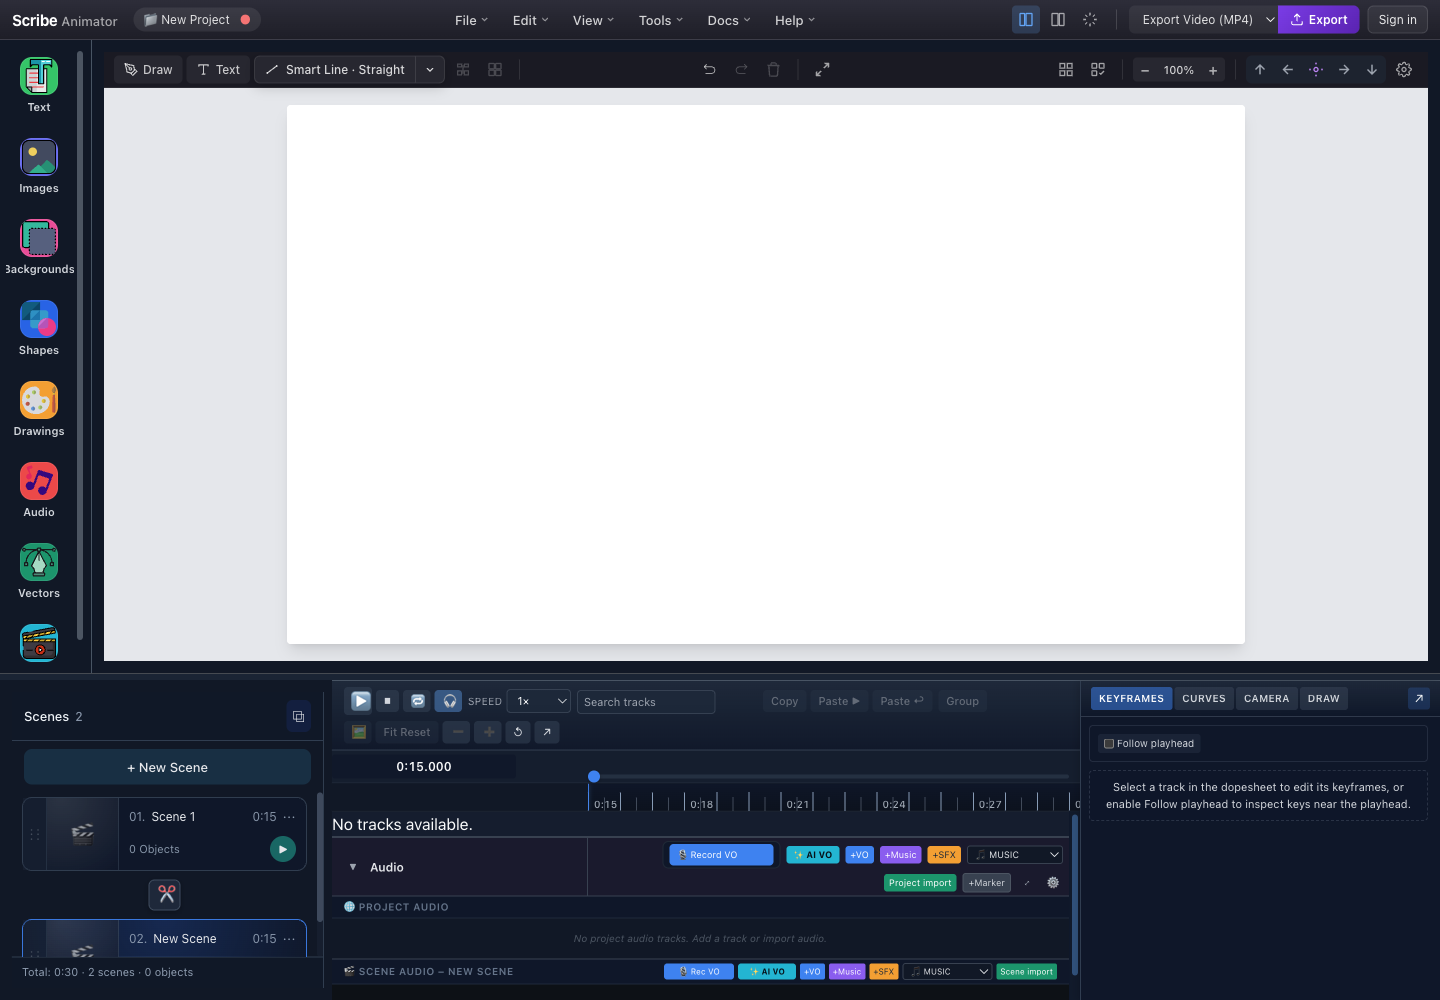
- Scene countThe manager reports the number of ordered scenes in the current project.
- New SceneCreates a scene after the active scene, selects it, and seeks to its global start.
- Scene cardShows order, name, duration, object count, play action, and the more-actions menu.
- Incoming transitionThe transition control between cards configures the transition into the later scene.
- Active Scene 2The blue outline identifies the scene that receives new objects and edits.
- Global playhead at 0:15Scene-local 0:00 in Scene 2 maps to project-global 0:15.
This capture and the marked controls were checked against the running Desktop editor with browser-based UI review on July 26, 2026. The header has no separate Share button, scene commands are exposed through cards rather than the unverified shortcut table that older docs showed, and transitions belong to the incoming scene. For exact create, rename, duplicate, reorder, duration, transition, template, reset, and Mobile Lite steps, follow Build with scenes and templates.
Application Layout Overview
Use the authentic annotated capture above as the layout reference.
| Area | Scene responsibility |
|---|---|
| Scene Manager | Creates, selects, orders, duplicates, renames, resets, and deletes scenes |
| Canvas | Shows and edits only the active scene's objects |
| Timeline | Maps scene-local edits into project-global playback time |
| Transition control | Configures the transition into the later scene |
| Playback | Previews the ordered scenes and their transitions as one project |
Scene Management Access:
- Left Sidebar → 🎬 Scenes — Open Scene Manager panel
- Timeline → Scene Track — View and select scenes
- Timeline → Scene Gaps — Add/edit transitions between scenes
What Are Scenes?
Scenes are the building blocks of your animation project. Each scene contains:
-
Objects — Text, images, SVGs, shapes on the canvas
-
Duration — How long the scene plays
-
Transition — How it transitions from the previous scene
-
Background — Individual scene background settings
-
A project owns the ordered scene list and project-wide settings.
-
Each scene owns its duration, objects, scene-level background override, camera state, and local timing.
-
A transition is stored as the incoming transition of the later scene.
-
Project-global time is calculated from the durations and transitions before the active scene.
Think of scenes like slides in a presentation — each scene tells part of your story, and transitions create smooth connections between them.
Quick Start: Creating Scenes
Create Your First Scene
- Open Scenes in the left rail.
- Select New Scene.
- Confirm the new card is active and the playhead has moved to its global start.
- Add content to the canvas. New objects now belong to that scene.
Scene Manager Panel
The real panel in the annotated capture exposes:
- the current scene count;
- New Scene;
- an ordered card for each scene;
- play, name, duration, object-count, and more-actions controls on each card;
- an incoming-transition control between adjacent cards;
- active-scene styling that identifies where edits will be applied.
Scene Card Anatomy
Each scene in the manager shows key information at a glance.
| Card element | Purpose |
|---|---|
| Play | Starts preview from that scene's global start |
| Scene name | Identifies the section in the story |
| Duration | Sets how long the scene remains active |
| Thumbnail | Provides a compact preview of the scene |
| Object count | Helps detect unexpectedly empty or overloaded scenes |
| More actions | Opens rename, duplicate, duration, reset, template, and delete actions available in the current build |
Card Information
| Element | Description |
|---|---|
| Play Button | Start playback from this scene |
| Title | Editable scene name |
| Thumbnail | Visual preview (auto-generated) |
| Object Count | Number of objects in scene |
| Duration | Scene length in seconds |
| Menu | Additional actions (rename, duplicate, delete) |
Scene Operations
Creating Scenes
| Method | How To |
|---|---|
| New Scene button | Click [+ New Scene] in Scene Manager |
| Duplicate | Menu (⋮) → Duplicate Scene |
| Keyboard | Ctrl/⌘ + Shift + N |
Selecting Scenes
Select a scene either from its Scene Manager card or from its scene region on the timeline. The selected scene becomes active, the canvas shows its content, and the global playhead seeks into its time range.
Reordering Scenes
- Drag a scene card toward its new position.
- Use the insertion feedback to confirm the intended order.
- Release the card.
- Verify the card order, global scene ranges, transition ownership, and preview sequence.
Reordering changes project-global timing. Review audio, camera, and other time-sensitive content afterward.
Scene Menu Actions
The more-actions menu is build-dependent. In the current editor it can expose actions such as:
- play from the scene;
- rename or duplicate;
- change duration;
- create a scene template;
- reset scene content;
- delete the scene.
Use the visible menu as the source of truth. Do not assume an older Thumbnail Color action is still available.
| Action | Description |
|---|---|
| Play Scene | Start playback from this scene |
| Rename | Change scene title |
| Duplicate | Create a copy with all objects |
| Set Duration | Change how long scene plays |
| Thumbnail Color | Set custom thumbnail background |
| Delete Scene | Remove scene from project |
Deleting a scene permanently removes all objects in that scene. This action cannot be undone.
Scene Duration
Control how long each scene plays in your animation.
Setting Duration
- Open the scene card's more-actions menu.
- Choose the duration action exposed by the current build.
- Enter a valid duration and confirm.
- Verify the card, timeline range, total project duration, and global playhead mapping.
Duration Guidelines
| Content Type | Recommended Duration |
|---|---|
| Title slide | 3-5 seconds |
| Simple drawing | 5-10 seconds |
| Complex illustration | 10-20 seconds |
| Text-heavy content | Calculate by reading speed |
| Voiceover sync | Match audio length |
Duration Validation
| Rule | Limit | Error |
|---|---|---|
| Desktop minimum | 1 second | The scene-manager control rejects shorter values |
| Desktop maximum | 30 seconds | Use multiple scenes for a longer Desktop beat |
| Shared/Mobile Lite maximum | 60 seconds | Mobile Lite exposes the shared 1–60 second range |
| Default new scene | 15 seconds | Adjust it to narration and content |
For voiceover sync, set scene duration slightly longer than the audio to avoid cutoffs.
Scene Transitions
Add professional transitions between scenes for smooth storytelling.
Transition Types
| Type | Icon | Effect Description |
|---|---|---|
| None (Cut) | ✂️ | Instant switch, no animation |
| Fade to Black | 🌑 | Fade out to black, fade in |
| Crossfade | 🔀 | Dissolve/blend between scenes |
| Wipe Left | ◀️ | New scene wipes from right |
| Wipe Right | ▶️ | New scene wipes from left |
| Wipe Up | 🔼 | New scene wipes from bottom |
| Wipe Down | 🔽 | New scene wipes from top |
| Slide Left | ⬅️ | New scene slides from right |
| Slide Right | ➡️ | New scene slides from left |
| Slide Up | ⬆️ | New scene slides from bottom |
| Slide Down | ⬇️ | New scene slides from top |
| Zoom In | 🔍 | Zoom into new scene |
| Zoom Out | 🔎 | Zoom out to new scene |
| Iris Open | ⭕ | Reveal the incoming scene through an expanding iris |
| Iris Close | 🔴 | Close toward the incoming scene |
| Iris Open | ⭕ | Circular opening reveal |
| Iris Close | 🔴 | Circular closing reveal |
Adding Transitions
- Select the transition control immediately before the later scene.
- Choose one of the transition types offered by the current picker.
- Set its duration when that control is available.
- Preview across the boundary and confirm that the transition belongs to the incoming scene.
Transition Duration
Use the picker’s visible duration control rather than relying on an old fixed range. Very short values can look like a cut; long values consume more of the adjoining scene content. Preview the boundary after every change.
| Setting | Range | Default |
|---|---|---|
| Desktop duration | 0.2–2.0 seconds, 0.1-second step | 0.5 seconds |
| Stored easing | ease-in-out for a newly selected transition | The current scene-manager picker does not expose a separate easing selector |
Transitions happen at the start of a scene (transitioning INTO that scene from the previous one). Scene 1 cannot have an incoming transition since there's no scene before it.
Timeline Scene View
Scenes are displayed on the timeline for visual editing.
Timeline Scene Track
The timeline places scenes in project order and converts each scene's local time to a global range. In the authentic capture, Scene 2 starts at 0:15 because Scene 1 lasts 15 seconds. Transition regions sit at scene boundaries and affect the resulting total-time mapping.
Visual Indicators
| Indicator | Meaning |
|---|---|
| Blue highlight | Active/selected scene |
| Playhead over scene | Currently playing |
| T marker | Transition between scenes |
| Gray bar | Transition duration |
Scene Playback
Play Controls
| Control | Action |
|---|---|
| ▶ Play | Play entire project from current position |
| Scene ▶ | Play from specific scene start |
| ⏸ Pause | Pause playback |
| ⏹ Stop | Stop and return to start |
| ← → | Navigate between scenes |
Playing from a Scene
Select the card's play action to seek to that scene's global start and begin preview. Confirm the playhead time before evaluating audio, camera, or transition synchronization.
Scene Thumbnails
Visual previews help identify scenes quickly.
Auto-Generated Thumbnails
The manager derives a compact thumbnail from scene content. Treat it as navigation assistance, not a pixel-accurate export preview; small text and edge content may be reduced or cropped.
Custom Thumbnail Colors
Older builds exposed a custom thumbnail-color action. It is not shown in the verified current Scene Manager capture, so do not depend on it. Use meaningful scene names and visible scene content for reliable navigation.
Use color coding to organize scenes by type — e.g., blue for intro scenes, green for content, red for calls-to-action.
Performance Modes
The Scene Manager adapts to system performance automatically.
Adaptive UI Modes
| Mode | Icon | When Active | UI Behavior |
|---|---|---|---|
| Rich | — | Normal operation | Full animations, smooth transitions |
| Compact | ⚡ | High scene count | Reduced animations |
| Minimal | ⚡⚡ | Performance stress | Instant transitions, minimal UI |
The Scene Manager can simplify rendering as projects grow. The exact compact or adaptive indicator is build-dependent; the visible scene count and current manager behavior are authoritative. Simplification must not change project data or export output.
Performance Guidelines
| Scene Count | Recommended Actions |
|---|---|
| 1-10 | No action needed |
| 11-25 | Monitor performance |
| 26-50 | Consider splitting into multiple projects |
| 50+ | Split project, reduce complexity |
There is no documented 50-scene compatibility cutoff. Split a project when navigation, preview, narration, or export becomes difficult to reason about—not because of an invented fixed threshold.
Keyboard behavior
Scene operations are intentionally discoverable from + New Scene, the scene card, and its ⋯ menu. When renaming or editing duration, press Enter to commit and Escape to cancel. Do not rely on older, unverified global shortcuts for creating, deleting, duplicating, or renaming scenes.
Common Workflows
Workflow 1: Create Multi-Scene Project
- Open Scene Manager.
- Create the required scenes.
- Name them by story purpose.
- Add and verify content in each active scene.
- Add only the transitions the story needs.
- Preview the full project from the beginning.
Workflow 2: Storyboard First
- Plan the story beats outside the editor.
- Create and name placeholder scenes in the intended order.
- Set approximate durations.
- Fill each scene with content and refine timing.
Workflow 3: Reorganize Existing Content
- Review the existing scene and identify natural story boundaries.
- Create shorter scenes and move or recreate the required content deliberately.
- Reorder the resulting cards.
- Recheck global audio, camera, and timing.
- Add transitions only after the new order is stable.
Troubleshooting
Scene Not Visible
| Issue | Cause | Solution |
|---|---|---|
| Objects missing | Wrong scene selected | Click correct scene in manager |
| Canvas blank | Scene has no content | Add objects to the scene |
| Scene not in list | Accidentally deleted | Undo (Ctrl/⌘ + Z) if recent |
Transition Problems
| Issue | Cause | Solution |
|---|---|---|
| No transition playing | Type set to "None" | Change transition type |
| Transition too fast | Duration too short | Increase duration |
| Choppy transition | Performance issue | Use simpler transition type |
Performance Issues
| Issue | Cause | Solution |
|---|---|---|
| Slow scene switching | Too many scenes | Split into multiple projects |
| UI lag | Many objects | Reduce object count per scene |
| Thumbnail not updating | Render delay | Refresh or wait a moment |
Best Practices
Scene Organization
- Name scenes descriptively — Use names like "Intro", "Problem", "Solution"
- Keep scenes focused — One main concept per scene
- Consistent timing — Similar scene types should have similar durations
- Use transitions purposefully — Don't overuse; simpler is often better
Duration Guidelines
- Match content complexity — More content = more time
- Consider reading speed — ~150 words per minute for narration
- Build rhythm — Vary durations to create pacing
- Leave breathing room — Add 0.5-1s buffer at scene ends
Transition Tips
- Use crossfade for related content — Smooth topic continuation
- Use cuts for dramatic changes — Hard breaks between sections
- Match transition to mood — Fast for energy, slow for calm
- Keep durations consistent — Usually 0.3-0.8 seconds
Pro tip: Use "Fade to Black" transitions to create chapter breaks in longer animations.
Summary
| Feature | Location | Purpose |
|---|---|---|
| Scene Manager | Left Sidebar → 🎬 Scenes | Create and manage scenes |
| Scene Cards | Scene Manager Panel | Visual scene overview |
| Transitions | Between scene cards | Add effects between scenes |
| Timeline View | Bottom Timeline | See scene timing |
| Duration Control | Scene Menu → Set Duration | Control scene length |
Scenes are the foundation of organized whiteboard animations. Use them to structure your story, control timing, and create professional transitions between ideas.
Related Documentation:
- Typography Text Guide — For adding text to scenes
- Images & Vectors Guide — For visual content
- Audio & Sound Guide — For scene-synced audio
- Background & Canvas Settings — For scene backgrounds