Audio & Sound - Complete Guide
Learn how to add background music, sound effects, and voiceovers to your animations in Scribe Animator. This guide covers the Audio Library, track management, timeline sync, and audio mixing basics.
Visual orientation
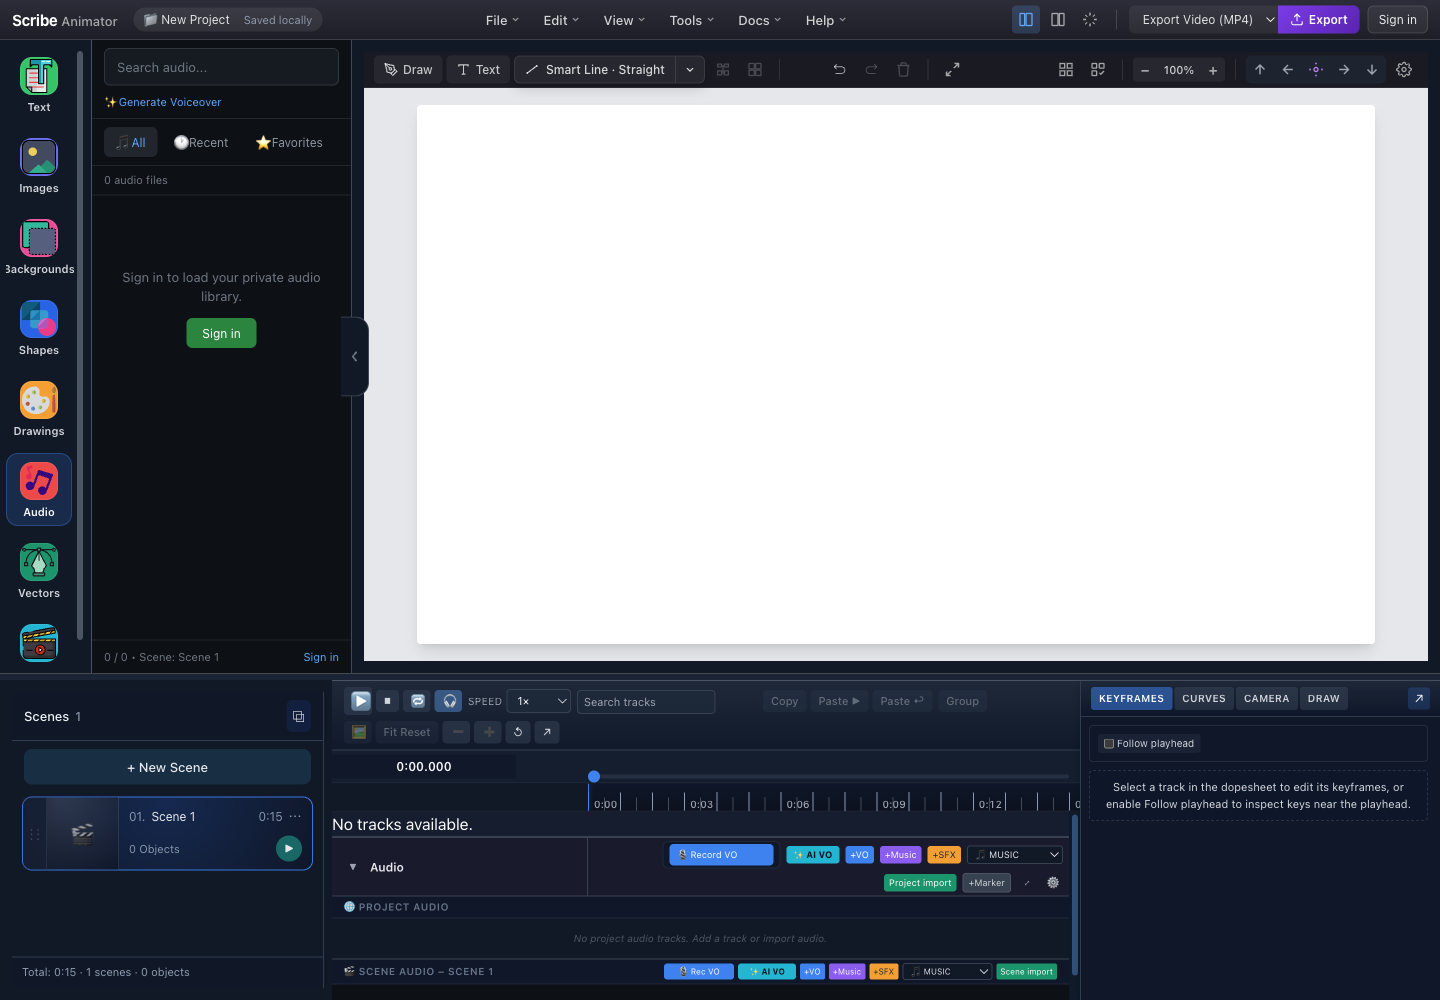
- Search and Generate VoiceoverFind private-library sources or open supported local AI narration.
- Library filtersAll, Recent, and Favorites organize sources without changing timeline clips.
- Private-library sign-in stateCloud library access can require sign-in; local project audio actions remain separate.
- Project Audio actionsRecord VO, AI VO, add role-specific tracks, import media, and add markers.
- Project and Scene AudioGlobal tracks and active-scene tracks use different time scopes.
This screenshot and its visible labels were checked in the real local Desktop editor at 1440 × 1000 on 26 July 2026. The private-library signed-out state does not disable local project/scene recording, import, or supported local generation. It is not a documentation playground.
For a task-based recording, import, generation, and sync workflow, see Voiceover and synchronization. This page remains the detailed audio reference.
Quick Start: Adding Audio
Step-by-Step Workflow
- Expand the bottom Audio lane.
- Decide whether the clip belongs in Project Audio or the active Scene Audio.
- Choose the import role: Voiceover, Music, SFX, or Generic.
- Use Project import or Scene import and select a supported local file.
- Resolve any size, decoding, or scene-overflow warning.
- Confirm the clip appears in the intended scope.
- Move or trim it, then preview from before the clip starts.
You can also drag a supported local audio file onto a compatible audio track. Confirm the highlighted target and time before dropping.
Local AI Voiceover
Open supported local narration from AI VO in Project Audio or Scene Audio, Generate Voiceover in the Audio Library/quick picker, or the Mobile Lite AI Voiceover sheet. Provider and model choices depend on the platform build and available assets.
Voice Quality
| Choice | When to use it | Limitation |
|---|---|---|
| Performance | Lower-memory devices and quick drafts | Voice quality can be lower |
| High Quality | Final narration review on a capable device | Larger model download and memory use |
| Ultra Quality | Only when the UI reports compatible acceleration and enough memory | Highest resource cost; not available for every provider/platform |
Supported builds can expose Kokoro Local, Pocket Local, or Supertonic Local, along with provider-specific languages, voices, and quality variants. The selected assets can download on first use. Treat size and availability shown in the dialog as authoritative; model packages can change independently of this guide.
Privacy and Storage
Local generation runs on the device after required model assets are available. Model downloads still require the configured asset host unless already cached or packaged. Review the provider disclosure in the dialog before generation.
Generated WAV files are local project/library sources by default and are not uploaded merely because preview generation completed. An explicit cloud save or host integration can have separate persistence behavior.
Placement Options
- Save to Audio Library only keeps the generated WAV available for later.
- Add to Project Audio inserts at the current project playhead.
- Add to Scene Audio inserts into the selected scene and uses the existing scene overflow handling.
- Download WAV saves the generated voiceover file locally.
Pocket voice cloning, where explicitly available, is session-scoped and requires an ownership/permission confirmation. Do not clone or imitate a real person without authorization, and disclose synthetic audio where the destination requires it.
Audio Library Panel
Access all your project audio from one central location.
Library Launcher
The launcher summarizes the project audio library and opens its management view. Depending on the current state, it can report the number of sources and their storage use.
- Open Audio from the left sidebar.
- Review the library state shown in the panel.
- Choose Manage when you need to import, preview, rename, or remove sources.
Audio Library Modal
The visible library depends on authentication and on the sources already available to the project. The screenshot above shows the authentic signed-out private-library state; it does not imply that local project actions are disabled.
| Area | What it is for |
|---|---|
| Search | Find a source by its displayed name |
| Type filter and sort | Narrow the list by role, then order it by name, duration, size, date, or type |
| Import | Add supported local audio after validation and decoding |
| Source list | Review the source name, role, duration, size, and clip-usage count when those values are available |
| Preview | Listen to the selected source and scrub its preview position |
| Project total | Monitor source storage against the current project warning boundary |
| Source actions | Rename, delete, or add the selected source to an eligible timeline scope |
Audio Track Types
Organize your audio into different track types for easier mixing.
Track Roles
| Role | Icon | Color | Use Case |
|---|---|---|---|
| Music | 🎵 | Blue | Background music, ambient tracks |
| SFX | 🔊 | Orange | Sound effects, whooshes, clicks |
| Voiceover | 🎙️ | Yellow | Narration, dialogue, speech |
| Generic | 📦 | Purple | Other audio, miscellaneous |
Track Layout on Timeline
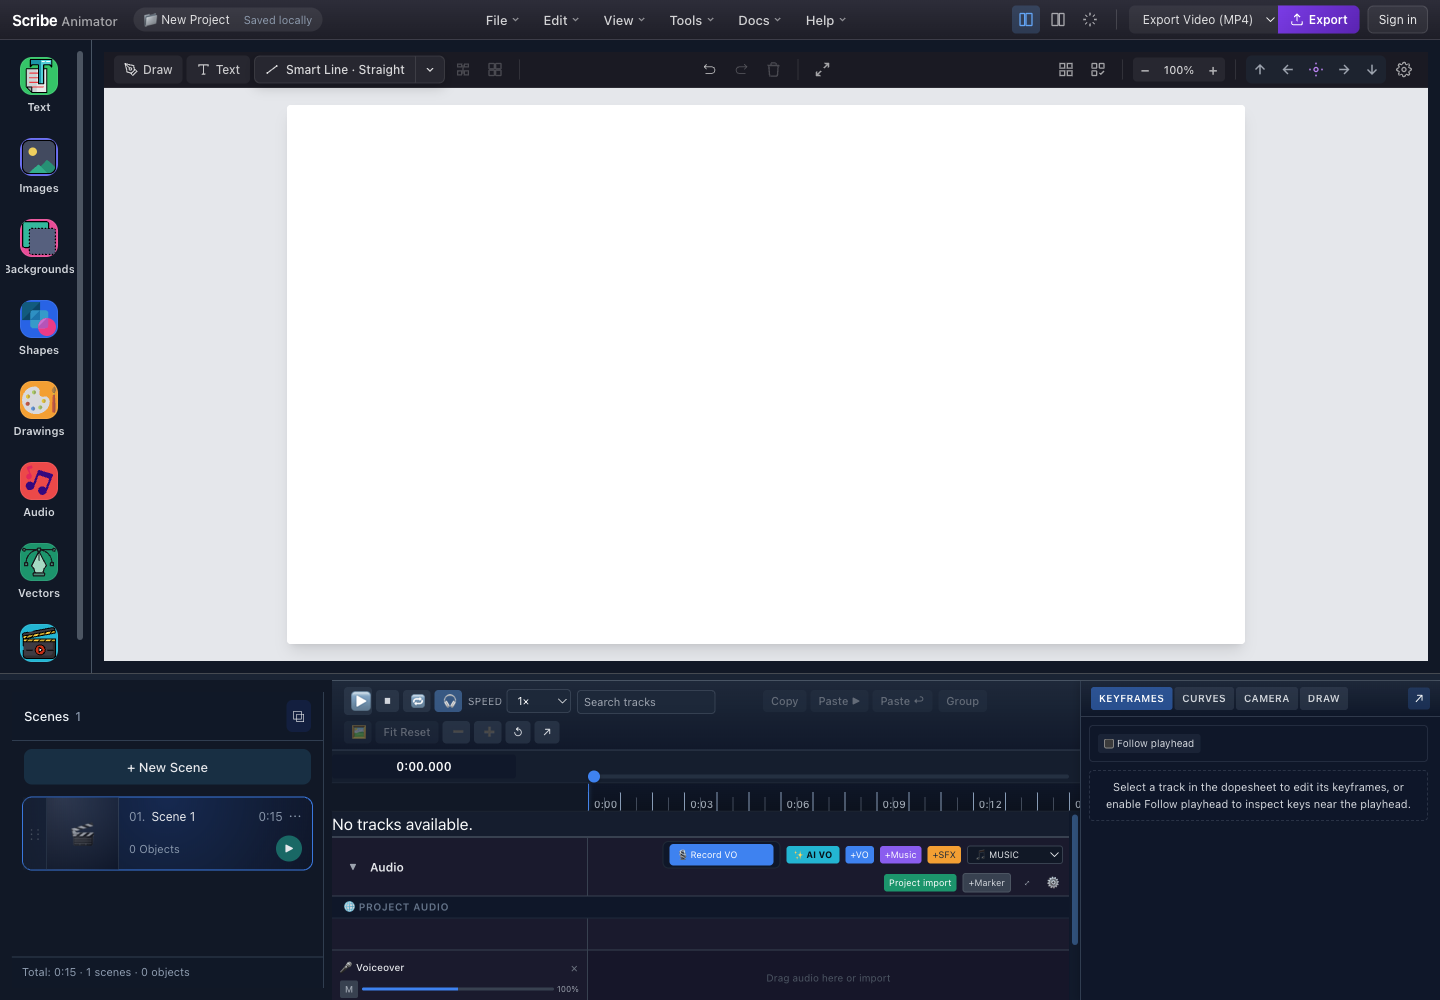
- Project Audio actionsCreate role-specific tracks, record or generate voiceover, import local media, and add markers.
- Project Audio scopeTracks in this section use project time and can continue across scenes.
- Voiceover track headerThe created track exposes its name and the controls supported by this build.
- Clip laneDrop or import a source here to create a project-scoped clip at an explicit time.
Each role uses the same timeline coordinate system:
- A Music clip commonly spans a long section or the entire project.
- SFX clips usually occupy short, precisely placed intervals.
- Voiceover clips often align with a scene or a narrated sequence.
- Overlapping clips play together unless their clip or track is muted.
Auto-Detection Rules
Scribe Animator automatically assigns track roles based on filename:
| Keywords in Filename | Assigned Role |
|---|---|
vo, voiceover, voice, narration, speech, dialogue | Voiceover |
sfx, sound effect, fx, foley, whoosh, click, beep, hit | SFX |
music, song, bgm, soundtrack | Music |
| (none of the above) | Music (default) |
You can manually change the track role anytime from the Audio Library or track header.
Importing Audio
Supported Formats
The file picker accepts audio files, including common MP3, WAV, OGG, M4A/AAC, WebM, and platform-specific audio types. Actual decoding is provided by the current browser or native WebView, so an accepted extension does not guarantee that every codec variant will load.
| Format | Typical extension | Guidance |
|---|---|---|
| MP3 | .mp3 | Broad compatibility and smaller music files |
| WAV | .wav | Predictable uncompressed/PCM workflows but larger files |
| OGG / WebM | .ogg, .webm | Common for browser recording and Opus audio; verify target-platform decoding |
| M4A / AAC | .m4a, .aac | Common on Apple/mobile devices; support depends on contained codec |
| Other audio types | .flac, .aiff, .caf, .opus, .wma, .amr, .mp4 | May be offered by a platform picker but still require conversion |
Import Methods
Method 1: Audio Library
- Open the Audio Library.
- Choose Import Audio.
- Select one or more supported files.
- Choose Open, then resolve any validation or decoding warning.
Method 2: Drag & Drop to Library
- Drag a supported file over the library's import target.
- Confirm that the target is visibly active before dropping.
- Drop the file and wait for validation, decoding, waveform generation, and duration analysis.
Method 3: Drag & Drop to Timeline
- Expand the audio lane and create or identify a compatible target track.
- Drag the file over that track.
- Confirm the highlighted target and time.
- Drop the file to create a clip at that position.
File Size Limits
| Limit Type | Size | Description |
|---|---|---|
| Soft recommendation (per file) | 4 MB | Warning shown; smaller sources improve project responsiveness |
| Hard limit (per file) | 5 MB | Import is blocked |
| Project Total (soft) | 50 MB | Warning when approaching limit |
Large audio files can slow down your project. Consider using compressed MP3 format (128-192 kbps) for background music to keep file sizes manageable.
Audio Clips
Clip Structure
An audio source is the full imported or generated recording. A clip references a portion of that source and places it on the timeline.
Importing, recording, generating, or placing a clip does not by itself create a script segment or bind animation to one. When an object must follow narration timing, use the separate Audio binding workflow.
- Trim Start removes time from the beginning of the source.
- Trim End removes time from the end of the source.
- The remaining portion becomes the audible clip.
- Offset determines where that clip begins on the project or scene timeline.
- Fade values shape the clip's volume near its visible start and end.
Clip Properties
| Property | Description | Range |
|---|---|---|
| Offset | When clip starts on timeline | 0 to project duration |
| Trim Start | How much to cut from beginning | 0 to source duration |
| Trim End | How much to cut from end | 0 to source duration |
| Fade In | Gradual volume increase at start | 0 to clip duration |
| Fade Out | Gradual volume decrease at end | 0 to clip duration |
| Muted | Silence this clip | On/Off |
Creating Clips
- Select the intended source in the Audio Library.
- Position the playhead at the required insertion time.
- Choose Add to Timeline and select the eligible Project Audio or Scene Audio destination when prompted.
- Confirm that the new clip appears on the correct track at the playhead.
- Preview from before the clip starts.
Timeline Integration
Playback Sync
Audio clips automatically sync with the global timeline.
The global playhead samples scene content and audio at the same project time. Project Audio can continue across scene boundaries, while Scene Audio is evaluated only inside its assigned scene. Short SFX clips can be placed at exact moments, and a voiceover can be scoped to the scene it narrates.
Track Scope
| Scope | Description | Visibility |
|---|---|---|
| Global | Project-wide track | All scenes |
| Scene | Scene-specific track | Only in assigned scene |
Use Global tracks for background music that spans the entire project. Use Scene tracks for voiceovers or SFX specific to one scene.
Audio Controls
Track Header Controls
Track headers identify the track and expose the controls supported by the current build. The authentic editor screenshot above is the source of truth; do not assume a Solo button or S shortcut exists when it is not visible.
Control Functions
| Control | Icon | Function |
|---|---|---|
| Mute | 🔇 / 🔊 | Silence track (toggle) |
| Volume / gain | Slider | Adjust track level and monitor the displayed value |
| Track name | Text/action | Rename the track so its role is clear |
| Delete | Trash action | Remove the track and its placed clips after confirmation |
Keyboard Shortcuts
The installed Help → Keyboard Shortcuts modal confirms Space for main timeline play/pause. Audio editing is focus-sensitive and can own its own undo/redo history immediately after an audio interaction. Use the visible mute, gain, rename, clip, and delete controls rather than assuming M, S, or duplicate shortcuts exist for audio.
Waveform Display
Audio clips show waveform visualization on the timeline.
Waveform Anatomy
The waveform is a timing aid: taller peaks represent larger sample amplitudes, while quieter regions appear shorter. The clip label identifies its source and role, and the clip's horizontal extent represents its trimmed duration. Use playback and meters—not waveform height alone—to judge perceived loudness.
Waveform Colors
| Color | Meaning |
|---|---|
| Blue | Normal audio |
| Yellow | Selected clip |
| Red | Clipping warning (too loud) |
| Gray | Muted clip |
Audio Processing
Import Pipeline
- The host receives the selected local file.
- Scribe validates the size and media type.
- The current browser or native WebView decodes the audio.
- The audio system calculates duration and other available metrics.
- It generates waveform peaks for timeline display.
- The validated source is added to the project audio store.
- A clip is created only when you add or drop that source onto an eligible track.
Audio Metrics
| Metric | Description | Display |
|---|---|---|
| Duration | Audio length | MM:SS format |
| File Size | Storage size | KB / MB |
| Sample Rate | Audio quality | 44.1 kHz typical |
| Channels | Mono/Stereo | 1 or 2 |
Budget & Performance
Memory Budget
Scribe enforces an in-memory audio safety budget in addition to per-file and project-source limits. Decoded audio can consume substantially more memory than the compressed source file, so the current warning or rejection message is authoritative for the device and project state.
Budget Warnings
| Boundary | Current behavior |
|---|---|
| 4 MB source | Per-file soft recommendation |
| 5 MB source | Per-file import is blocked |
| 50 MB project sources | Soft warning that the project can slow down |
| 256 MB approximate in-memory audio | Runtime safety budget; generated or imported audio can be rejected before exceeding it |
Running low on audio budget can cause playback issues. Delete unused audio files to free up memory.
Performance Tips
- Use compressed formats — MP3 at 128-192 kbps for music
- Trim unused portions — Remove silence and unused sections
- Delete unused sources — Clean up files not used in any clip
- Limit concurrent clips — Avoid too many overlapping audio clips
Filtering & Sorting
Filter Options
| Filter | Description |
|---|---|
| All Types | Show all audio files |
| 🎵 Music | Only music tracks |
| 🔊 SFX | Only sound effects |
| 🎙️ Voiceover | Only voiceover/narration |
| 📦 Other | Generic/unclassified |
Sort Options
| Sort By | Description |
|---|---|
| Name | Alphabetical order |
| Duration | Shortest to longest |
| Size | Smallest to largest |
| Date Added | Newest first (default) |
| Type | Grouped by role |
Managing Audio Files
Rename Audio
- Select the source in the library.
- Choose Rename.
- Enter a descriptive name.
- Press
Enteror use the visible confirmation action.
Delete Audio
- Select one or more sources.
- Check each source's used in X clips count.
- Choose Delete Selected.
- Review the confirmation carefully.
- Choose Cancel to keep the sources, or Delete to remove them and any dependent clips.
Deleting audio files that are used in clips will also remove those clips from the timeline. Check the "used in X clips" count before deleting.
Preview Audio
- Select a source in the library.
- Choose Play in the preview area.
- Drag the preview playhead to inspect another part of the source.
- Confirm the current-time and total-duration readout.
- Stop the library preview before judging timeline sync; the project transport is the authoritative timing check.
Common Workflows
Workflow 1: Add Background Music
- Open Audio in the sidebar.
- Open the library management view.
- Import the music file and resolve any warning.
- Position the project playhead at the required start.
- Add the source to a Project Audio Music track.
- Trim or fade it, then preview across at least one scene boundary.
Workflow 2: Add Sound Effect at Specific Time
- Position the playhead at the desired cue.
- Drag the SFX source onto the correct SFX track.
- Confirm the highlighted target and time before dropping.
- Preview from just before the cue and adjust the offset if needed.
Workflow 3: Record Voiceover
- Choose Record VO in the intended Project Audio or Scene Audio scope.
- Grant microphone access only when you are ready to record.
- Speak the narration, then choose Stop.
- Review the recorded source and its placement.
- Trim silence, align the clip to the scene, and preview synchronization.
Troubleshooting
Audio Not Playing
| Issue | Cause | Solution |
|---|---|---|
| No sound | Browser muted | Check browser/system volume |
| No sound | Track muted | Click unmute (🔇) on track header |
| No sound | Clip muted | Check clip mute status |
| Choppy audio | Performance issue | Close other applications |
Import Errors
| Error | Cause | Solution |
|---|---|---|
| "File too large" | Exceeds the current 5 MB per-file limit | Compress or trim the audio file |
| "Invalid format" | Unsupported codec | Convert to MP3 or WAV |
| "Decode failed" | Corrupted file | Try re-exporting from source |
Sync Issues
| Issue | Cause | Solution |
|---|---|---|
| Audio drifts | Variable frame rate | Export at constant frame rate |
| Audio ahead/behind | Offset incorrect | Adjust clip offset property |
| Gaps in audio | Trim settings wrong | Check trim start/end values |
Best Practices
Audio Quality
- Use appropriate bitrate — 128-192 kbps for background music
- Match sample rates — 44.1 kHz or 48 kHz consistently
- Normalize levels — Keep peak levels around -6 dB
- Add headroom — Don't let audio clip (hit 0 dB)
Organization
- Name files clearly — Use descriptive names like
intro-whoosh.wav - Use track roles — Assign Music/SFX/VO for easy filtering
- Clean unused files — Regularly delete unused audio sources
- Keep backups — Export project to preserve audio references
Performance
- Limit track count — 3-5 audio tracks is typical
- Avoid long files — Split long audio into segments
- Use fades — Smooth transitions reduce artifacts
- Preview before export — Check sync before final render
Pro tip: Add a short fade-in (0.1-0.3s) to all clips to avoid click/pop sounds at the start of playback.
Summary
| Feature | Location | Purpose |
|---|---|---|
| Audio Library | Left Sidebar → 🎵 Audio | Import and manage audio files |
| Track Types | Timeline | Music, SFX, Voiceover, Generic |
| Clip Editing | Timeline | Trim, fade, position audio |
| Preview Player | Audio Library Modal | Listen before adding |
| Budget Monitor | Audio Library Modal | Track memory usage |
The Audio system in Scribe Animator provides everything you need to add professional sound to your whiteboard animations — from background music to precise sound effects and voiceovers.
Related documentation: